
1. Introduction
This manual provides essential information for the proper setup, operation, and maintenance of your XDrum DD-516 Electronic Drum Set. Please read this manual thoroughly before using the instrument to ensure safe and optimal performance. Keep this manual for future reference.
2. Safety Instructions
- Power Supply: Use only the specified power adapter. Ensure the voltage matches your local power supply.
- Placement: Place the drum set on a stable, level surface. Avoid extreme temperatures, humidity, or direct sunlight.
- Water and Moisture: Do not expose the unit to water or moisture. If liquid enters the unit, disconnect power immediately and contact service personnel.
- Cleaning: Clean the unit with a soft, dry cloth. Do not use abrasive cleaners or solvents.
- Ventilation: Ensure adequate ventilation around the sound module to prevent overheating.
- Handling: Avoid dropping or subjecting the unit to strong impacts.
3. Package Contents
Verify that all components listed below are included in your package:
- XDrum DD-516 Sound Module
- 4 Stereo Drum Pads
- 3 Stereo Cymbal Pads
- 1 Kick Trigger Pad
- 1 Hi-Hat Pedal Controller
- Drum Rack System
- Kick Pedal
- Complete Cabling Set
- Drumsticks
- Tuner (for drum key adjustments, if applicable)
- Power Adapter
4. Setup
Follow these steps to assemble and connect your XDrum DD-516 Electronic Drum Set.
4.1. Assembling the Drum Rack
Carefully unpack all components. Assemble the drum rack according to the diagrams provided in the separate assembly guide (if included). Ensure all clamps are securely tightened to provide a stable foundation for the pads and cymbals.

Figure 4.1: The complete XDrum DD-516 electronic drum set after assembly.
4.2. Attaching Pads and Cymbals
Mount the drum pads and cymbal pads onto the rack using the provided clamps and arms. Position them ergonomically for comfortable playing. The set includes 4 stereo drum pads and 3 stereo cymbal pads.

Figure 4.2: A drum pad securely mounted on the rack.

Figure 4.3: Two cymbal pads attached to the drum rack.
4.3. Connecting Pedals
Connect the kick trigger pad to the kick pedal. Place the hi-hat control pedal in a comfortable position. Ensure both pedals are stable on the floor.

Figure 4.4: The kick drum pedal connected to its pad.

Figure 4.5: The hi-hat control pedal.
4.4. Connecting the Sound Module
Mount the DD-516 sound module to the drum rack. Use the multicore cable to connect all pads and pedals to their respective inputs on the sound module. The module features connectors for Kick, Snare, Tom1, Tom2, Tom3, HiHat, Ride, Crash, and Hi-Hat Control. Connect the power adapter to the module and then to a power outlet.

Figure 4.6: The fully assembled drum set, showing the placement of pedals.
5. Operating Instructions
This section details the functions of the DD-516 sound module and how to use your electronic drum set.
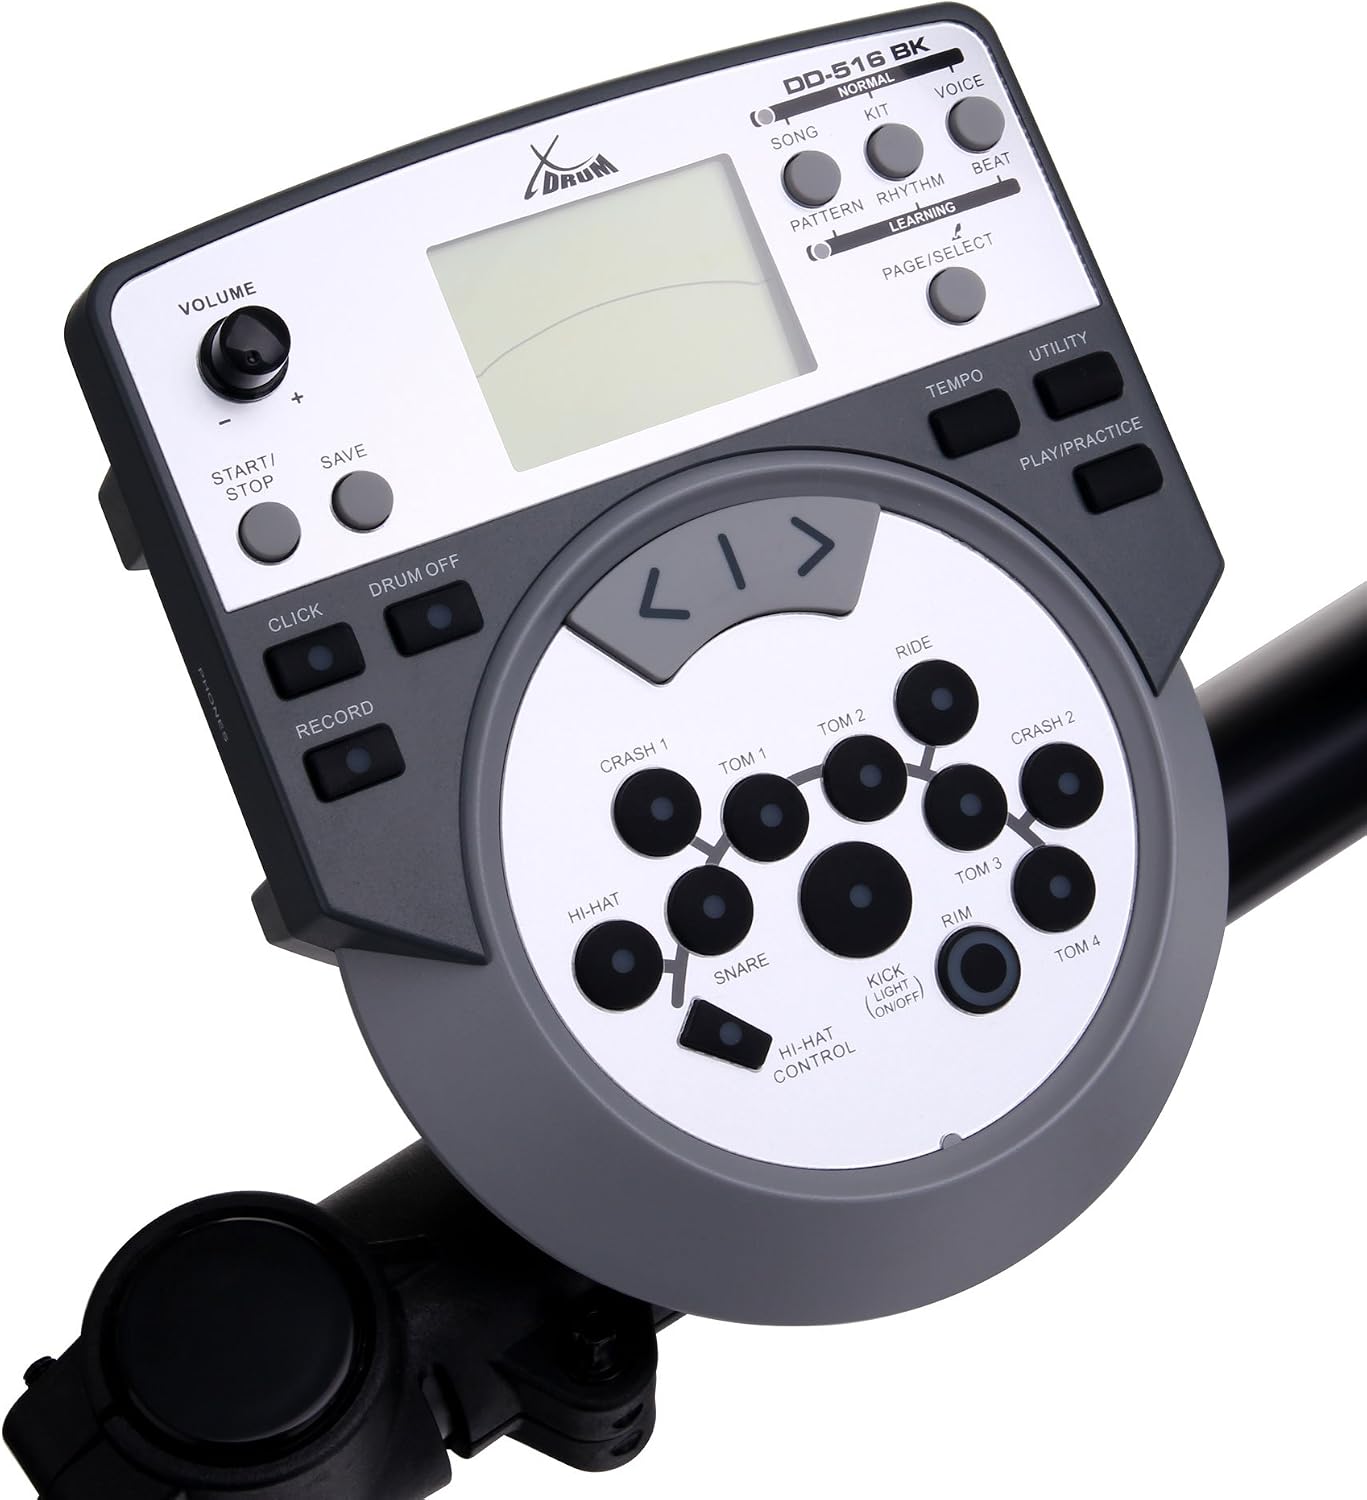
Figure 5.1: The DD-516 sound module interface.
5.1. Sound Module Overview
The sound module is the central control unit for your drum set. It features a display, various buttons for navigation and function selection, and a volume knob.
5.2. Power On/Off
Press the POWER button to turn the module on or off. Ensure all connections are secure before powering on.
5.3. Adjusting Volume
Use the VOLUME knob on the module to adjust the overall output level. For individual pad volume adjustments, refer to the module's menu settings.
5.4. Selecting Drum Kits
The DD-516 module includes 45 pre-installed drum kits. Use the KIT button and navigation arrows to browse and select different drum kits. Each kit offers a unique sound configuration.
5.5. Voice Selection and Effects
The module provides 400 voices (Drums, Percussion, SFX). Use the VOICE button to access and assign different sounds to individual pads. The module also features a 3-band equalizer for sound shaping.
5.6. Playing Songs and Practice Features
The module contains 50 pre-installed songs. Use the SONG button to select and play along with these tracks. The PLAY/PRACTICE section offers features for learning and improving your drumming skills, including a metronome (CLICK) and tempo control.
5.7. Recording
Press the RECORD button to capture your drumming performance. Refer to the module's display and manual for detailed recording procedures and playback options.
5.8. MIDI Connectivity
The module includes a MIDI Out connector, allowing you to connect to external MIDI devices or computer software for recording, sequencing, or using the DD-516 as a MIDI controller.
6. Maintenance
Proper maintenance ensures the longevity and performance of your drum set.
- Cleaning: Regularly wipe down pads, cymbals, and the sound module with a soft, dry, lint-free cloth. For stubborn dirt, a slightly damp cloth can be used, followed by a dry one. Avoid harsh chemicals.
- Cable Management: Keep cables organized and free from kinks or excessive bending to prevent damage.
- Storage: When not in use for extended periods, store the drum set in a clean, dry environment, away from direct sunlight and extreme temperatures.
- Pad Care: Avoid striking the pads with excessive force, which can reduce their lifespan.
7. Troubleshooting
If you encounter issues with your DD-516, refer to the following common problems and solutions:
- No Sound:
- Check if the power adapter is securely connected and the module is turned on.
- Ensure the master volume knob is turned up.
- Verify that headphones or speakers are properly connected and their volume is adjusted.
- Check all pad and pedal cables are securely plugged into the correct inputs on the sound module.
- Pad Not Responding:
- Ensure the pad's cable is firmly connected to both the pad and the module.
- Test the pad with a different cable if available.
- Check the module's settings to ensure the pad is enabled and assigned a sound.
- Distorted Sound:
- Reduce the master volume or individual pad volumes.
- Check the audio cables for damage or loose connections.
- Ensure external speakers or headphones are not overdriven.
- Module Display Not Working:
- Power cycle the module (turn off, wait 10 seconds, turn on).
- Ensure the power adapter is functioning correctly.
If these steps do not resolve the issue, please contact XDrum customer support.
8. Specifications
| Feature | Specification |
|---|---|
| Model Number | 00034116 |
| Dimensions (L x W x H) | 115 x 50 x 33 cm |
| Weight | 25.22 kg |
| Voices | 400 (Drums, Percussion, SFX) |
| Drum Kits | 45 |
| Pre-installed Songs | 50 |
| Equalizer | 3-band |
| Connectors | MIDI Out, Kick, Snare, Tom1, Tom2, Tom3, HiHat, Ride, Crash, Hi-Hat Control (Multicore) |
9. Warranty and Support
For warranty information and technical support, please refer to the warranty card included with your product or visit the official XDrum website. Keep your proof of purchase for any warranty claims.

