
Spyker P20-5010
Spyker 50 lb. Spreader User Manual
Model: P20-5010
Brand: Spyker
Introduction
This manual provides essential information for the safe and effective operation, assembly, and maintenance of your Spyker P20-5010 Broadcast Spreader. Please read this manual thoroughly before using the product and retain it for future reference.
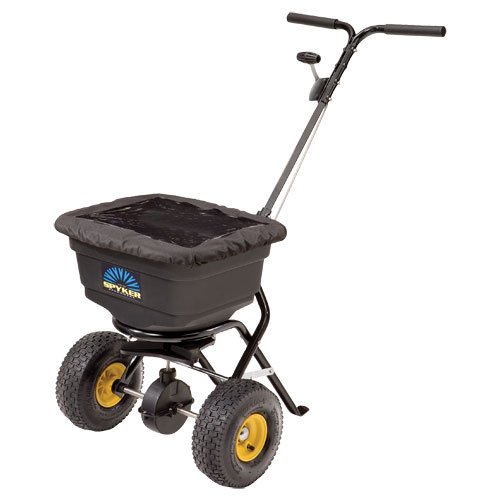
Image: The Spyker 50 lb. Broadcast Spreader, featuring a black poly hopper, sturdy frame, and large pneumatic tires. The handle is visible at the top, and the spreading mechanism is located beneath the hopper.
Safety Information
Always observe the following safety precautions to prevent injury or damage to the spreader:
- Read and understand all instructions before operation.
- Wear appropriate personal protective equipment, such as gloves and eye protection, when handling materials and operating the spreader.
- Ensure the spreader is on a stable, level surface during filling and storage.
- Do not overload the hopper beyond its stated capacity (50 lbs).
- Keep children and pets away from the spreader during operation and storage.
- Clean the spreader thoroughly after each use to prevent material buildup and corrosion.
- Store the spreader in a dry, protected area.
Proposition 65 Warning: This product may contain chemicals known to the State of California to cause cancer and birth defects or other reproductive harm.
Parts List
The Spyker P20-5010 Broadcast Spreader typically includes the following main components:
- Poly Hopper with Cover
- Handle Assembly
- Frame Assembly
- 10-inch Pneumatic Tires (2)
- Axle and Gearbox Assembly (with enclosed aluminum gears)
- Flow Control Rod (metal rod for on/off control)
- Material Screen
- Hardware for Assembly
Assembly/Setup
Follow these steps to assemble your Spyker P20-5010 Broadcast Spreader:
- Unpack Components: Carefully remove all parts from the packaging and verify against the parts list.
- Attach Frame to Hopper: Secure the frame assembly to the bottom of the poly hopper using the provided hardware. Ensure all bolts are tightened securely.
- Install Axle and Wheels: Slide the axle through the designated openings in the frame. Attach the 10-inch pneumatic tires to the axle, securing them with washers and cotter pins or nuts as instructed.
- Mount Handle Assembly: Connect the handle assembly to the frame. The handle height is adjustable; select a comfortable height for operation and secure it firmly.
- Connect Flow Control: Attach the metal flow control rod from the handle to the spreading mechanism beneath the hopper. Ensure it operates smoothly to open and close the hopper opening.
- Insert Screen and Cover: Place the material screen inside the hopper. Position the hopper cover over the top of the hopper.
- Final Check: Before first use, inspect all connections and moving parts to ensure they are properly assembled and secure.
Operating Instructions
To achieve optimal results with your Spyker P20-5010 Broadcast Spreader:
- Prepare Material: Ensure the material you are spreading (e.g., fertilizer, seed) is dry and free of clumps. Use the included screen to filter out large debris.
- Fill Hopper: With the flow control in the "closed" position, carefully fill the poly hopper with your desired material, up to its 50 lb. capacity.
- Set Spread Rate: Adjust the flow control mechanism on the handle to the desired spread rate according to the material manufacturer's recommendations. The effective spread range is typically 4 to 12 feet wide.
- Begin Spreading: Start walking at a consistent pace before opening the flow control. Push the spreader forward, maintaining a steady speed.
- Close Flow Control: Before stopping or turning, close the flow control to prevent over-application in one area.
- Overlap Passes: For even coverage, overlap each pass slightly.
- Empty Hopper: After use, empty any remaining material from the hopper.
The positive "direct drive" On/Off system, utilizing a metal rod instead of a cable, ensures smooth and precise operation.
Maintenance
Regular maintenance will extend the life of your spreader:
- Cleaning: After each use, thoroughly clean the hopper, spreading mechanism, and wheels with water. Do not use harsh chemicals. Allow all parts to dry completely.
- Lubrication: Periodically apply a light lubricant to moving parts, such as the axle and flow control linkage, to ensure smooth operation.
- Tire Pressure: Check the pressure of the 10-inch pneumatic tires regularly and inflate to the recommended PSI (refer to tire sidewall for details).
- Corrosion Protection: The frame is powder coated to resist corrosion, but inspect for any chips or scratches and touch up if necessary to prevent rust. The enclosed aluminum gears are designed to resist corrosion and do not require frequent maintenance.
- Storage: Store the spreader in a clean, dry place, away from direct sunlight and extreme temperatures.
Troubleshooting
| Problem | Possible Cause | Solution |
|---|---|---|
| Material not spreading evenly or at all. |
|
|
| Wheels not turning smoothly. |
|
|
| Hopper cover flying off. |
|
|
Specifications
- Model: P20-5010
- Hopper Capacity: 50 lbs.
- Hopper Material: Polyethylene
- Tire Type: Pneumatic
- Tire Size: 10 inches
- Gear Type: Enclosed Aluminum Gears
- Flow Control: Positive Direct Drive (Metal Rod)
- Frame Finish: Powder Coated
- Spread Width: 4 - 12 feet (effective range)
Warranty & Support
For specific warranty information and customer support, please refer to the documentation included with your purchase or visit the official Spyker website. Keep your proof of purchase for warranty claims.
Manufacturer: Spyker
ASIN: B00D9F3A8W
Related documentsP20-5010


Ask a question about this manual
Ask about setup, troubleshooting, compatibility, parts, safety, or missing instructions. Manuals+ will review the question and use this page’s manual context to help answer it.