
MSI B85-G41 PC Mate
MSI B85-G41 PC Mate Motherboard User Manual
Model: B85-G41 PC Mate
Brand: MSI
1. Introduction
This user manual provides detailed instructions for the installation, operation, and maintenance of your MSI B85-G41 PC Mate ATX Motherboard. Designed for Intel LGA 1150 processors, this motherboard features the Intel B85 Express chipset, DDR3 memory support, SATA 6Gb/s, and USB 3.0 connectivity. It includes multiple expansion slots, various display outputs (VGA, DVI, HDMI), and Gigabit LAN for reliable network connectivity. Please read this manual thoroughly before proceeding with installation to ensure proper setup and optimal performance.
2. Product Overview
The MSI B85-G41 PC Mate motherboard is built with robust components to provide a stable and efficient computing platform. Key features include:
- Socket LGA 1150: Supports Intel 4th Generation Core processors.
- Intel B85 Express Chipset: Provides essential features for business and mainstream computing.
- ATX Form Factor: Standard size for compatibility with most PC cases.
- Expansion Slots: Includes 1 PCI-E x16 3.0, 1 PCI-E x16 (running at x4 mode), 2 PCI-E x1, and 2 PCI slots for various expansion cards.
- Display Outputs: Integrated VGA, DVI, and HDMI ports support diverse monitor setups, including 4K UHD resolution.
- OC Genie 4: MSI's automatic overclocking technology for enhanced performance.
- Military Class 4 Components: Ensures high stability, efficiency, and quality with components like Dark Choke and Solid CAP.
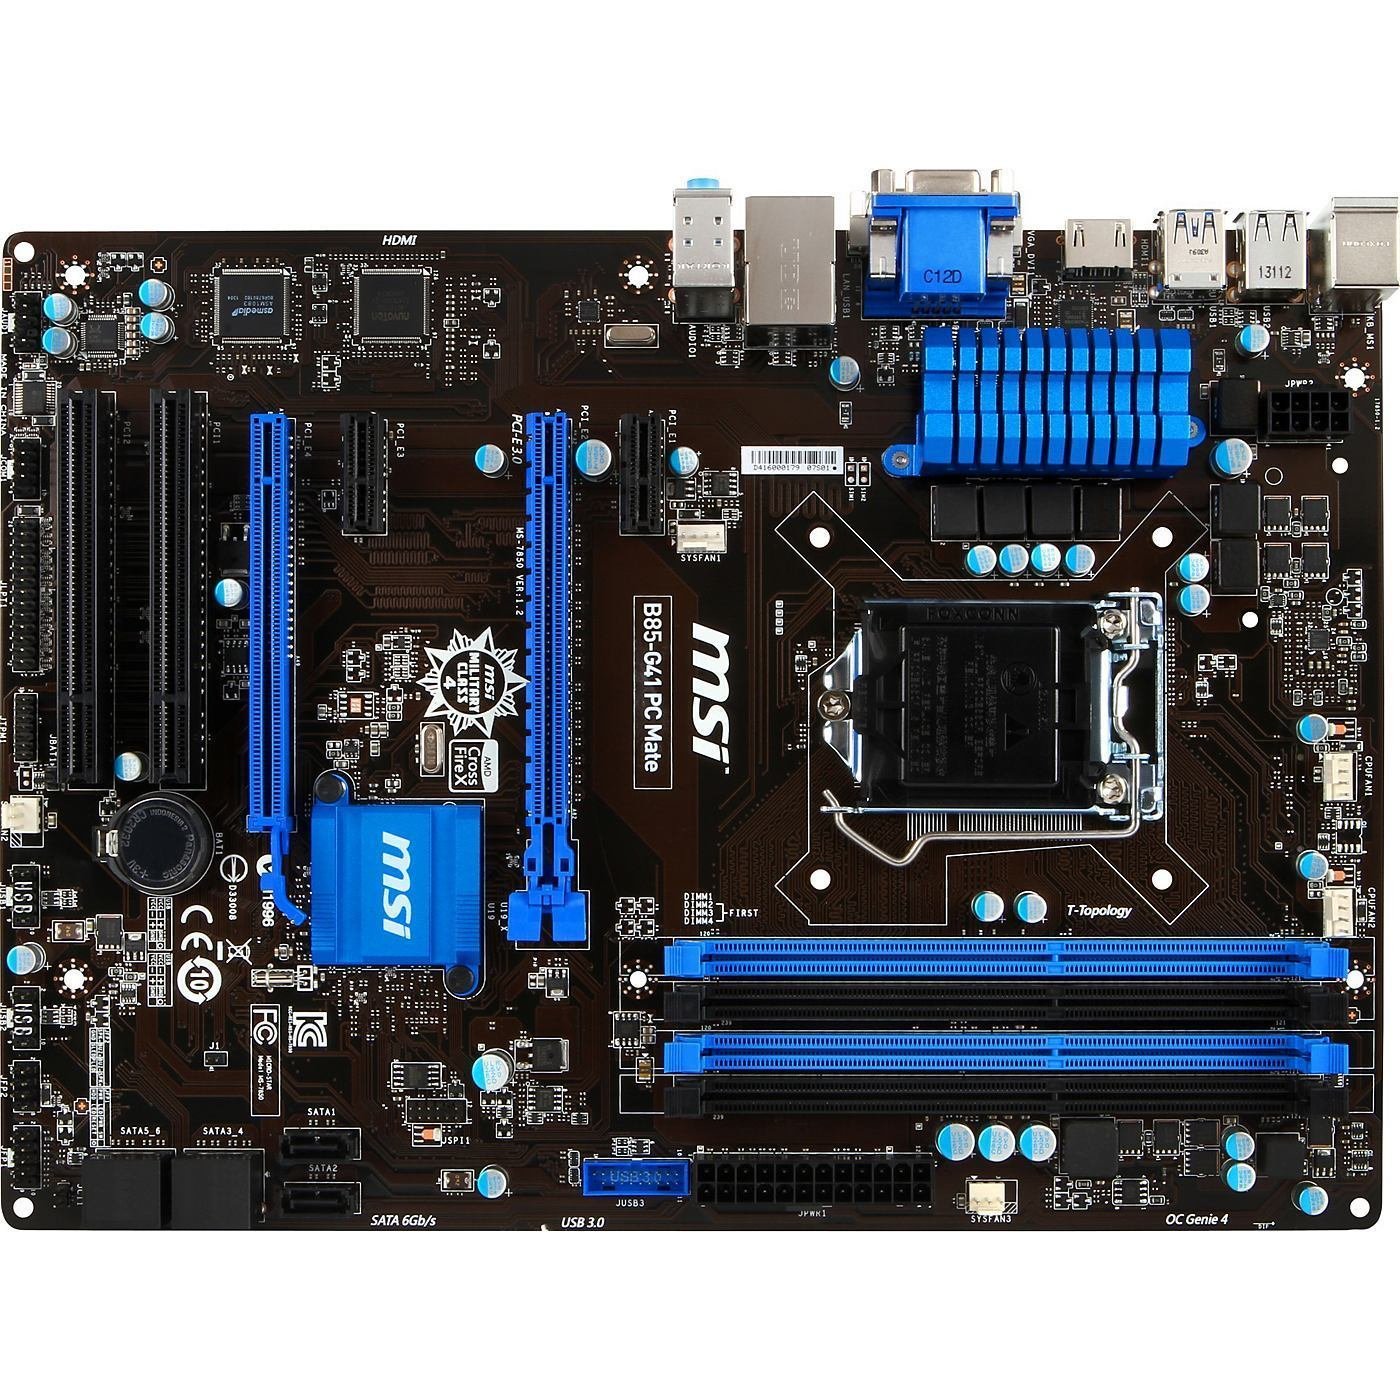
Figure 2.1: Top view of the MSI B85-G41 PC Mate Motherboard, highlighting the CPU socket, RAM slots, and expansion slots.

Figure 2.2: Angled view of the MSI B85-G41 PC Mate Motherboard, showing the heatsinks and various connectors.
3. Setup
Before installing any components, ensure your system is powered off and unplugged from the wall outlet. Wear an anti-static wrist strap to prevent electrostatic discharge (ESD) damage.
3.1. CPU Installation
- Locate the LGA 1150 CPU socket on the motherboard.
- Open the CPU socket lever and lift the metal load plate.
- Carefully align your Intel LGA 1150 processor with the socket, ensuring the gold triangle on the CPU matches the triangle on the socket. Do not force the CPU into place.
- Lower the load plate and secure it by pushing down the lever until it clicks into place.
3.2. RAM Installation
- Identify the four DDR3 DIMM slots. For dual-channel operation, install memory modules into slots of the same color (e.g., DIMM1 and DIMM2).
- Open the clips at both ends of the DIMM slot.
- Align the notch on the DDR3 memory module with the key in the DIMM slot.
- Press down firmly on both ends of the memory module until the clips snap into place.
3.3. Storage Device Installation (SATA)
- Connect one end of a SATA data cable to a SATA 6Gb/s port on the motherboard.
- Connect the other end of the SATA data cable to your hard drive or SSD.
- Connect a SATA power cable from your power supply unit (PSU) to the storage device.
3.4. Expansion Card Installation
- Select an appropriate PCI-E or PCI slot for your expansion card (e.g., graphics card, sound card).
- Remove the corresponding metal slot cover from your PC case.
- Align the expansion card with the slot and press down firmly until it is securely seated.
- Secure the card with a screw or retention clip from your PC case.
3.5. Power Connections
- Connect the 24-pin ATX main power connector from your PSU to the motherboard.
- Connect the 8-pin ATX 12V CPU power connector from your PSU to the motherboard.
3.6. Front Panel Connections
Connect the front panel cables (power button, reset button, HDD LED, power LED, front USB, front audio) to their respective headers on the motherboard. Refer to the motherboard diagram for exact pin assignments.
Video 3.1: A demonstration of motherboard component installation. While this video features a SHANGZHAOYUAN B85M PRO motherboard, the general installation steps for LGA 1150 CPUs, DDR3 RAM, and other components are similar to the MSI B85-G41 PC Mate.
4. Operating Instructions
4.1. Initial Boot and BIOS Setup
After assembling your system, connect a monitor, keyboard, and mouse. Power on your system. During startup, press the 'Del' key repeatedly to enter the BIOS/UEFI setup utility. Here you can configure system settings, boot order, and enable features like MSI's OC Genie 4 for automatic performance tuning.
4.2. Driver Installation
After installing your operating system, install the necessary drivers for your motherboard. These typically include chipset drivers, LAN drivers, audio drivers, and any specific utility drivers. Drivers can be found on the MSI official website for your specific motherboard model.
4.3. Operating System Installation
Insert your operating system installation media (USB drive or DVD) and follow the on-screen prompts to install the OS. Ensure the boot order in BIOS is set to prioritize your installation media.
5. Maintenance
5.1. BIOS Updates
Periodically check the MSI website for BIOS updates. BIOS updates can improve system stability, add support for new hardware, or fix bugs. Follow the instructions provided by MSI carefully when performing a BIOS update to avoid system damage.
5.2. Cleaning
Regularly clean your computer's interior to prevent dust buildup, which can lead to overheating and reduced performance. Use compressed air to remove dust from fans, heatsinks, and other components. Ensure the system is powered off and unplugged before cleaning.
5.3. Component Checks
Occasionally inspect all cable connections to ensure they are secure. Check for any signs of physical damage to components or the motherboard itself.
6. Troubleshooting
If you encounter issues with your motherboard, consider the following common troubleshooting steps:
- No Power/No Boot: Double-check all power connections (24-pin ATX, 8-pin CPU). Ensure the power supply is functional. Try clearing the CMOS (Complementary Metal-Oxide-Semiconductor) by removing the CMOS battery for a few minutes or using the clear CMOS jumper.
- No Display: Verify that your monitor is connected to the correct display output on the motherboard or graphics card. Reseat your graphics card and RAM modules.
- Component Not Detected: Ensure all components (RAM, storage drives, expansion cards) are properly seated and connected. Check BIOS settings to confirm they are enabled.
- System Instability/Crashes: This could be due to overheating, faulty RAM, or an unstable overclock. Monitor temperatures, test RAM modules individually, and reset BIOS settings to default if overclocking is enabled.
For more advanced troubleshooting or persistent issues, please refer to the comprehensive troubleshooting guide on the official MSI support website or contact MSI technical support.
7. Specifications
Below are the detailed technical specifications for the MSI B85-G41 PC Mate Motherboard:
| Feature | Specification |
|---|---|
| Brand | MSI |
| Model Name | B85-G41 PC MATE |
| CPU Socket | LGA 1150 |
| Chipset Type | Intel B85 Express |
| Compatible Devices | Personal Computer |
| RAM Memory Technology | DDR3 |
| Memory Clock Speed | 1333 MHz |
| Memory Slots Available | 4 |
| Memory Storage Capacity (Max) | 64 GB |
| Graphics Card Interface | PCI, PCI Express |
| Total PCIe Ports | 4 (1x PCI-E x16 3.0, 1x PCI-E x16 (x4), 2x PCI-E x1) |
| Total SATA Ports | 6 (SATA 6Gb/s) |
| System Bus Standard Supported | SATA 3 |
| USB 2.0 Ports | 4 (Rear) |
| Total USB Ports | 8 (4x USB 3.0, 4x USB 2.0) |
| Number of Ethernet Ports | 1 (Gigabit LAN) |
| Total Number of HDMI Ports | 1 |
| Other Display Outputs | VGA, DVI |
| Platform | Windows 8 (Compatible with other OS versions) |
| Item Weight | 3 Pounds |

Figure 7.1: Rear I/O panel of the MSI B85-G41 PC Mate Motherboard, showing various connectivity ports.
8. Warranty and Support
For detailed warranty information, please refer to the warranty card included with your product or visit the official MSI website. MSI provides technical support and resources to assist with any product-related inquiries or issues. Ensure you have your product model and serial number ready when contacting support.
MSI Official Support Website: www.msi.com
Related documentsB85-G41 PC Mate


Ask a question about this manual
Ask about setup, troubleshooting, compatibility, parts, safety, or missing instructions. Manuals+ will review the question and use this page’s manual context to help answer it.