
1. Introduction
This manual provides instructions for the APEX LD200RM remote control, designed for use with various APEX LCD and LED television models. This remote control offers full functionality for your compatible APEX television, ensuring convenient operation of all features.
Compatible APEX TV Models:
- LD3249
- LD3288, LD3288T, LD3288M
- LD4077, LE4077M
- LD4088
- LD4688
- LE3212, LE3212D
- LE4012
- LE4612
- LE3242
- LE3942
- LE40B12
- LE4243
- LE4643
- LE5043
2. Setup
2.1 Battery Installation
The APEX LD200RM remote control requires two (2) AA batteries for operation. Follow these steps to install the batteries:
- Locate the battery compartment cover on the back of the remote control.
- Press down on the tab and slide the cover off.
- Insert two AA batteries, ensuring the positive (+) and negative (-) terminals align correctly with the markings inside the compartment.
- Slide the battery compartment cover back into place until it clicks securely.
Note: Always replace both batteries at the same time. Do not mix old and new batteries, or different types of batteries.
2.2 Initial Use
The APEX LD200RM remote control is an original replacement and typically does not require any programming or pairing. Once batteries are installed, point the remote control towards your compatible APEX television and begin operation.
3. Operating Instructions
This section details the functions of the buttons on your APEX LD200RM remote control.
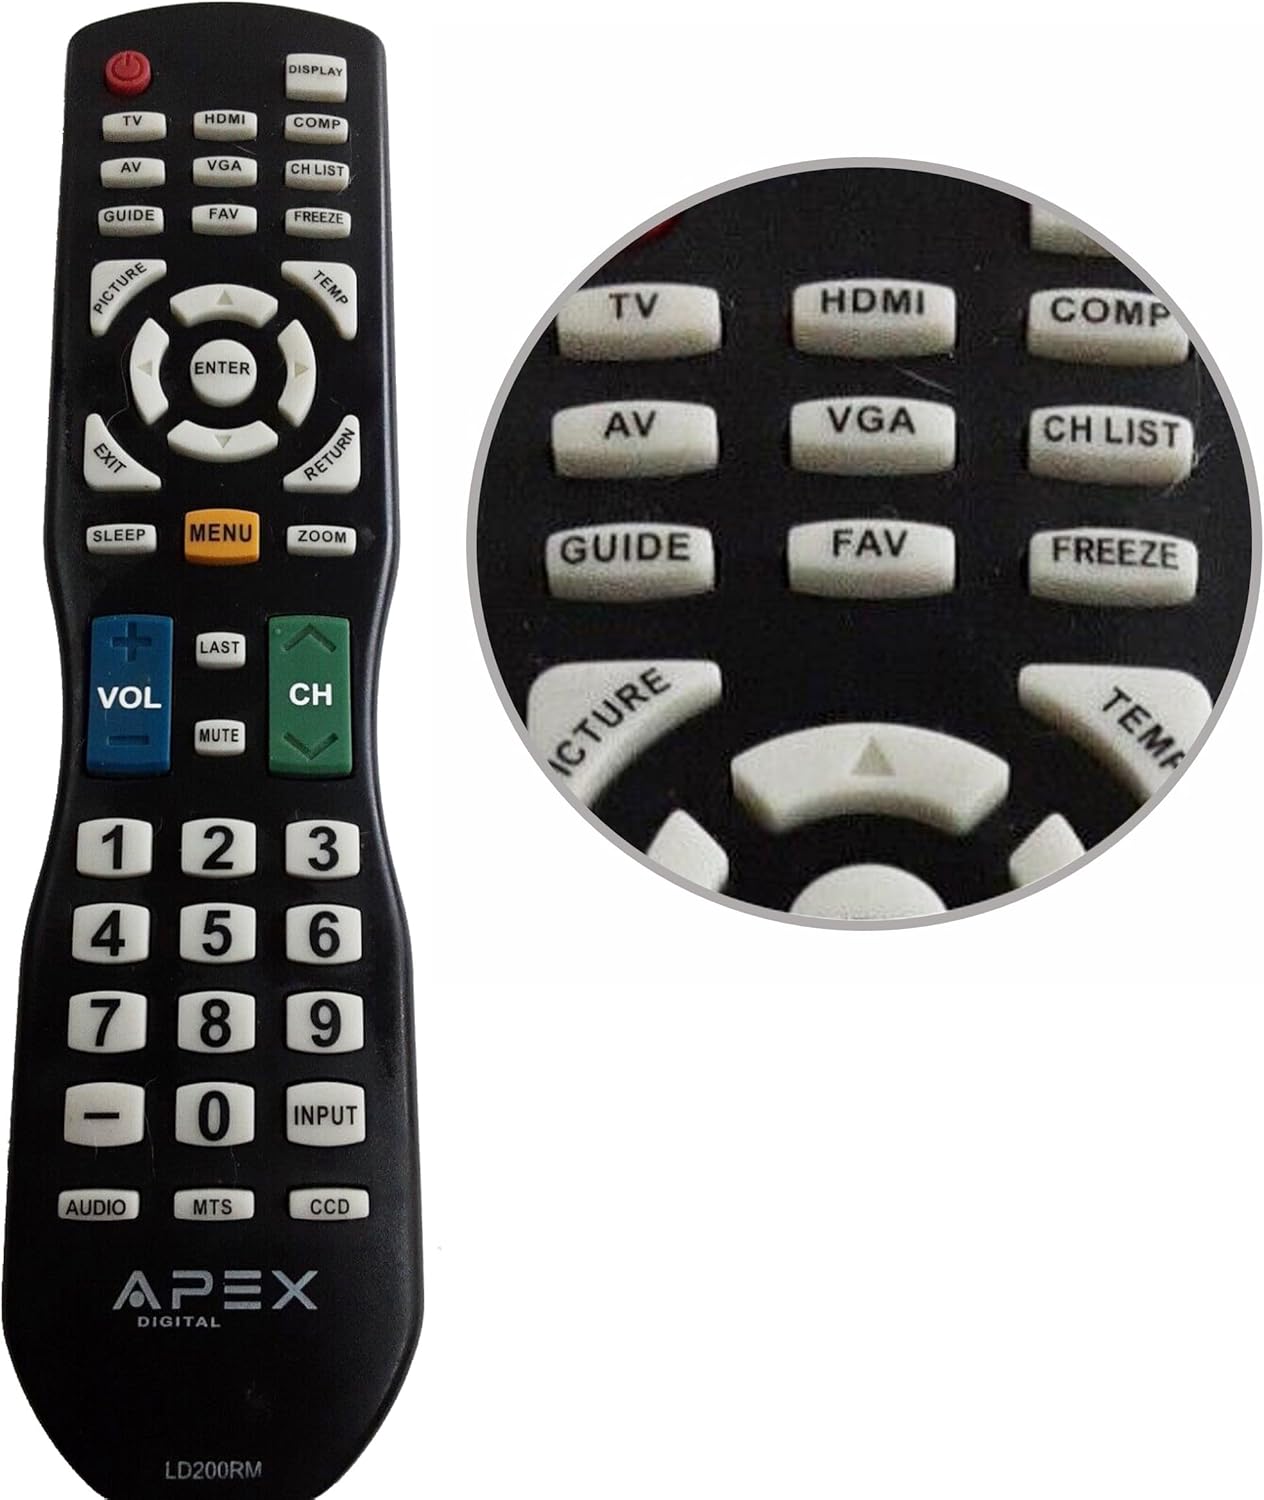
Figure 1: APEX LD200RM Remote Control Layout. This image displays the entire remote control, highlighting the arrangement of its various function buttons, including power, input selection, navigation, volume, channel, and numeric keypad.

Figure 2: Close-up of APEX LD200RM Remote Control Top Buttons. This image provides a detailed view of the upper section of the remote, focusing on buttons such as TV, HDMI, AV, VGA, COMP, CH LIST, DISPLAY, GUIDE, FAV, FREEZE, PICTURE, TEMP, MENU, ENTER, EXIT, RETURN, SLEEP, and ZOOM.
3.1 Power and Input Selection
- POWER (Red Button): Turns the television on or off.
- TV: Selects the TV tuner input.
- HDMI: Selects the HDMI input.
- AV: Selects the Audio/Video input.
- VGA: Selects the VGA input.
- COMP: Selects the Component video input.
- DISPLAY: Shows on-screen display information.
3.2 Channel and Volume Control
- VOL (+/-): Increases or decreases the volume level.
- CH (Up/Down): Changes the television channel up or down.
- LAST: Returns to the previously viewed channel.
- MUTE: Mutes or unmutes the television audio.
- CH LIST: Displays the channel list.
3.3 Menu and Navigation
- MENU: Opens the television's main menu.
- ENTER: Confirms a selection within the menu.
- Arrow Buttons (Up/Down/Left/Right): Navigates through menu options and adjusts settings.
- EXIT: Exits the current menu or on-screen display.
- RETURN: Returns to the previous menu or screen.
3.4 Numeric Keypad and Special Functions
- 0-9 (Numeric Buttons): Directly enters channel numbers.
- INPUT: Cycles through available input sources.
- GUIDE: Displays the electronic program guide (if available).
- FAV: Accesses favorite channels.
- FREEZE: Freezes the current image on the screen.
- PICTURE: Adjusts picture settings.
- TEMP: (Function may vary by model, often related to picture temperature or a specific mode).
- SLEEP: Sets the sleep timer.
- ZOOM: Adjusts the screen zoom level.
- AUDIO: Selects audio modes or tracks.
- MTS: Multi-channel Television Sound (stereo/SAP).
- CCD: Closed Captioning Display.
4. Maintenance
4.1 Battery Replacement
When the remote control's performance degrades or it stops responding, it is likely time to replace the batteries. Refer to Section 2.1 for detailed battery installation instructions. Always use fresh AA batteries.
4.2 Cleaning
To clean the remote control, use a soft, dry cloth. For stubborn dirt, slightly dampen the cloth with water or a mild, non-abrasive cleaner. Avoid using harsh chemicals or abrasive materials, as these can damage the remote's surface or internal components.
4.3 Storage
Store the remote control in a cool, dry place away from direct sunlight and extreme temperatures. If the remote will not be used for an extended period, it is advisable to remove the batteries to prevent leakage and potential damage.
5. Troubleshooting
- Remote control is not responding:
- Ensure the batteries are correctly installed with the correct polarity (+/-).
- Replace old batteries with new AA batteries.
- Check for any obstructions between the remote control and the television's infrared sensor.
- Ensure you are within the effective range of the television's IR receiver.
- Some buttons are not working:
- This could indicate low battery power. Replace the batteries.
- Ensure the remote is clean and there is no debris lodged under the buttons.
- Verify that the button function is applicable to your specific TV model. Some functions may not be supported by all compatible TVs.
- Television is not turning on/off:
- Confirm the television is plugged into a working power outlet.
- Try using the power button directly on the television to rule out a TV issue.
6. Specifications
| Feature | Detail |
|---|---|
| Model Number | LD200RM |
| Brand | Apex |
| Compatible Devices | APEX LCD & LED Televisions |
| Power Source | 2 x AA Batteries (not included) |
| Product Dimensions | 10 x 6 x 2 inches (approximately) |
| Item Weight | 3.2 ounces (approximately) |
| Color | Black |
| Special Feature | Ergonomic design |
7. Warranty Information
This APEX LD200RM remote control typically comes with a 30-day warranty from the date of purchase. This warranty covers manufacturing defects. For specific details regarding warranty claims, returns, or replacements, please refer to your purchase documentation or contact the seller directly.
8. Support
If you encounter issues not covered in this manual or require further assistance, please contact the retailer or the manufacturer's customer support. When contacting support, please have your product model number (LD200RM) and your television model number readily available.


