1. Important Safety Instructions
Please read all safety and operating instructions carefully before using this television. Keep these instructions for future reference.
- Power Source: Operate the TV only from the type of power source indicated on the marking label.
- Ventilation: Ensure proper ventilation. Do not block any ventilation openings.
- Water and Moisture: Do not expose the TV to rain or moisture. Do not use near water.
- Cleaning: Unplug the TV from the wall outlet before cleaning. Use a soft, dry cloth.
- Servicing: Do not attempt to service this product yourself. Refer all servicing to qualified service personnel.
- Placement: Place the TV on a stable, level surface. Avoid placing it in direct sunlight or near heat sources.
2. Package Contents
Verify that all items are present in the package:
- Coby LEDTV3218 32-Inch LED TV
- Remote Control (with 2 AAA batteries)
- TV Stand Base and Screws
- Power Cord
- User Manual (this document)
3. Product Overview
The Coby LEDTV3218 is a 32-inch LED television designed for clear picture quality and versatile connectivity. It features a 720p resolution display and a 60Hz refresh rate, suitable for everyday viewing.

Figure 3.1: Front view of the Coby LEDTV3218 LED TV, showing the screen and stand.

Figure 3.2: Side view of the Coby LEDTV3218, illustrating its slim design.
4. Setup
4.1 Attaching the Stand
- Carefully place the TV screen-down on a soft, clean surface to prevent scratches.
- Align the TV stand base with the mounting holes on the bottom of the TV.
- Secure the stand using the provided screws. Ensure all screws are tightened firmly.
4.2 Connecting Devices
The TV offers various input ports for connecting external devices. Refer to Figure 4.1 for port locations.
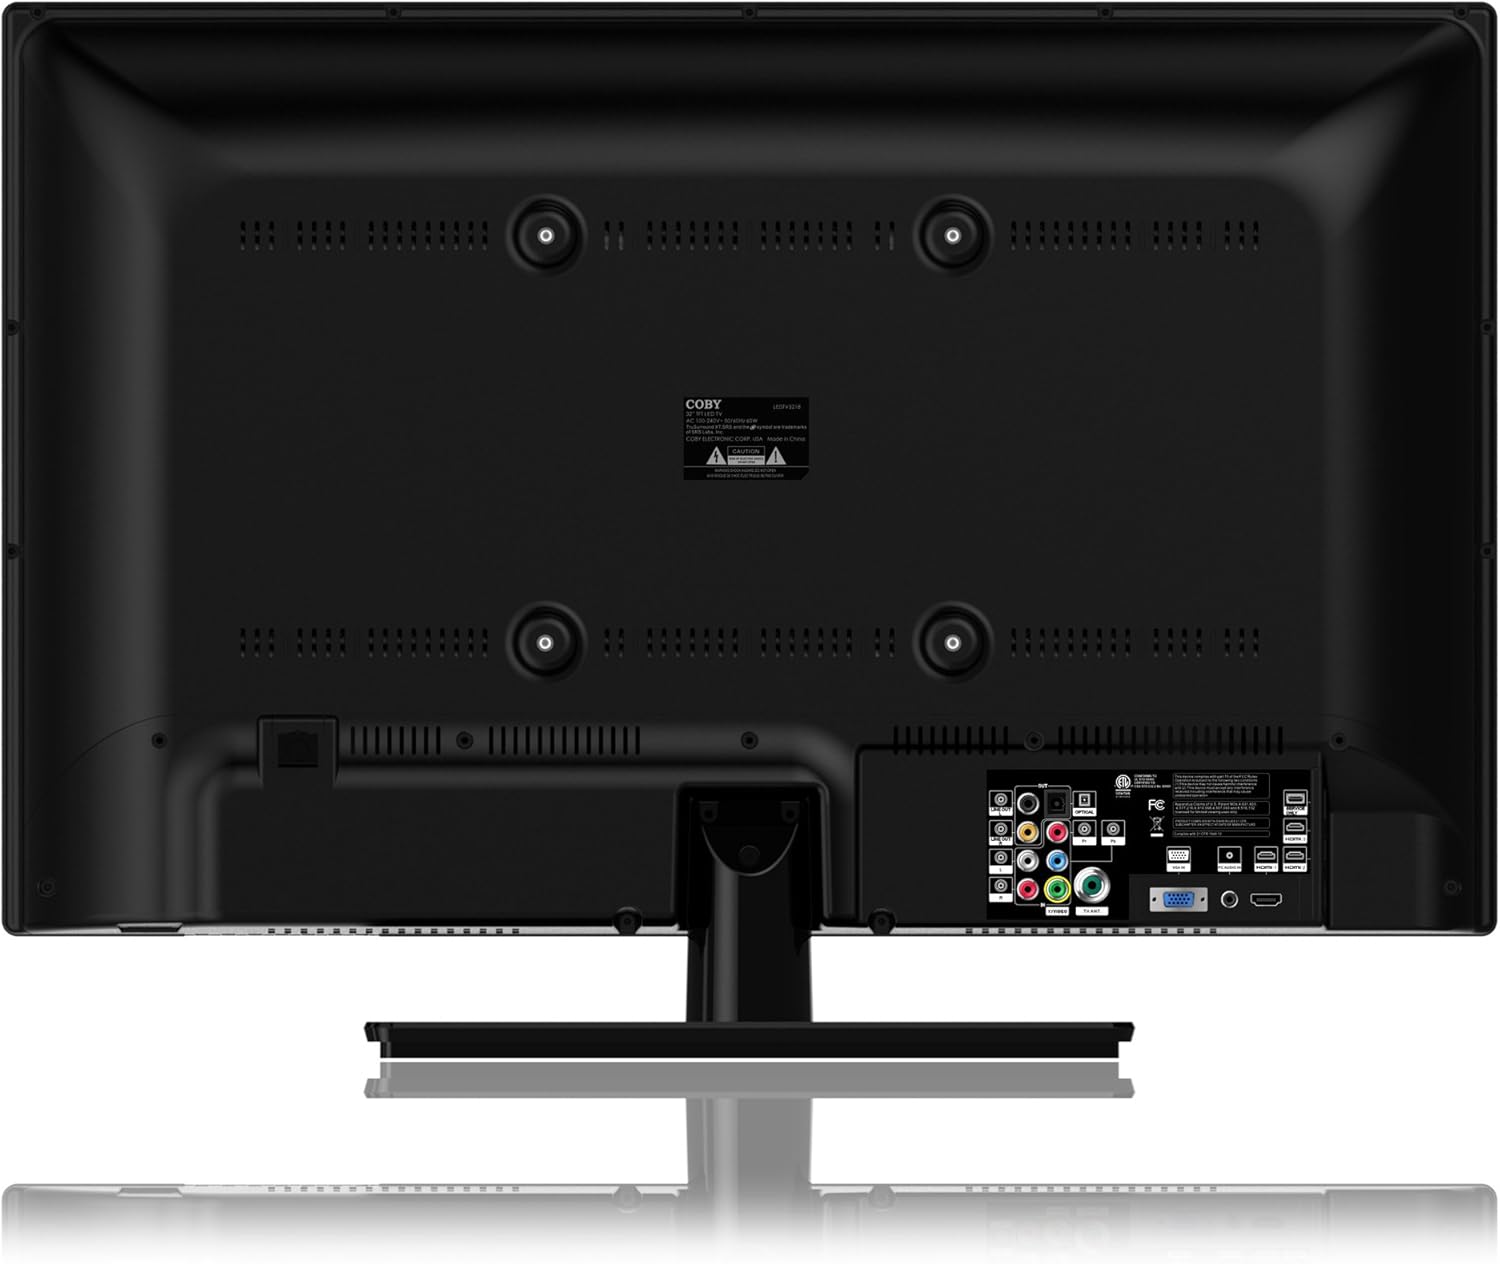
Figure 4.1: Rear panel connections of the Coby LEDTV3218.
- HDMI Inputs (3): Connect Blu-ray players, game consoles, cable/satellite boxes, or other HDMI-enabled devices.
- VGA (PC Input): Connect a computer for use as a monitor.
- Component Video (YPbPr): Connect older video devices using component cables.
- Composite Video (AV): Connect older video devices using RCA cables.
- Antenna/Cable (RF): Connect an antenna for over-the-air broadcasts or a cable TV connection.
- USB: For media playback (check manual for supported formats).
- Audio Out: Connect to external audio systems.
4.3 Initial Power On
- Connect the power cord to the TV and then to a wall outlet.
- Press the power button on the TV or the remote control.
- Follow the on-screen prompts to complete the initial setup, including language selection and channel scanning.
5. Operating Your TV
5.1 Remote Control Functions
The remote control allows you to access all TV functions. Insert the two AAA batteries (included) into the remote control, observing polarity.
- Power: Turns the TV on or off.
- Input: Selects the input source (HDMI, AV, Component, etc.).
- Volume +/-: Adjusts the volume level.
- Channel +/-: Changes channels.
- Menu: Opens the On-Screen Display (OSD) menu.
- Navigation Buttons (Up/Down/Left/Right/OK): Navigate through menus and confirm selections.
- Exit: Closes the current menu.
- Mute: Mutes or unmutes the sound.
5.2 On-Screen Display (OSD) Menu
Press the Menu button on the remote to access the OSD. Use the navigation buttons to select and adjust settings.
- Picture Settings: Adjust brightness, contrast, color, tint, sharpness, and select picture modes (e.g., Standard, Dynamic, Movie).
- Sound Settings: Adjust bass, treble, balance, and select sound modes (e.g., Standard, Music, Movie). Enable or disable SRS TRuSurround XT.
- Channel Settings: Perform auto-scan or manual scan for channels. Access parental controls (V-Chip).
- Time Settings: Set current time, sleep timer, and auto-off functions.
- Setup: Language selection, factory reset, software update (if available).
6. Maintenance
6.1 Cleaning the TV
Always unplug the TV before cleaning.
- Screen: Gently wipe the screen with a soft, lint-free cloth. For stubborn marks, use a screen cleaner specifically designed for LED displays, applied to the cloth, not directly to the screen.
- Cabinet: Wipe the cabinet and stand with a soft, dry cloth. Do not use abrasive cleaners or solvents.
6.2 Storage
If storing the TV for an extended period, disconnect all cables and store it in a cool, dry place, preferably in its original packaging to protect it from dust and physical damage.
7. Troubleshooting
If you encounter issues with your TV, refer to the following common problems and solutions:
- No Power:
- Ensure the power cord is securely plugged into the TV and the wall outlet.
- Check if the wall outlet is functioning by plugging in another device.
- Press the power button on the TV itself, not just the remote.
- No Picture/Poor Picture:
- Verify the correct input source is selected (e.g., HDMI 1, AV).
- Check all cable connections between the TV and external devices.
- Adjust picture settings (brightness, contrast, sharpness) in the OSD menu.
- If using an antenna, perform a channel scan.
- No Sound/Poor Sound:
- Ensure the volume is not muted and is turned up.
- Check audio cable connections for external devices.
- Adjust sound settings in the OSD menu.
- Remote Control Not Working:
- Replace the batteries with new ones, ensuring correct polarity.
- Ensure there are no obstructions between the remote and the TV's IR sensor.
- Point the remote directly at the TV.
8. Specifications
Technical specifications for the Coby LEDTV3218 32-Inch LED TV:
| Feature | Specification |
|---|---|
| Brand | Coby |
| Model Number | LEDTV3218 |
| Screen Size | 32 Inches |
| Display Technology | LED |
| Resolution | 720p |
| Refresh Rate | 60 Hz |
| Item Weight | 15.4 Pounds |
| Product Dimensions | 8 x 28.9 x 20.6 inches |
| Color | Black |
| Total HDMI Ports | 3 |
| Parental Control Technology | V-Chip |
| Energy Compliance | Energy Star 6.0 Compliant |

Figure 8.1: Energy Guide label for the Coby LEDTV3218, showing estimated yearly energy cost.
9. Warranty and Support
For warranty information or technical support, please refer to the warranty card included with your product or visit the official Coby website. Keep your purchase receipt as proof of purchase for warranty claims.


