Introduction
This manual provides detailed instructions for the installation, operation, and maintenance of the Legrand Micro REX T11 Daily Analogue Timer Switch, model 412780. This device is designed to automatically control the switching on and off of an electrical circuit, such as lighting or heating systems, at pre-selected times throughout a 24-hour period.
The Micro REX T11 is a manual programmable time switch featuring one output (16A - 250V) and is intended for installation within a dispenser, occupying one module width.
Important Safety Information
WARNING: Risk of electric shock. Installation and maintenance must be performed by a qualified electrician in accordance with all local and national electrical codes. Always disconnect power at the main circuit breaker before installing or servicing this device.
- Do not operate the device if it appears damaged.
- Ensure the power supply matches the device's specifications (230V~ 50Hz).
- Do not immerse the device in water or expose it to excessive moisture.
- Keep out of reach of children.
Product Overview
The Legrand Micro REX T11 is a compact, DIN rail-mountable analogue timer switch. Below is an illustration of the device with key components identified.
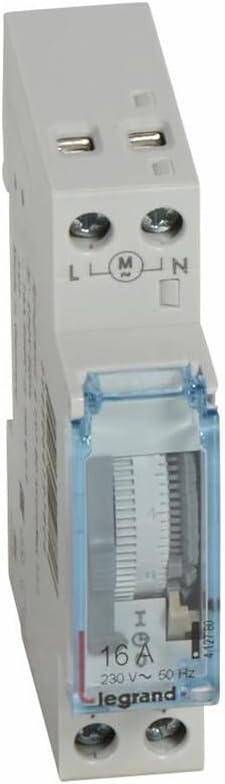
Figure 1: Front view of the Legrand Micro REX T11 Timer Switch. This image shows the white plastic housing, the transparent blue cover over the dial, and the electrical terminals labeled L, M, and N at the top. The dial for setting time and programming pins is visible through the cover, along with the 16A, 230V~ 50Hz rating.
Key Components:
- Programming Dial: A rotating dial with segments for setting ON/OFF times.
- Manual Override Switch: Allows temporary manual control of the circuit.
- Electrical Terminals (L, M, N): Connections for live, switched live (load), and neutral wires.
- Time Indicator: Shows the current time.
Installation Instructions
The Micro REX T11 is designed for installation in a standard electrical dispenser or distribution board, typically mounted on a DIN rail.
Steps for Installation:
- Power Disconnection: Before beginning any electrical work, ensure the main power supply to the circuit is completely disconnected at the circuit breaker or fuse box. Verify with a voltage tester.
- Mounting: Clip the timer switch onto the DIN rail within the dispenser. Ensure it is securely fastened.
- Wiring: Connect the electrical wires to the appropriate terminals as follows:
- Connect the incoming Live wire to the terminal marked L.
- Connect the Neutral wire to the terminal marked N.
- Connect the Live wire going to the load (e.g., light fixture, heater) to the terminal marked M (switched output).
Refer to the wiring diagram on the device or packaging for precise connections. Ensure all connections are tight and secure.
- Cover Installation: Once wiring is complete and verified, close the dispenser cover.
- Power Reconnection: Restore power to the circuit from the main circuit breaker.
Operating Instructions
The Micro REX T11 is an analogue daily timer, meaning its programming repeats every 24 hours.
Setting the Current Time:
- Rotate the central dial clockwise until the current time aligns with the time indicator arrow on the timer's face. The dial is marked with 24 hours.
Programming ON/OFF Times:
- The dial is surrounded by small segments or pins. Each segment typically represents a specific time interval (e.g., 15 minutes).
- To set an ON period, push the corresponding segments outwards. When a segment is pushed outwards, the circuit will be ON during that time interval.
- To set an OFF period, leave the corresponding segments pushed inwards. The circuit will be OFF during these intervals.
- Ensure that the desired ON/OFF periods are clearly defined by pushing out or leaving in the appropriate segments around the entire 24-hour dial.
Manual Override:
The timer may include a manual override switch (often a small lever or button) that allows you to temporarily switch the connected circuit ON or OFF, regardless of the programmed settings. Consult the specific markings on your device for its operation (e.g., "I" for ON, "O" for OFF, or an automatic mode symbol).
Maintenance
The Legrand Micro REX T11 timer switch requires minimal maintenance. Regular checks can help ensure its longevity and proper function.
- Cleaning: Periodically wipe the exterior of the device with a soft, dry cloth. Do not use abrasive cleaners or solvents. Ensure power is disconnected before cleaning.
- Inspection: Annually inspect the wiring connections to ensure they remain tight and free from corrosion. Check for any signs of physical damage to the device.
- Functionality Check: Occasionally verify that the programmed ON/OFF cycles are operating correctly and that the timekeeping mechanism is accurate.
Troubleshooting
If you encounter issues with your Legrand Micro REX T11 timer switch, refer to the following common problems and solutions:
| Problem | Possible Cause | Solution |
|---|---|---|
| Device not powering on / Load not switching. |
|
|
| Timer not keeping accurate time. |
|
|
| Programmed events not occurring. |
|
|
If the problem persists after attempting these solutions, contact Legrand customer support or a qualified electrician.
Specifications
| Feature | Detail |
|---|---|
| Brand | Legrand |
| Model Number | 412780 |
| Type | Daily Analogue Programmable Time Switch |
| Output | 1 output, 16A - 250V |
| Voltage | 230V~ 50Hz |
| Module Width | 1 module |
| Color | White |
| Material | Plastic |
| Product Dimensions (D x W x H) | 0.79"D x 2.36"W x 3.35"H |
| Item Weight | 0.08 Kilograms (2.89 ounces) |
| Country of Origin | FR (France) |
| UPC | 793518665068 |
Warranty and Support
Legrand products are manufactured to high quality standards. For specific warranty information regarding your Micro REX T11 timer switch, please refer to the documentation included with your purchase or visit the official Legrand website.
For technical assistance, troubleshooting beyond this manual, or to inquire about replacement parts, please contact Legrand customer support:
- Legrand Official Website: www.legrand.us (or relevant regional website)
- Refer to your product packaging for specific contact numbers or email addresses.
When contacting support, please have your product model number (412780) and purchase date available.


