1. Introduction
This manual provides instructions for the setup, operation, and maintenance of your Genie GM3T-BX 3-Button Remote. This remote is designed for use with Genie Intellicode garage door openers and systems operating on dual frequencies of 315 MHz and 390 MHz, as well as older Genie systems utilizing 9 or 12 DIP switches.
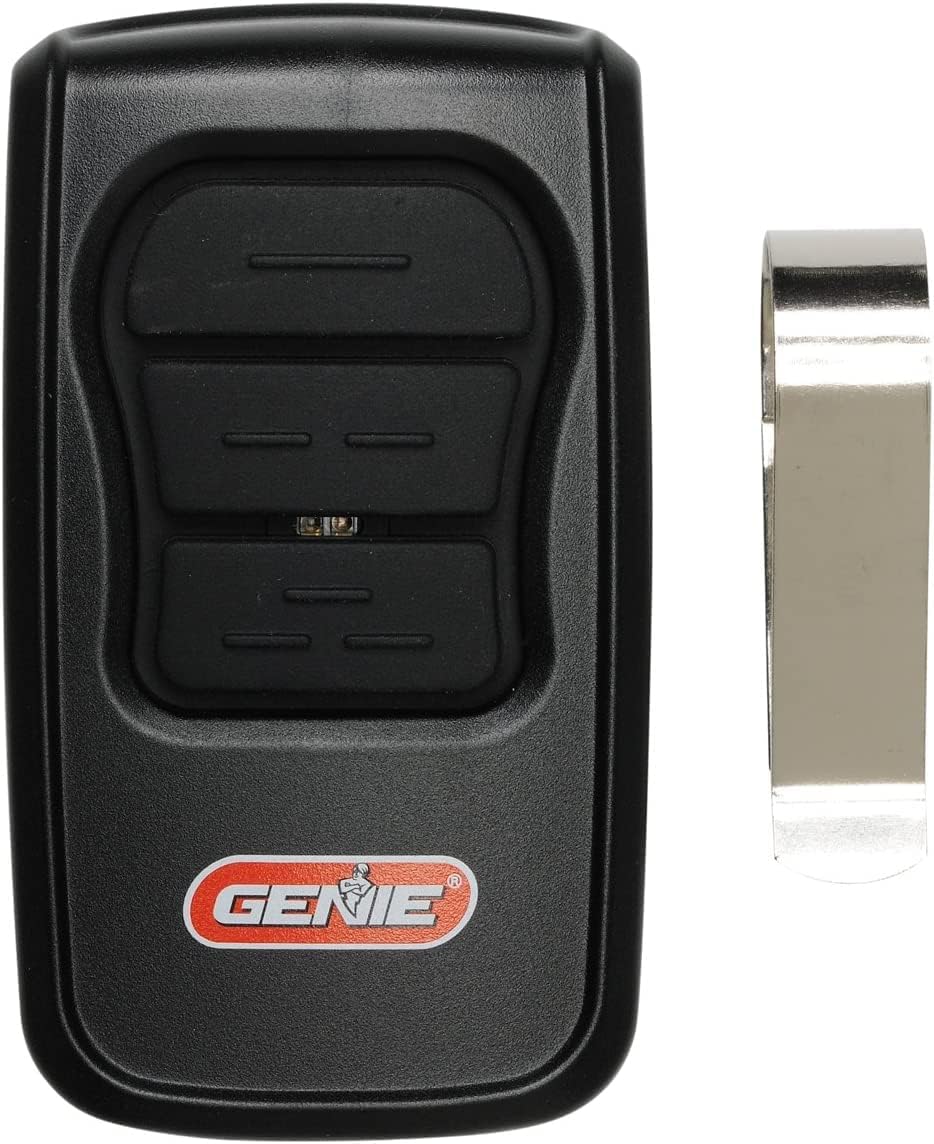
Image 1.1: The Genie GM3T-BX 3-Button Remote, shown with its accompanying visor clip. This remote features three distinct buttons for controlling multiple garage door openers or functions.
2. Key Features
- Universal Compatibility: Works with all Genie Intellicode garage door openers (Genie Intellicode 1 and Intellicode 2) and older Genie systems using 9 or 12 DIP switches.
- Dual Frequency Operation: Supports both 315 MHz and 390 MHz frequencies for broad compatibility.
- Three Programmable Buttons: Allows control of up to three different garage door openers or functions.
- LED Indicator: Provides visual feedback during programming and operation.
- Compact Design: Ergonomic and portable, includes a visor clip for convenient storage in a vehicle.

Image 2.1: The remote control, emphasizing its compatibility with both Intellicode and 9/12 DIP switch technologies, indicating its versatility across various Genie garage door opener models.
3. Package Contents
Verify that all items are present in your package:
- 1 x Genie GM3T-BX 3-Button Remote
- 1 x Visor Clip
- 1 x CR2032 Battery (pre-installed or separate)
- 1 x Set of Programming Instructions (detailed guide)

Image 3.1: A visual representation of the items included in the product package: the remote control, a metal visor clip, a CR2032 coin cell battery, and a printed instruction manual.
4. Setup and Programming
The GM3T-BX remote can be programmed to operate with various Genie garage door openers. Refer to the detailed programming instructions included in your package for specific steps tailored to your opener model (Intellicode 1, Intellicode 2, or DIP switch systems).
4.1. General Programming Steps (Intellicode Systems)
- Locate the "Learn Code" button on your garage door opener motor head. The location may vary by model.
- Press and release the "Learn Code" button. An LED indicator on the opener will typically illuminate.
- Within 30 seconds, press and release the desired button on your GM3T-BX remote. The opener's LED will flash or turn off, indicating successful programming.
- Test the remote by pressing the programmed button. The garage door should activate.
4.2. Programming Steps (DIP Switch Systems)
For older Genie openers utilizing 9 or 12 DIP switches, you will need to match the switch settings on your GM3T-BX remote to those on your existing remote or garage door opener motor head.
- Open the battery compartment of your GM3T-BX remote to access the DIP switches.
- Carefully observe the ON/OFF/MIDDLE positions of the DIP switches on your existing remote or opener.
- Adjust the DIP switches on the GM3T-BX remote to match these settings. If your opener uses 9 switches, leave the remaining 3 switches on the GM3T-BX in the neutral (middle) position.
- Close the battery compartment and test the remote.

Image 4.1: The Genie GM3T-BX remote control with its LED indicator illuminated, displaying red and yellow lights. This visual cue is important during the programming process and for confirming button presses.
5. Operating Instructions
Once programmed, operating the Genie GM3T-BX remote is straightforward:
- To Open/Close the Garage Door: Press the programmed button corresponding to your garage door opener. The door will begin to move.
- To Stop the Garage Door: Press the same programmed button again while the door is in motion.
- Multiple Doors: If you have programmed multiple buttons for different garage doors, press the respective button for the door you wish to operate.

Image 5.1: A user's hand pressing one of the buttons on the Genie GM3T-BX remote, which is conveniently clipped to a car's sun visor for easy access while driving.
6. Compatibility
The Genie GM3T-BX remote is designed for broad compatibility with Genie garage door opener systems. It supports:
- Genie Intellicode 1 & 2: All Intellicode series garage door openers.
- Genie 912 Units: Older Genie systems that use 9-position DIP switches.
- Genie 12-Position DIP Switch Systems: Compatible with systems using 12-position DIP switches.
- Dual Frequency: Operates on both 315 MHz and 390 MHz frequencies.
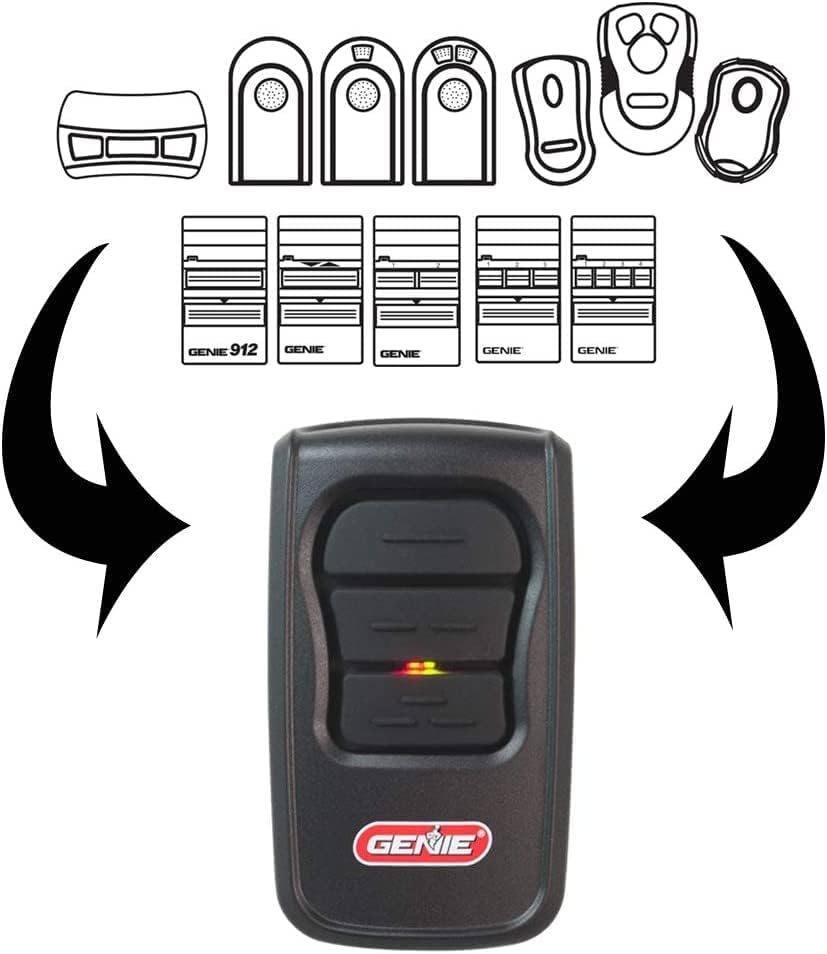
Image 6.1: A diagram visually explaining the compatibility of the GM3T-BX remote with different Genie remote models and DIP switch configurations, including 9-switch and 12-switch systems, highlighting its versatile design.
7. Battery Information
7.1. Battery Type
The Genie GM3T-BX remote uses one CR2032 coin cell battery.
7.2. Battery Replacement
- Locate the battery compartment cover on the back of the remote.
- Using a small screwdriver or coin, gently pry open the cover.
- Remove the old CR2032 battery.
- Insert a new CR2032 battery with the positive (+) side facing up.
- Snap the battery compartment cover back into place.
- Test the remote to ensure proper function.
Warning: Dispose of used batteries properly. Keep batteries out of reach of children.
8. Troubleshooting
| Problem | Possible Cause | Solution |
|---|---|---|
| Remote does not activate opener. |
|
|
| Reduced operating range. |
|
|
| LED on remote does not light up. |
|
|
9. Specifications
| Manufacturer | Genie |
| Model Number | GM3T-BX |
| Frequencies | 315 MHz, 390 MHz |
| Number of Buttons | 3 |
| Compatibility | Genie Intellicode (1 & 2), 9-position DIP switch, 12-position DIP switch |
| Battery Type | CR2032 Coin Cell |
| Color | Black |
| Package Dimensions | 15 x 7.3 x 3.7 cm |
| Item Weight | 0.1 pounds (approx. 45 grams) |
10. Safety Information
- Do not allow children to operate the remote control or play with the garage door opener.
- Keep the remote control out of reach of children.
- Only operate the garage door when it is in full view and free of obstructions.
- Never walk or run under a moving garage door.
- If the remote is lost or stolen, clear the opener's memory and reprogram all remaining remotes for security.
11. Warranty and Support
For warranty information or technical support, please refer to the documentation provided with your original Genie garage door opener or visit the official Genie website. Contact information for customer service is typically available on the manufacturer's website.
For further assistance, you may also refer to the Genie Support Page.


