
Satlink WS-6908
Satlink WS-6908 SE DVB-S FTA Satellite Meter User Manual
Model: WS-6908 | Brand: Satlink
1. Introduction
Thank you for choosing the Satlink WS-6908 SE DVB-S FTA Satellite Meter. This device is designed to assist you in accurately installing and aligning satellite dishes. It also functions as a portable DVB-S receiver and multimedia player. This manual provides detailed instructions for safe and efficient operation of your device.
2. Safety Information
- Read all instructions carefully before use.
- Do not expose the device to rain or moisture.
- Avoid extreme temperatures and direct sunlight.
- Do not attempt to open or repair the device yourself. Refer all servicing to qualified personnel.
- Use only the provided power adapters for charging.
- Keep the device away from strong magnetic fields.
3. Package Contents
Please check the package for the following items:
- Satlink WS-6908 Unit
- Rubber Protective Case
- 220V Charging Adapter
- 12V Car Charging Adapter
- A/V Cable Adapter (3.5mm jack to 3x RCA)

Image 1: Satlink WS-6908 SE DVB-S FTA Satellite Meter and its complete set of accessories, including the main unit, protective case, power adapters, and A/V cable.
4. Product Overview
4.1 Front Panel and Display
The device features a 3.5-inch (8.9 cm) color TFT LCD display for clear viewing of menus, signal strength, and TV channels. The front panel includes navigation buttons and a numeric keypad for easy operation.

Image 2: Angled view of the Satlink WS-6908 SE, highlighting the front panel with its 3.5-inch color TFT LCD display and control buttons.
4.2 Rear Panel and Ports
The rear panel houses the main power switch, speaker, and battery compartment. The side panels provide access to the satellite input, AV input/output, and USB port.

Image 3: Rear view of the Satlink WS-6908 SE, showing the speaker grille and battery cover.

Image 4: Side views of the Satlink WS-6908 SE, illustrating the various ports including the satellite input, AV input/output, and USB port.
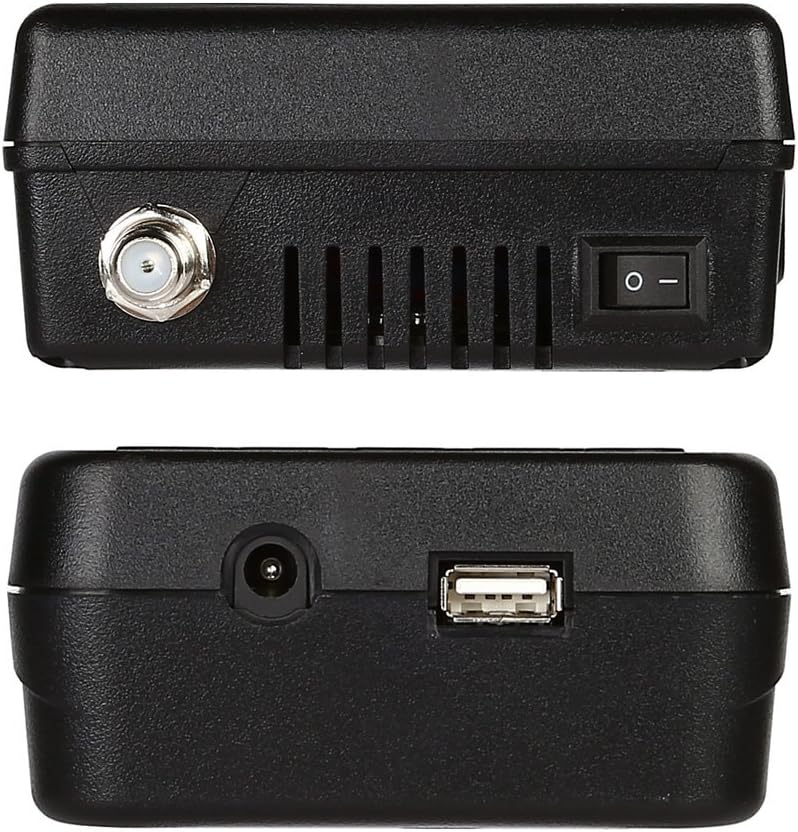
Image 5: Top and bottom views of the Satlink WS-6908 SE, showing the F-connector for satellite input and the power/USB ports.
5. Setup
5.1 Charging the Battery
Before first use, fully charge the internal 3000mAh Li-ion battery. Connect the provided 220V charging adapter to the device's power input and a wall outlet. The 'Charge' indicator light will illuminate. A full charge typically takes several hours and provides 3-6 hours of operation.
5.2 Initial Power On
Press the power button located on the side or rear of the device to turn it on. The display will light up, showing the main menu.
5.3 Language Selection
From the main menu, navigate to 'System Setup' or 'Settings' to select your preferred language. The device supports 7 menu languages: German, English, French, Portuguese, Spanish, Italian, and Polish.
6. Operating Instructions
6.1 Satellite Installation (Signal Finding)
- Connect your LNB (Low Noise Block) cable from the satellite dish to the 'LNB IN' port on the Satlink WS-6908.
- From the main menu, select 'Satellite Install' or 'Quick Search'.
- Choose the desired satellite from the list (e.g., Astra, Hotbird). If not listed, you may need to add transponder data manually in the system settings.
- Adjust the satellite dish's azimuth and elevation while observing the signal strength and quality indicators on the display. The device provides both percentage and bar graph displays.
- Fine-tune the dish position until the signal strength and quality are maximized. The built-in speaker will emit a tone, which increases in pitch with stronger signal.
- Once a stable signal is achieved, you can perform an 'Automatic Channel Search' to find available TV and radio programs.
6.2 DVB-S TV and Radio Reception
After a successful channel search, you can view DVB-S TV programs and listen to DVB-S radio programs directly on the device's screen. Use the navigation buttons to browse channels.
6.3 AV Output Function
The device can be connected to an external TV or monitor using the provided A/V cable adapter. Connect the 3.5mm jack to the device's AV OUT port and the RCA connectors to your TV's AV input. This allows the WS-6908 to function as a standard DVB-S receiver for your television.
6.4 AV Input Function
The AV IN port allows you to connect external devices such as video cameras or other playback equipment. Use the appropriate cable to connect your external device to the WS-6908's AV IN port. Select the AV input source from the device's menu to view the external signal on the screen.
6.5 Multimedia Player
Insert a USB stick containing JPG image files or MP3 audio files into the USB port. Navigate to the 'Multimedia' section in the main menu to browse and play your stored media.
7. Maintenance
7.1 Cleaning
Wipe the device with a soft, dry cloth. Do not use liquid cleaners or abrasive materials.
7.2 Firmware Updates
Firmware updates can be performed via a USB stick. Visit the official Satlink website for the latest firmware and instructions. Ensure the device is fully charged before initiating any firmware update.
7.3 Battery Care
To prolong battery life, avoid fully discharging the battery frequently. If storing the device for an extended period, charge it to approximately 50% and recharge every few months.
8. Troubleshooting
| Problem | Possible Cause | Solution |
|---|---|---|
| Device does not power on. | Battery is discharged or power adapter is not connected. | Charge the battery using the provided adapter. Ensure the power button is pressed. |
| No signal detected. | LNB cable not connected properly, dish misalignment, incorrect satellite selected. | Check LNB cable connection. Re-align the satellite dish. Verify the correct satellite is selected in the menu. |
| Poor signal quality. | Dish not precisely aligned, LNB fault, cable damage. | Fine-tune dish alignment. Check LNB and cable for damage. |
| No channels found after scan. | Weak signal, incorrect transponder settings, LNB not receiving power. | Ensure strong signal strength. Verify transponder settings. Check LNB power settings in the menu. |
| Multimedia files not playing. | Unsupported file format, USB stick not recognized. | Ensure files are JPG or MP3 format. Try reformatting the USB stick (FAT32) or using a different one. |
9. Specifications
| Feature | Detail |
|---|---|
| Model Number | WS-6908 |
| Display | 3.5" / 8.9cm Color TFT LCD |
| Frequency Range | 950 - 2150 MHz (DVB-S) |
| Connectivity Technology | AV, USB |
| Total USB Ports | 1 |
| Audio Output Mode | Stereo |
| Compatible Devices | Satellite Antenna |
| Supported Audio Format | MP3 |
| Battery Voltage | 12 Volt |
| Battery Capacity | 3000mAh Li-ion (3-6 hours operation) |
| Satellite Service Description | Reception of DVB-S TV and Radio programs |
| Number of Component Outputs | 1 (AV Output) |
| Video Output Resolution | 480i |
| Supported Standards | DVB-S, MP3, JPG |
| Menu Languages | German, English, French, Portuguese, Spanish, Italian, Polish |
| Manufacturer | Jointron(Quanzhou) Industry Co.,Ltd |
| UPC | 700371120870, 662629115918 |
10. Warranty and Support
10.1 Warranty Information
This product comes with a 24-month manufacturer's warranty. Please retain your proof of purchase for warranty claims. The warranty covers defects in materials and workmanship under normal use.
10.2 Customer Support
For technical assistance, troubleshooting, or warranty inquiries, please contact your retailer or the manufacturer directly. A detailed manual may be available on CD or upon request via email. Firmware updates are available via USB stick from the manufacturer's website.
Related documentsWS-6908


Ask a question about this manual
Ask about setup, troubleshooting, compatibility, parts, safety, or missing instructions. Manuals+ will review the question and use this page’s manual context to help answer it.