
RCA RCD30A
RCA Digital Alarm Clock User Manual
Model: RCD30A | Brand: RCA
1. Introduction and Overview
This manual provides comprehensive instructions for the RCA Digital Alarm Clock, Model RCD30A. Designed for simplicity and reliability, this alarm clock features a large, easy-to-read LED display and essential functions for daily use.
Key Features:
- 1.4 inch red LED display
- Easy to use control buttons
- Repeating snooze functionality with a large, full-width button
- High/low display brightness control
- AC powered operation
- "No Worry" battery backup option (9V battery not included) to retain time settings and alarm function during power outages.

Figure 1: Front view of the RCA Digital Alarm Clock.
2. Setup
2.1 Power Connection
Connect the AC power cord from the alarm clock to a standard electrical outlet. The display will illuminate, and the clock will be ready for time setting.
2.2 Battery Backup Installation
For "No Worry" battery backup, install a 9V battery (not included) into the battery compartment located on the back of the unit. This feature ensures that time settings and alarm functions are retained during power interruptions, although the digital display will not light up when operating on battery power.
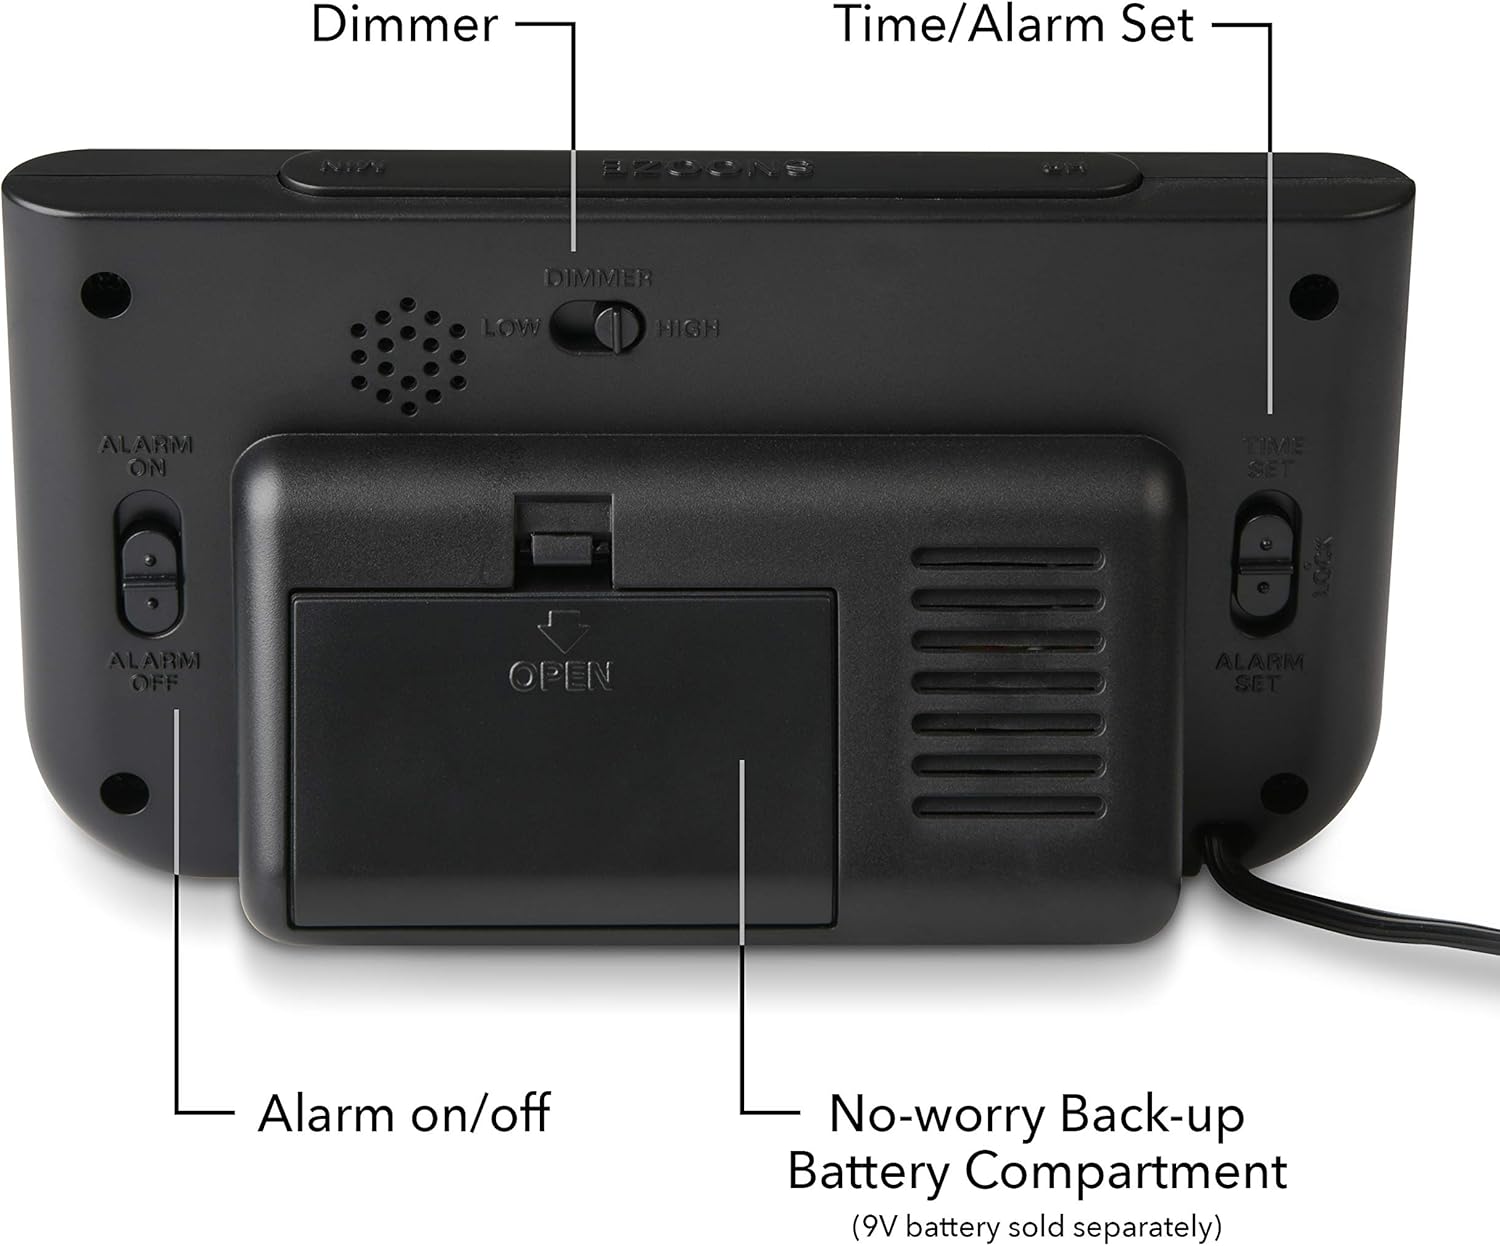
Figure 2: Rear view with battery compartment and controls labeled.
3. Operating Instructions
3.1 Setting the Time
- Locate the TIME SET button on the back of the clock.
- Press and hold the TIME SET button. The display will begin to flash.
- While holding TIME SET, press the HOUR button to adjust the hour. Observe the PM indicator for correct AM/PM setting.
- While holding TIME SET, press the MIN button to adjust the minutes.
- Release the TIME SET button to save the current time.
3.2 Setting the Alarm
- Locate the ALARM SET button on the back of the clock.
- Press and hold the ALARM SET button. The alarm time will begin to flash.
- While holding ALARM SET, press the HOUR button to adjust the alarm hour.
- While holding ALARM SET, press the MIN button to adjust the alarm minutes.
- Release the ALARM SET button to save the alarm time.
- To activate the alarm, slide the ALARM ON/OFF switch to the "ON" position. An alarm indicator light will appear on the display.
3.3 Using the Snooze Function
When the alarm sounds, press the large SNOOZE button located on the top of the clock. This will temporarily silence the alarm for approximately 9 minutes. The alarm will sound again after the snooze period ends.

Figure 3: Top view highlighting the Snooze button.
3.4 Adjusting Display Brightness
The clock features a high/low display brightness control. Locate the DIMMER switch on the back of the unit and slide it to your preferred brightness level (High or Low).
4. Maintenance
4.1 Cleaning
To clean the clock, wipe the surface with a soft, dry cloth. Do not use abrasive cleaners or solvents, as they may damage the finish.
4.2 Battery Replacement
If the clock experiences frequent power outages or if the battery backup feature is not functioning correctly, replace the 9V battery in the battery compartment. Ensure proper polarity when inserting the new battery.
5. Troubleshooting
If you encounter issues with your RCA Digital Alarm Clock, please refer to the following common problems and solutions:
| Problem | Possible Cause / Solution |
|---|---|
| Display is blank / Clock not working | Ensure the AC power cord is securely plugged into a working electrical outlet. Check if the outlet has power. |
| Time/Alarm settings lost after power outage | The 9V battery for backup may be missing or depleted. Install a new 9V battery. Note: The display does not light up during battery backup operation. |
| Alarm does not sound | Ensure the ALARM ON/OFF switch is in the "ON" position. Verify the alarm time is set correctly. |
| Buttons are unresponsive | Unplug the unit from the power outlet for a few minutes, then plug it back in to reset. |
For further assistance, you may refer to the official User Manual (PDF) available here.
6. Specifications
| Feature | Detail |
|---|---|
| Brand | RCA |
| Model Number | RCD30A |
| Display Type | Digital LED |
| Display Size | 1.4-Inch |
| Color | Black |
| Power Source | Corded Electric |
| Battery Backup | 9V (battery not included) |
| Product Dimensions | 5"W x 6"H |
| Material | Plastic |
| Special Features | Snooze, Alarm, High/Low Brightness Control |
7. Warranty and Support
7.1 Warranty Information
This RCA Digital Alarm Clock comes with a Limited Warranty. Please refer to the warranty card included with your purchase for specific terms and conditions, or visit the official RCA website for detailed warranty information.
7.2 Customer Support
For technical support, product inquiries, or service, please visit the official RCA Store on Amazon: RCA Store.
Related documentsRCD30A


Ask a question about this manual
Ask about setup, troubleshooting, compatibility, parts, safety, or missing instructions. Manuals+ will review the question and use this page’s manual context to help answer it.