
1. Introduction
The Soundstream MPQ-7B is a high-quality 7-band parametric equalizer designed to provide precise control over your audio system's frequency response. Featuring independent subwoofer level control and 2 selectable balanced RCA inputs, this unit allows for fine-tuning of your sound environment, ensuring optimal audio performance. It includes front, rear, and subwoofer RCA outputs for versatile system integration.
2. Safety Information
- Power Supply: Ensure the unit is connected to a stable 12V DC power source. Incorrect voltage can damage the device.
- Wiring: All wiring should be performed by a qualified professional to prevent electrical shorts or damage to your vehicle's electrical system.
- Mounting: Mount the equalizer securely in a location that does not obstruct driver visibility or vehicle controls. Avoid areas exposed to excessive heat, moisture, or direct sunlight.
- Volume Levels: Prolonged exposure to high volume levels can cause hearing damage. Adjust audio levels responsibly.
- Ventilation: Ensure adequate ventilation around the unit to prevent overheating.
3. Product Overview
The Soundstream MPQ-7B features a user-friendly layout with clearly labeled controls and connections.

Figure 3.1: Front View of Soundstream MPQ-7B. This image displays the top and front of the equalizer, highlighting the seven frequency adjustment knobs, the master volume/fader control, the subwoofer volume, and the input selector switch. The unit is black with blue graphic accents.

Figure 3.2: Close-up of Front Panel Controls. A detailed view of the front panel, showing the large volume/fader knob on the left, the CD/AUX input selector button, the subwoofer volume knob, and the seven smaller equalizer frequency adjustment knobs (40Hz, 100Hz, 275Hz, 700Hz, 2KHz, 5KHz, 14KHz) with their respective +/-18dB markings.
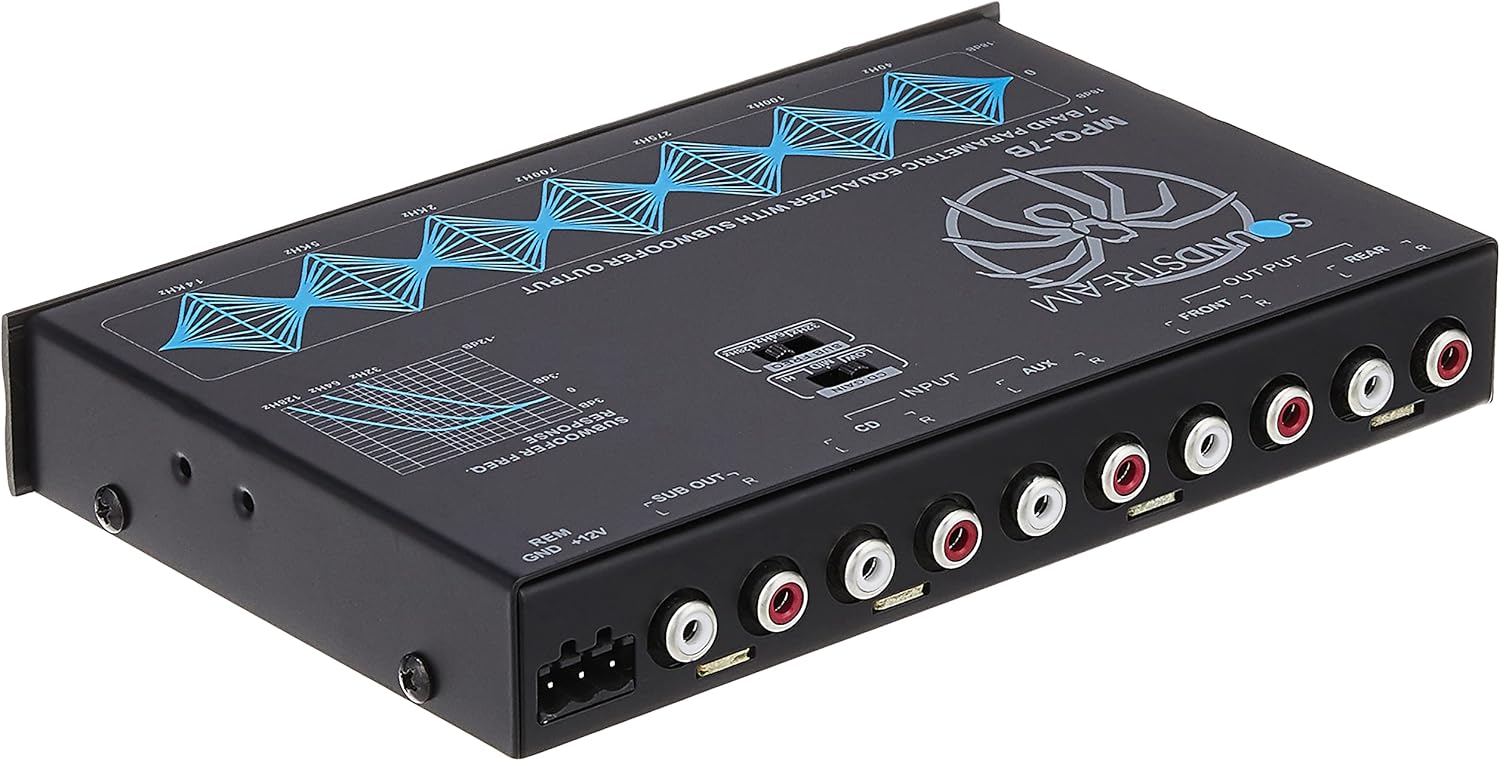
Figure 3.3: Rear Panel Connections. This image shows the rear of the equalizer, featuring the RCA input and output jacks (Front, Rear, Sub Out), the power terminal block (REM, GND, +12V), and the subwoofer frequency response graph.
3.1. Front Panel Controls
- VOLUME-FADER Knob: Controls the overall output volume and allows fading between front and rear outputs.
- CD/AUX Button: Selects between the CD (main) input and the auxiliary input.
- SUB VOLUME Knob: Adjusts the output level of the subwoofer channel independently.
- Equalizer Frequency Knobs (40Hz, 100Hz, 275Hz, 700Hz, 2KHz, 5KHz, 14KHz): Each knob allows for +/-18dB boost or cut at its respective frequency band.
3.2. Rear Panel Connections
- INPUT (CD/AUX): RCA inputs for connecting your head unit or other audio sources.
- OUTPUT (FRONT/REAR/SUB OUT): RCA outputs for connecting to amplifiers.
- REM/GND/+12V Terminal: Power input connections for remote turn-on, ground, and 12V DC power.
- SUBWOOFER FREQ RESPONSE: Adjustable low-pass crossover for the subwoofer output (32Hz, 64Hz, 128Hz).
4. Setup and Installation
Proper installation is crucial for optimal performance and safety. It is recommended to have this unit installed by a professional car audio technician.
4.1. Mounting
Choose a secure, dry location away from direct heat sources and moisture. Ensure sufficient space for wiring and ventilation. The unit can be mounted under the dashboard, in the glove compartment, or in the trunk, depending on available space and accessibility requirements.
4.2. Wiring Connections
- Ground (GND): Connect the ground wire to a clean, unpainted metal surface of the vehicle chassis. Ensure a solid, low-resistance connection.
- +12V (Power): Connect the +12V wire to a constant 12V power source from the vehicle's battery, preferably through a fused connection (fuse not included, typically 1A).
- Remote (REM): Connect the remote turn-on wire to the remote output of your head unit. This will turn the equalizer on and off with your car's audio system.
- RCA Inputs: Connect the RCA output cables from your head unit to the corresponding CD or AUX input jacks on the equalizer.
- RCA Outputs: Connect the FRONT, REAR, and SUB OUT RCA outputs from the equalizer to the corresponding inputs on your amplifiers.
5. Operating Instructions
5.1. Basic Operation
- Power On/Off: The unit powers on automatically when the remote turn-on signal is received from your head unit.
- Input Selection: Press the CD/AUX button to toggle between your primary audio source (CD) and the auxiliary input.
- Master Volume and Fader: Use the large VOLUME-FADER knob to adjust the overall system volume. Push the knob in or pull it out to adjust the front-to-rear fader balance.
5.2. Equalizer Adjustments
The MPQ-7B offers seven frequency bands for precise audio shaping:
- 40Hz: Controls the very low bass frequencies.
- 100Hz: Adjusts the mid-bass frequencies.
- 275Hz: Affects the lower midrange.
- 700Hz: Controls the central midrange frequencies.
- 2KHz: Adjusts the upper midrange, impacting vocal clarity.
- 5KHz: Controls the lower treble, affecting brightness.
- 14KHz: Adjusts the high treble, impacting airiness and sparkle.
Rotate each knob clockwise to boost the frequency (+18dB) or counter-clockwise to cut the frequency (-18dB). Experiment with different settings to achieve your desired sound profile.
5.3. Subwoofer Control
- SUB VOLUME: Use this knob to independently adjust the output level of your subwoofer, allowing you to balance bass with the rest of your system.
- SUBWOOFER FREQ RESPONSE: Select the desired low-pass crossover frequency for your subwoofer output (32Hz, 64Hz, or 128Hz) using the switch on the rear panel. This ensures only low frequencies are sent to your subwoofer amplifier.
6. Maintenance
- Cleaning: Use a soft, dry cloth to clean the unit. Do not use abrasive cleaners or solvents, as they may damage the finish or controls.
- Connections: Periodically check all wiring connections to ensure they are secure and free from corrosion.
- Storage: If storing the unit for an extended period, disconnect it from power and store it in a cool, dry place.
7. Troubleshooting
| Problem | Possible Cause | Solution |
|---|---|---|
| No Power | Blown fuse; Loose power/ground/remote wire; No remote signal from head unit. | Check and replace fuse; Verify all power connections are secure; Ensure head unit's remote output is active. |
| No Sound | Incorrect RCA connections; Input selector incorrect; Amplifier not powered. | Verify RCA input/output connections; Ensure correct input (CD/AUX) is selected; Check amplifier power. |
| Distorted Sound | Input gain too high; Output level too high; Poor ground connection. | Reduce input gain on equalizer or head unit; Lower equalizer output level; Check ground wire for secure connection. |
| Popping Noise on Turn Off | Ground loop issue; Remote turn-off delay mismatch. | Ensure all components share a common, clean ground point; Consult a professional for ground loop isolation or remote turn-on delay solutions. |
| Equalizer Knobs Not Responding | Internal fault. | Contact Soundstream support or a qualified technician for repair. |
If you encounter issues not listed here or if the suggested solutions do not resolve the problem, please contact Soundstream customer support or a certified car audio technician.
8. Specifications
| Feature | Specification |
|---|---|
| Number of Bands | 7 |
| Frequency Bands | 40Hz, 100Hz, 275Hz, 700Hz, 2KHz, 5KHz, 14KHz |
| Cut/Boost Range | +/- 18dB |
| Signal-to-Noise Ratio (S/N) | 115dB |
| Max Output Level | 8V |
| Frequency Response | 10-15,000Hz (10Hz-1.5KHz according to box art) |
| Power Supply | 30V Bipolar Switching Power Supply |
| Inputs | 2 selectable balanced RCA inputs (CD/AUX) |
| Outputs | Front, Rear, and Subwoofer RCA outputs |
| Subwoofer Crossover Frequencies | 32Hz, 64Hz, 128Hz (selectable) |
| Dimensions (L x W x H) | 22.23 x 18.42 x 5.72 cm (8.75 x 7.25 x 2.25 inches) |
| Weight | 1.36 kg (3 lbs) |
| Color | Black/Blue |
9. Warranty and Support
For warranty information and customer support, please refer to the documentation included with your purchase or contact Soundstream directly through their official website or authorized dealer. Warranty terms may vary based on region and retailer.
For technical assistance or service inquiries, please visit the Soundstream website or contact their customer service department. Always provide your product model number (MPQ-7B) and purchase details when seeking support.


