1. Introduction
This manual provides detailed instructions for the installation, operation, and maintenance of your GIGABYTE GA-H77-DS3H motherboard. Please read this manual thoroughly before attempting any installation or configuration to ensure proper functionality and to prevent damage to your system components.
The GIGABYTE GA-H77-DS3H is an ATX motherboard designed for Intel LGA 1155 processors, featuring Intel H77 Express Chipset, Dual UEFI BIOS, and support for AMD CrossFireX technology. It incorporates GIGABYTE's Ultra Durable 4 Classic design for enhanced stability and longevity.
2. Key Features
- CPU Support: Compatible with 3rd Gen Intel 22nm CPUs and 2nd Gen Intel Core CPUs (LGA1155 socket).
- Chipset: Intel H77 Express Chipset.
- Memory: 4 x 1.5V DDR3 DIMM sockets, supporting up to 32 GB of system memory. Dual channel memory architecture with support for DDR3 1600/1333/1066 MHz, non-ECC, and Extreme Memory Profile (XMP) modules.
- Audio: VIA VT2021 codec.
- LAN: Atheros GbE LAN chip (10/100/1000 Mbit).
- Expansion Slots: 1 x PCI Express x16 slot (x16), 1 x PCI Express x16 slot (x4), 2 x PCI Express x1 slots, 2 x PCI slots. Supports AMD CrossFireX technology.
- Storage Interface: 2 x SATA 6Gb/s connectors, 3 x SATA 3Gb/s connectors, 1 x mSATA. Supports RAID 0/1/5/10.
- USB: Up to 4 USB 3.0/2.0 ports and up to 8 USB 2.0/1.1 ports.
- Video Output: HDMI/DVI interface for HD video playback.
- Special Features: GIGABYTE 3D BIOS (Dual UEFI), Ultra Durable 4 Classic, GIGABYTE 333 Onboard Acceleration (USB 3.0, SATA 3.0 & 3x USB Power), GIGABYTE On/Off Charge for USB devices.
3. Setup and Installation
3.1. Package Contents
Before you begin, ensure all components listed below are present in your motherboard package:
- GIGABYTE GA-H77-DS3H Motherboard
- I/O Shield
- SATA Cables
- User Manual and Driver CD
3.2. Motherboard Layout
Familiarize yourself with the layout of the motherboard before installation. This image shows the overall layout of the GIGABYTE GA-H77-DS3H motherboard, highlighting key components such as the CPU socket, DIMM slots, and expansion slots.

Figure 3.2.1: Top-down view of the GIGABYTE GA-H77-DS3H motherboard, showing the CPU socket, RAM slots, and various connectors.
3.3. Installing the CPU
- Locate the LGA1155 CPU socket on the motherboard.
- Open the CPU socket lever and remove the protective cover.
- Carefully align your Intel LGA1155 processor with the socket, ensuring the notches on the CPU match the keys on the socket. Do not force the CPU into place.
- Lower the CPU into the socket.
- Close the CPU socket lever to secure the processor.
3.4. Installing Memory (RAM)
- Locate the four DDR3 DIMM slots.
- Open the clips at both ends of the DIMM slot.
- Align the memory module with the slot, ensuring the notch on the module matches the key in the slot.
- Press down firmly on both ends of the memory module until the clips snap into place.
- For dual-channel operation, install memory modules in matching colored slots (e.g., both blue or both white).
3.5. Connecting Storage Devices
The motherboard features 2 x SATA 6Gb/s connectors and 3 x SATA 3Gb/s connectors. Connect your SATA hard drives or SSDs using the provided SATA cables. The mSATA connector supports compatible mSATA SSDs.
3.6. Connecting Power Supply
Connect the 24-pin ATX main power connector and the 4-pin ATX 12V power connector from your power supply to the corresponding headers on the motherboard.
3.7. Connecting Peripherals (Back Panel)
This image illustrates the various ports available on the back panel of the motherboard. Connect your keyboard, mouse, display, and other peripherals to the appropriate ports.
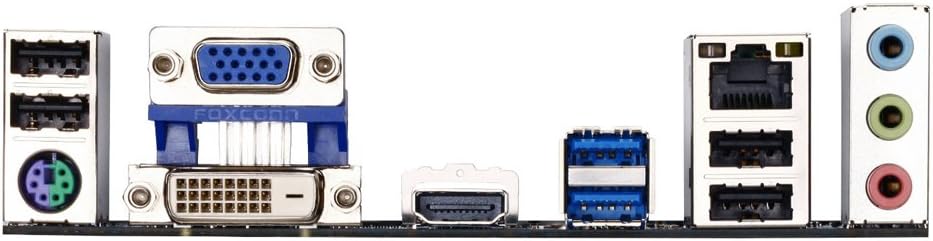
Figure 3.7.1: Rear I/O panel of the GIGABYTE GA-H77-DS3H motherboard, showing ports for PS/2, D-Sub, DVI-D, HDMI, USB 3.0/2.0, USB 2.0/1.1, RJ-45, and audio jacks.
- PS/2 Port: For connecting a PS/2 keyboard or mouse.
- Video Ports: D-Sub, DVI-D, and HDMI for display output.
- USB Ports: 2 x USB 3.0/2.0 ports (blue) and 4 x USB 2.0/1.1 ports (black).
- RJ-45 Port: For Gigabit Ethernet network connection.
- Audio Jacks: Three audio jacks for line-in, line-out, and microphone.
4. Operating System and BIOS
4.1. BIOS Setup
The GIGABYTE GA-H77-DS3H features GIGABYTE 3D BIOS (Dual UEFI). To enter BIOS setup, press the DEL key during system startup. The BIOS allows you to configure system settings, boot order, and monitor hardware status.
The Dual UEFI BIOS provides a backup BIOS chip, ensuring system stability and recovery in case of main BIOS corruption. LED indicators on the motherboard show the status of the main and backup BIOS.
4.2. Driver Installation
After installing your operating system, install the necessary drivers from the included driver CD or download the latest drivers from the GIGABYTE official website. This includes chipset drivers, audio drivers, LAN drivers, and any other peripheral drivers.
5. Maintenance
- Keep Clean: Regularly clean dust from the motherboard and components using compressed air. Ensure the system is powered off and unplugged before cleaning.
- BIOS Updates: Periodically check the GIGABYTE website for BIOS updates. Update the BIOS only if necessary and follow the instructions carefully.
- Component Checks: Ensure all cables and components are securely connected. Loose connections can cause system instability.
6. Troubleshooting
- No Power: Check all power connections (24-pin ATX, 4-pin ATX 12V, CPU fan, system fans). Ensure the power supply is switched on.
- No Display: Verify that the graphics card (if dedicated) or integrated graphics output is correctly connected to the monitor. Reseat RAM modules.
- System Instability/Crashes: This could be due to incompatible RAM, overheating, or faulty components. Check RAM compatibility, ensure proper cooling, and test components individually.
- BIOS Issues: If the system fails to boot due to BIOS issues, the Dual UEFI BIOS should automatically recover. If not, consult the GIGABYTE support website for specific recovery procedures.
7. Specifications
| Feature | Detail |
|---|---|
| CPU Socket | Intel LGA 1155 |
| Compatible Processors | Intel Core i7/i5/i3/Pentium/Celeron (3rd Gen 22nm & 2nd Gen) |
| Chipset | Intel H77 Express |
| Memory Slots | 4 x DDR3 DIMM sockets |
| Max Memory | 32 GB DDR3 |
| Memory Speed | 1600/1333/1066 MHz |
| SATA Ports | 2 x SATA 6Gb/s, 3 x SATA 3Gb/s, 1 x mSATA |
| USB Ports (Rear) | 2 x USB 3.0/2.0, 4 x USB 2.0/1.1 |
| Video Output | 1 x D-Sub, 1 x DVI-D, 1 x HDMI |
| LAN | Atheros GbE LAN chip (10/100/1000 Mbit) |
| Audio | VIA VT2021 codec |
| Expansion Slots | 1 x PCIe x16 (x16), 1 x PCIe x16 (x4), 2 x PCIe x1, 2 x PCI |
| Form Factor | ATX |
| Dimensions | 13 x 11 x 3 inches |
8. Warranty and Support
For warranty information, please refer to the warranty card included with your product or visit the official GIGABYTE website. Technical support and driver downloads are available on the GIGABYTE support page.
GIGABYTE Official Website: www.gigabyte.com
9. Product Videos
9.1. Product Overview Video
Video 9.1.1: A general product overview video showcasing the features and design of a motherboard. This video provides a visual introduction to the product's capabilities and aesthetics.
9.2. B75 Motherboard Display Video
Video 9.2.1: This video demonstrates the features and interfaces of a B75 motherboard, including CPU socket, RAM slots, PCI-E slots, SATA ports, and rear I/O. While not the exact model, it illustrates common motherboard components and connections.
9.3. H61 LGA1155 Motherboard Overview
Video 9.3.1: A brief overview of an H61 LGA1155 motherboard. This video highlights the physical aspects and connectivity options typical for motherboards using the LGA1155 socket, which is relevant to the GA-H77-DS3H.


