1. Introduction
The Aputure Amaran AHL-N60 LED Ring Flash is a versatile lighting accessory designed for macro photography and other close-up applications. It provides consistent, uniform illumination, offering both continuous light and flash modes. This manual details the proper setup, operation, maintenance, and troubleshooting for your AHL-N60 unit, ensuring optimal performance and longevity.
2. Safety Information
- Do not look directly into the LED lights when they are active, as this may cause eye strain or damage.
- Keep the device away from water and other liquids to prevent electric shock or malfunction.
- Do not attempt to disassemble or modify the unit. Repairs should only be performed by authorized service personnel.
- Ensure proper battery installation and use only recommended battery types. Remove batteries during extended periods of non-use.
- Keep out of reach of children.
3. Package Contents
Verify that all items are present in your package:
- Amaran AHL-N60 LED Ring Flash Unit
- Controller Unit
- Set of Lens Adapter Rings (various sizes)

Figure 3.1: Complete Aputure Amaran AHL-N60 LED Ring Flash kit, including the ring light, controller, and adapter rings.
4. Product Overview
The AHL-N60 consists of an LED ring light, a control unit, and various lens adapter rings for compatibility with different camera lenses.
4.1 Components
- LED Ring Light: Houses the LED array for illumination. Attaches to the lens via an adapter ring.
- Controller Unit: Connects to the camera's hot shoe and the LED ring light. Contains controls for power, mode selection, and brightness adjustment.
- Adapter Rings: Thread onto your camera lens, allowing the LED ring light to be securely mounted.
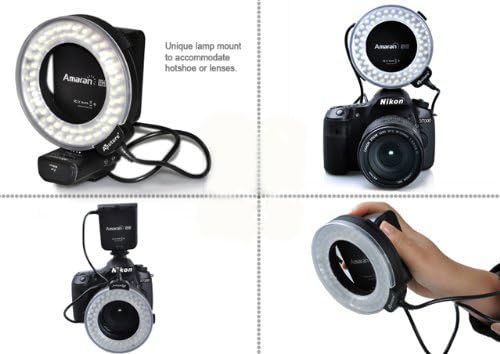
Figure 4.1: Various mounting options for the Amaran AHL-N60, showcasing its flexibility.
4.2 Controls on the Controller Unit
- Power Button: Turns the unit on or off.
- Mode Button: Cycles through different lighting modes (e.g., full, left side, right side, flash).
- Brightness Dial: Adjusts the intensity of the LED light.
- Flash/Continuous Switch: Toggles between continuous illumination and flash mode.
5. Setup
5.1 Battery Installation
The controller unit requires batteries for operation. Open the battery compartment on the controller unit and insert the specified number and type of batteries, ensuring correct polarity. Close the compartment securely.
5.2 Mounting to Camera
- Select the appropriate adapter ring that matches the filter thread size of your camera lens.
- Screw the chosen adapter ring onto the front filter thread of your camera lens.
- Slide the LED ring light onto the adapter ring until it clicks into place or is securely fastened.
- Attach the controller unit to your camera's hot shoe and tighten the locking mechanism.
- Connect the cable from the LED ring light to the designated port on the controller unit.

Figure 5.1: The Amaran AHL-N60 LED Ring Flash correctly mounted on a DSLR camera.
6. Operating Modes
The Amaran AHL-N60 offers multiple lighting modes to suit various photographic needs.
- Power On/Off: Press the Power button on the controller unit to turn the device on or off.
- Continuous Light Mode: Set the Flash/Continuous switch to the 'Continuous' position. The LEDs will remain lit.
- Flash Mode: Set the Flash/Continuous switch to the 'Flash' position. The LEDs will only illuminate when the camera's shutter is triggered.
- Brightness Adjustment: Rotate the Brightness Dial to increase or decrease the light intensity.
- Lighting Modes: Press the Mode button to cycle through the available lighting patterns:
- Full Brightness: All LEDs illuminate evenly.
- Left Side Only: Only the LEDs on the left half of the ring illuminate.
- Right Side Only: Only the LEDs on the right half of the ring illuminate.

Figure 6.1: Visual comparison of a subject photographed without and with the Amaran AHL-N60 ring flash, highlighting its effect.
7. Maintenance
- Cleaning: Use a soft, dry cloth to clean the exterior of the unit. For stubborn dirt, a slightly damp cloth can be used, followed by immediate drying. Do not use harsh chemicals or abrasive cleaners.
- Storage: Store the AHL-N60 in a cool, dry place, away from direct sunlight and extreme temperatures. If storing for an extended period, remove the batteries from the controller unit.
- Battery Care: Replace batteries when performance diminishes. Dispose of used batteries responsibly according to local regulations.
8. Troubleshooting
- Unit does not power on:
- Check if batteries are correctly installed and fully charged.
- Ensure the power button is pressed firmly.
- LEDs are dim or uneven:
- Adjust the brightness dial.
- Replace batteries if they are low.
- Ensure the ring light is securely connected to the controller unit.
- Flash mode not working:
- Verify the Flash/Continuous switch is set to 'Flash'.
- Ensure the controller unit is properly seated in the camera's hot shoe and making good contact.
- Check camera settings to ensure external flash is enabled.
If problems persist, contact Aputure customer support for further assistance.
9. Specifications
| Feature | Specification |
|---|---|
| Brand | Aputure |
| Model Number | AHL-C60 (also known as AHL-N60 series) |
| Product Dimensions | 21.01 x 5.99 x 10.01 cm |
| Item Weight | 421.84 g |
| Camera Flash Type | Macro |
| Flash Sync Speed | 1/20000 Seconds |
| Wireless Communication Technology | Optical Pulse |
| First Available Date | June 27, 2014 |
10. Warranty and Support
Warranty information for the Aputure Amaran AHL-N60 LED Ring Flash is typically provided with the product packaging at the time of purchase. Please refer to the documentation included with your unit for specific warranty terms and conditions.
For technical support, service, or inquiries regarding your product, please contact Aputure customer service. You can usually find contact information on the official Aputure website or through your product retailer.


