
Olympus LS-100
Olympus LS-100 Voice Recorder Instruction Manual
Model: LS-100
Introduction
This manual provides detailed instructions for the proper use and maintenance of your Olympus LS-100 Voice Recorder. The LS-100 is designed for high-fidelity audio capture, offering features such as 24-bit/96kHz Linear PCM recording, multi-track capabilities, and versatile input options including XLR with phantom power. Please read this manual thoroughly before operating the device to ensure optimal performance and longevity.
Safety Information
- Battery Safety: Use only the specified Lithium Ion battery. Do not expose to extreme temperatures or attempt to disassemble.
- Water and Moisture: Keep the device away from water and high humidity to prevent damage.
- Cleaning: Use a soft, dry cloth for cleaning. Avoid liquid cleaners or solvents.
- Disposal: Dispose of the device and batteries according to local regulations. Do not incinerate.
- Hearing Protection: Avoid listening at high volumes for extended periods to prevent hearing damage.
Package Contents
Verify that all items are present in the package:
- Olympus LS-100 Digital Voice Recorder
- Lithium Ion Battery (pre-installed or separate)
- USB Cable
- Instruction Manual (this document)
Parts Identification
Front View

Image: Front view of the Olympus LS-100 Voice Recorder, showing the display, control buttons, and built-in microphones.
- Built-in Stereo Microphones: Left and Right 90-degree directional condenser microphones.
- LCD Display: Shows recording status, menu options, and file information.
- Peak Level Indicators: LED lights to indicate audio input levels.
- Menu Button: Accesses the device's settings and options.
- Function Buttons (F1, F2, F3): Context-sensitive buttons for various operations.
- Navigation/OK Button: Used for menu navigation and selection.
- Stop Button: Stops recording or playback.
- Play Button: Starts or pauses playback.
- Record Button: Initiates recording.
- Erase Button: Deletes files.
- REC Level Dial: Adjusts recording input sensitivity.
- XLR/Phantom Power Inputs: Connect external microphones requiring XLR or phantom power.
Rear View
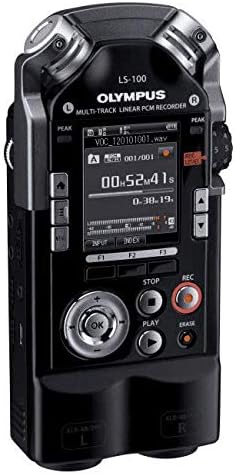
Image: Rear view of the Olympus LS-100 Voice Recorder, showing the battery compartment and external speaker.
- Battery Compartment: Houses the rechargeable Lithium Ion battery.
- Built-in Speaker: For basic audio playback.
- Tripod Mount: Standard thread for mounting on a tripod.
Setup
Battery Installation and Charging
- Locate the battery compartment on the rear of the device.
- Open the compartment cover.
- Insert the supplied Lithium Ion battery, ensuring correct polarity.
- Close the battery compartment cover securely.
- Connect the device to a power source using the supplied USB cable to charge the battery. The charging indicator will illuminate.
SD Card Insertion
- Locate the SD card slot on the side of the device.
- Insert a compatible SD, SDHC, or SDXC card into the slot until it clicks into place.
- To remove, push the card gently until it ejects.
Powering On/Off
- To Power On: Press and hold the power button (usually located on the side) until the display illuminates.
- To Power Off: Press and hold the power button until the device shuts down.
Initial Settings
Upon first power-on, you may be prompted to set the date, time, and language. Use the navigation buttons to select options and the OK button to confirm.
Operating Instructions
Basic Recording (Internal Microphones)
- Ensure the device is powered on.
- Select your desired recording mode (e.g., PCM, MP3) and quality settings via the Menu.
- Adjust the REC Level dial to set the input sensitivity. Monitor the peak level indicators to avoid distortion.
- Press the Record button to begin recording. The recording indicator will illuminate.
- To pause recording, press the Record button again. Press it once more to resume.
- To stop recording, press the Stop button. The file will be saved automatically.
Using External Microphones (XLR/Phantom Power)
The LS-100 features two XLR inputs with switchable phantom power for professional external microphones.
- Connect your XLR microphones to the corresponding L and R XLR inputs.
- If your microphones require phantom power, enable it through the device's menu settings.
- Adjust the individual input levels for each XLR channel using the REC Level dial or menu options.
- Proceed with recording as described in the Basic Recording section.
Playback
- Navigate to the desired file using the navigation buttons.
- Press the Play button to start playback.
- Use the navigation buttons to fast-forward or rewind during playback.
- Press the Stop button to end playback.
File Management
- Transferring Files: Connect the LS-100 to a computer using the USB cable. The device will appear as a removable storage device, allowing you to drag and drop files.
- Deleting Files: Select the file you wish to delete and press the Erase button. Confirm the deletion when prompted.
- Organizing Files: Files are typically saved into folders (e.g., Folder A, Folder B). You can manage these folders and move files within the device's menu.
Multi-Track Recording
The LS-100 supports up to eight tracks for multi-track recording. Refer to the on-screen menu for specific instructions on track layering, mixing, and editing functions.
Special Functions
- Tuner: An integrated tuner assists musicians with instrument tuning.
- Metronome: Provides a rhythmic click for practice or recording.
- Lissajous Function: A visual tool for analyzing stereo phase relationships.
Maintenance
- Cleaning: Wipe the exterior of the device with a soft, dry cloth. Do not use abrasive cleaners or solvents.
- Storage: Store the recorder in a cool, dry place away from direct sunlight and extreme temperatures. Remove the battery if storing for extended periods.
- Firmware Updates: Periodically check the Olympus support website for available firmware updates to ensure optimal performance and access to new features.
Troubleshooting
| Problem | Possible Cause | Solution |
|---|---|---|
| Device does not power on. | Battery is depleted or incorrectly inserted. | Charge the battery or re-insert it correctly. |
| No sound during playback. | Volume is too low; headphones not connected; file corrupted. | Increase volume; connect headphones; try playing another file. |
| Recording level is too low or distorted. | REC Level is set too low/high; microphone issue. | Adjust REC Level; check microphone connections and settings. |
| Cannot save files to SD card. | SD card is full or write-protected; card error. | Delete unnecessary files; check write-protect switch; try a different SD card. |
| Device freezes or becomes unresponsive. | Temporary software glitch. | Remove and re-insert the battery to perform a hard reset. |
Specifications
| Feature | Detail |
|---|---|
| Product Dimensions | 6.3 x 2.8 x 1.3 inches |
| Item Weight | 9.9 ounces (0.28 Kilograms) |
| Item Model Number | V313020BW000 |
| Batteries | 1 Lithium Ion battery required (included) |
| Manufacturer | Olympus |
| Compatible Devices | Personal Computer |
| Hardware Interface | Secure Digital Card |
| Microphone Form Factor | Built-In |
| Recording Format | WAV (up to 24 Bit/96 KHZ Linear PCM), MP3 |
| Headphones Jack | 3.5 millimeters |
| Memory Storage Capacity | 4 GB (internal) |
| Screen Size | 3.5 inches |
| Microphones | 90 degree directional, stereo condenser microphones |
| Inputs | XLR/Phantom Power Supply |
| Tracks | Eight Tracks (multi-track recording) |
Warranty and Support
For warranty information and customer support, please refer to the warranty card included with your product or visit the official Olympus support website. Keep your proof of purchase for warranty claims.
Online Resources: For additional support, FAQs, and firmware updates, please visit the Olympus Global Website.
Related documentsLS-100


Ask a question about this manual
Ask about setup, troubleshooting, compatibility, parts, safety, or missing instructions. Manuals+ will review the question and use this page’s manual context to help answer it.