1. Introduction
Welcome to the Keurig K-Cup B130 In-Room Brewing System. This single-serve coffee maker is designed for convenience, brewing one perfect 8-ounce cup of coffee, tea, or hot cocoa at a time. Its compact design and simple operation make it ideal for various settings. Please read this manual thoroughly before operating your new brewer to ensure safe and optimal performance.
2. Important Safety Information
- Read all instructions before using the appliance.
- Do not touch hot surfaces. Use handles or knobs.
- To protect against fire, electric shock, and injury to persons, do not immerse cord, plugs, or appliance in water or other liquid.
- Close supervision is necessary when any appliance is used by or near children.
- Unplug from outlet when not in use and before cleaning. Allow to cool before putting on or taking off parts, and before cleaning the appliance.
- Do not operate any appliance with a damaged cord or plug or after the appliance malfunctions or has been damaged in any manner. Return appliance to the nearest authorized service facility for examination, repair, or adjustment.
- The use of accessory attachments not recommended by the appliance manufacturer may result in fire, electric shock, or injury to persons.
- Do not use outdoors.
- Do not let cord hang over edge of table or counter, or touch hot surfaces.
- Do not place on or near a hot gas or electric burner, or in a heated oven.
- Always attach plug to appliance first, then plug cord into the wall outlet. To disconnect, turn any control to "off", then remove plug from wall outlet.
- Do not use appliance for other than intended use.
- This appliance is for household use only.
3. Package Contents
Ensure all items are present before discarding packaging materials:
- Keurig K-Cup B130 Brewing System
- Removable Drip Tray
- K-Cup Pod Holder
- Filter (pre-installed)
4. Setup
4.1 Unpacking and Placement
- Remove all packaging materials from the brewer.
- Place the brewer on a stable, flat surface.
- Ensure the power cord is accessible and not pinched.
4.2 Initial Rinse
Before first use, perform an initial rinse cycle:
- Plug the brewer into a grounded outlet.
- Lift the brewer handle to open the K-Cup pod holder.
- Do not insert a K-Cup pod. Close the handle.
- The water reservoir lid will pop open. Fill the single-use water reservoir with fresh water up to the 'Fill Level' mark.
- Place a large mug (at least 8 oz) on the drip tray.
- Press the 'Brew' button. The brewer will dispense hot water.
- Discard the hot water. Your brewer is now ready for use.
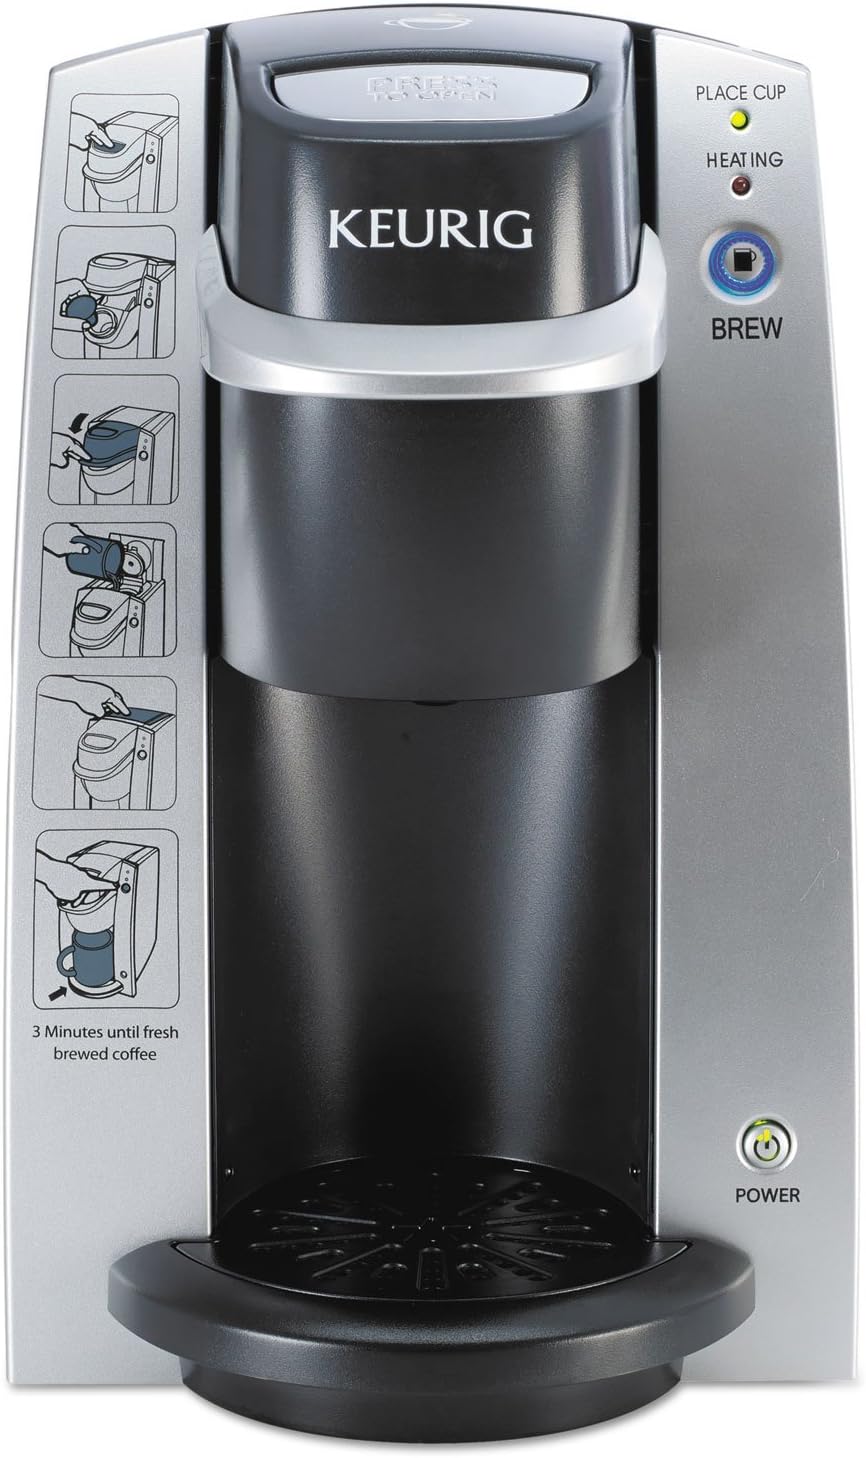
Figure 1: Front view of the Keurig B130 brewer with step-by-step visual instructions for brewing coffee.
5. Operating Instructions
5.1 Brewing a Beverage
- Ensure the brewer is plugged in and powered on. The 'Heating' light will be red while heating and turn green when ready.
- Lift the brewer handle to open the K-Cup pod holder.
- Place a K-Cup pod into the holder.
- Close the handle firmly. The water reservoir lid will pop open.
- Fill the single-use water reservoir with fresh water up to the 'Fill Level' mark.
- Place a mug on the drip tray. The brewer is designed to fit approximately a 4.5-inch mug with the tray in place, or a 5-inch mug if the tray is removed.
- The 'Brew' button will blink blue. Press the 'Brew' button to start brewing.
- Brewing will begin. Heat times may vary (3-5 minutes for room temperature water, 5-7 minutes for cold water).
- Once brewing is complete, carefully remove your hot beverage.
- Lift the handle, remove the used K-Cup pod, and discard it.
5.2 Automatic On/Off Function
The Keurig B130 features an energy-saving automatic On/Off function. The brewer will automatically turn off after a period of inactivity to conserve power.
Video 1: Demonstrates the simple steps to use the Keurig B130 to make coffee or tea, highlighting its ease of operation.
6. Maintenance & Cleaning
Regular cleaning ensures optimal performance and longevity of your brewer.
6.1 Drip Tray Cleaning
- The drip tray can be easily removed for cleaning.
- Simply slide the drip tray out from the base of the brewer.
- Wash the drip tray and its cover with warm, soapy water. Rinse thoroughly and dry.
- Reinsert the drip tray into the brewer.
6.2 General Cleaning
- Wipe the exterior of the brewer with a damp, non-abrasive cloth.
- Do not immerse the brewer in water or other liquids.
Video 2: A short preview demonstrating the convenience of the Keurig B130 for single-cup brewing, suitable for travel or home use.
7. Troubleshooting
If your Keurig B130 brewer is not functioning as expected, please refer to the following common issues and solutions:
7.1 Brewer Not Powering On
- Ensure the power cord is securely plugged into a grounded outlet.
- Check if the outlet is functional by plugging in another appliance.
7.2 No Water Dispensed
- Verify that the water reservoir is filled to the 'Fill Level' mark.
- Ensure the K-Cup pod holder is properly closed.
7.3 Coffee is Weak or Not Hot Enough
- Ensure the brewer has completed its heating cycle (green 'Heating' light).
- Heat times can vary based on water temperature. Cold water takes longer to heat.
- Ensure you are using a fresh K-Cup pod.
8. Specifications
| Feature | Detail |
|---|---|
| Brand | Keurig |
| Model Name | B130 |
| Product Dimensions | 7"D x 10"W x 11"H |
| Item Weight | 7.2 pounds |
| Color | Silver |
| Coffee Maker Type | Drip Coffee Machine |
| Special Feature | In Room Brewing |
| Capacity | 8 ounces (single-use reservoir) |
| Power | 700 watts |
| Coffee Input Type | K-Cup Pods (not compatible with reusable K-Cup filters) |
| Operation Mode | Fully Automatic |
| Included Components | Filter |

Figure 2: Side view of the Keurig B130 brewer with key dimensions (7"D x 10"W x 11"H) indicated.
9. Warranty & Support
For warranty information and customer support, please refer to the documentation included with your Keurig K-Cup B130 Brewing System or visit the official Keurig website. You can also find additional support and product information by visiting the Keurig Store on Amazon.


