
Gardner Bender HST-250
Gardner Bender HST-250 Heat Shrink Tubing User Manual
Model: HST-250
Brand: Gardner Bender
Product Overview
The Gardner Bender 1/4 inch Heat Shrink Tubing (6-Pack) is designed to provide robust abrasion and moisture protection for electrical wires and cables. Constructed from flame-retardant polyolefin, this tubing offers excellent resistance to common fluids and solvents. It is ideal for repairing, strengthening, and protecting cable insulation, ensuring strong and reliable connections. Beyond electrical applications, it can be used for general purposes such as adding a perspiration-resistant grip to tool and sporting handles or neatly sealing rope ends to prevent unraveling. This product is particularly effective for repairing appliance, extension, or small electronic cords that show exposed bare wires.

Figure 1: Gardner Bender HST-250 Heat Shrink Tubing, 6-count package contents.
Safety Information
WARNING: This product contains a chemical known to the State of California to cause cancer and birth defects, or other reproductive harm.
Always protect heat shrink tubing from exposure to heat sources and direct sunlight to prevent shrinkage before application. Ensure adequate ventilation when applying heat. The tubing is self-extinguishing within 30 seconds and will not drip, crack, or flow upon heating.
Setup and Preparation
Before applying the heat shrink tubing, ensure the area is clean and free from debris. Identify the section of wire or cable that requires insulation, repair, or bundling. For electrical repairs, ensure power is disconnected from the circuit.

Figure 2: Retail packaging for Gardner Bender HST-250 Heat Shrink Tubing.
Operating Instructions
Follow these steps for proper application of the heat shrink tubing:
- Remove Insulation: If repairing exposed wires, carefully remove any damaged insulation from the wires. Ensure the wire conductors are clean and ready for connection.
- Slide Heat Shrink Over Wire: Before making any splices or connections, slide the appropriate length of heat shrink tubing over one of the wires or cables to be covered. Ensure it is positioned far enough away from the work area so it does not accidentally shrink during the splicing process.
- Make Splice/Connection: Complete your electrical splice or connection as required. Ensure the connection is secure and properly insulated if using electrical tape or other primary insulation methods.
- Slide Heat Shrink Into Place: Once the splice or connection is made, slide the heat shrink tubing over the connection point, ensuring it completely covers the area to be protected.
- Heat and Shrink Until Tight: Apply heat evenly to the tubing using a heat gun or appropriate heat source. Move the heat source continuously to ensure uniform shrinkage. The tubing will begin to shrink at 120°C (250°F) and will conform tightly to the shape of the wire or connection. Continue heating until the tubing is snug and secure, and adhesive (if present) is visible at the ends.

Figure 3: Sliding heat shrink tubing onto a prepared wire.

Figure 4: Applying heat to shrink the tubing securely around the wire.
For best results, ensure the heat source is not held stationary in one spot for too long to prevent scorching or uneven shrinkage.
Maintenance and Storage
Gardner Bender Heat Shrink Tubing requires minimal maintenance once applied. Its durable polyolefin construction is resistant to common fluids and solvents, providing long-lasting protection.
For unused tubing, store in a cool, dry place away from direct sunlight and extreme heat sources to prevent premature shrinkage or degradation. Keep the tubing in its original packaging until ready for use to protect it from dust and environmental factors.
Troubleshooting
- Tubing not shrinking evenly: Ensure heat is applied uniformly around the entire circumference of the tubing. Move the heat source continuously back and forth along the length of the tubing.
- Tubing not shrinking completely: The heat source may not be hot enough, or not applied for long enough. Increase the heat or duration of application, ensuring not to overheat the underlying wire.
- Tubing appears scorched or damaged: The heat source may be too hot or held too close/stationary for too long. Adjust the heat setting or distance from the tubing.
- Tubing too loose after shrinking: Ensure the correct size tubing was selected. The 2:1 shrink ratio means the tubing shrinks to half its original inner diameter. If the tubing is still too loose, a smaller diameter may be required.
Specifications
| Feature | Description |
|---|---|
| Model Number | HST-250 |
| Pre-Shrink Diameter | 1/4 inch (6.4 mm) |
| Post-Shrink Diameter | 1/8 inch (3.2 mm) |
| Shrink Ratio | 2:1 |
| Material | Flame-retardant Polyolefin |
| Continuous Operating Temperature | -55°C (-67°F) to 135°C (275°F) |
| Shrink Temperature | 120°C (250°F) to 250°C (480°F) |
| Dielectric Strength | 600 V/Mil |
| Product Dimensions | 4 x 0.25 x 0.25 inches (per piece) |
| Compliance | UL 224, 125°C; CSA C22.2 No3 198.1, 125°C; MIL-DTL-23053/5, Class 1 and 2, AMS 3636 and 3637; DEF STAN 59-79, Issue 3 Type 2a |
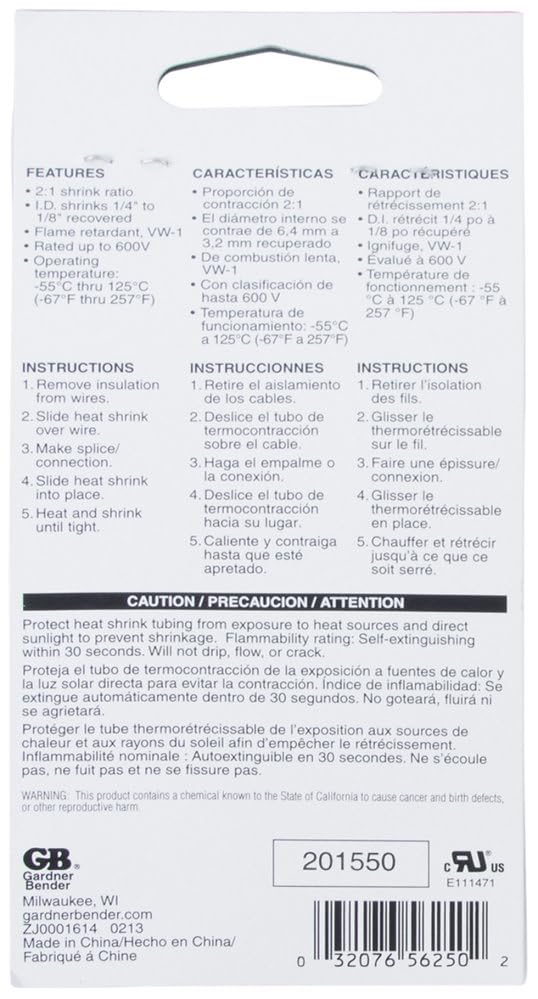
Figure 5: Product packaging reverse side with specifications and instructions. UPC: 0032076562502
Warranty and Support
Specific warranty information for the Gardner Bender HST-250 Heat Shrink Tubing is not provided in the available product data. For detailed warranty terms or technical support, please refer to the official Gardner Bender website or contact their customer service directly.
No official product videos from the seller were found in the provided data.
Related documentsHST-250


Ask a question about this manual
Ask about setup, troubleshooting, compatibility, parts, safety, or missing instructions. Manuals+ will review the question and use this page’s manual context to help answer it.