
Brookstone B002MB89GW
Brookstone TimeSmart Auto-Setting Alarm Clock User Manual
Model: B002MB89GW
Introduction
Thank you for purchasing the Brookstone TimeSmart Auto-Setting Alarm Clock. This manual provides detailed instructions for setting up, operating, and maintaining your new alarm clock. Please read this manual thoroughly before use to ensure proper function and longevity of your device.
The Brookstone TimeSmart alarm clock is designed for convenience, automatically setting itself to the correct time upon connection and adjusting for power outages and Daylight Saving Time. It features an easy-to-read display with adjustable backlight and user-friendly controls.
Product Overview
Familiarize yourself with the components of your Brookstone TimeSmart alarm clock.
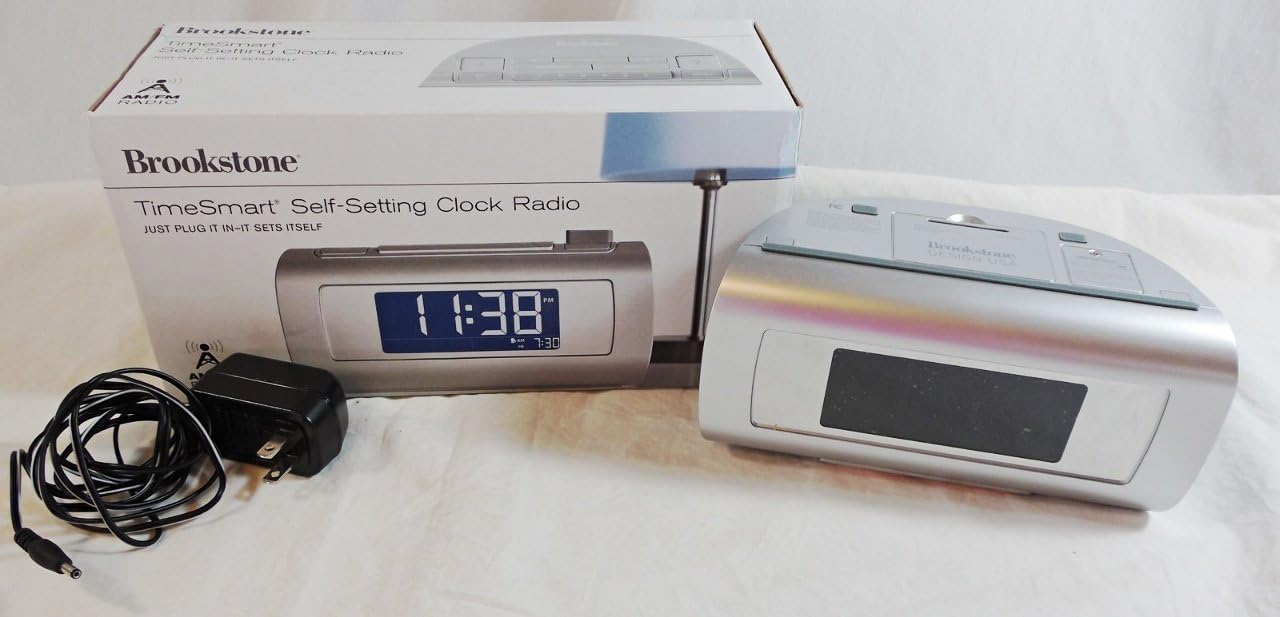
Image 1: The Brookstone TimeSmart alarm clock, its retail packaging, and the included power adapter. The clock features a large digital display.

Image 2: A close-up front view of the alarm clock, showing its large, blue digital display indicating the time 12:19 PM, along with alarm settings and AM/PM indicator.
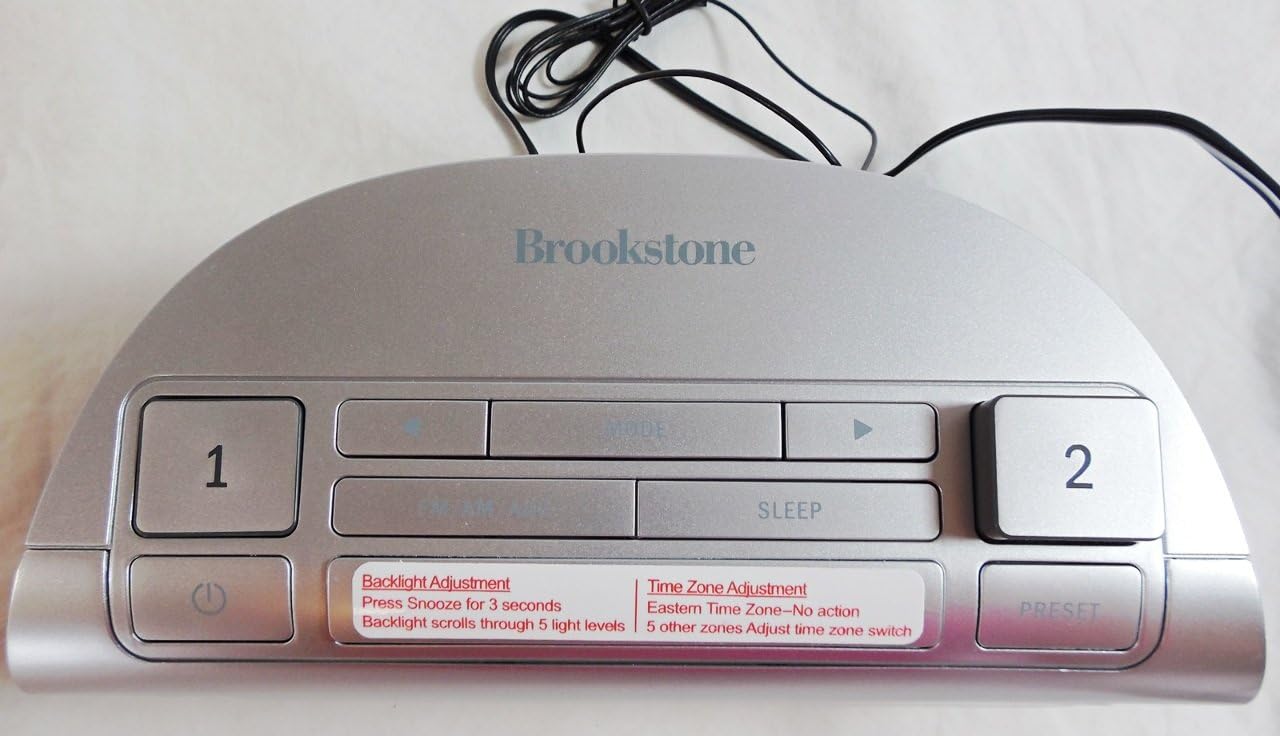
Image 3: Top view of the alarm clock, highlighting the control buttons including Alarm 1, Alarm 2, Mode, Sleep, and Preset buttons. Labels for Backlight Adjustment and Time Zone Adjustment are visible.

Image 4: Rear view of the alarm clock, showing the speaker grille, AUX input, and power input port. FCC compliance information and model number are also visible.
Setup
Follow these steps to set up your Brookstone TimeSmart alarm clock for the first time.
- Power Connection: Connect the included power adapter to the DC input port on the back of the alarm clock. Plug the other end into a standard electrical outlet. The clock will automatically power on.
- Time Zone Selection: Upon initial power-up, the clock will prompt you to select your time zone. Use the navigation buttons (likely labeled with arrows or 'Mode') to cycle through the available time zones. Press the 'Preset' or 'Set' button to confirm your selection. The clock will then automatically set the correct time.
- Daylight Saving Time (DST): The clock is designed to automatically adjust for Daylight Saving Time. Ensure this feature is enabled if applicable to your region. Refer to the 'Operating' section for details on checking or changing this setting.
- Battery Backup (Optional): While the clock remembers settings during power outages, for extended outages, you may insert backup batteries (not included) into the battery compartment on the bottom of the unit. This ensures timekeeping continues even without AC power.
Operating Instructions
Setting Alarms
The Brookstone TimeSmart alarm clock features two independent alarms (Alarm 1 and Alarm 2).
- Select Alarm: Press the 'Alarm 1' or 'Alarm 2' button on the top of the clock. The alarm time will appear on the display.
- Adjust Time: Use the 'Hour' and 'Minute' buttons (often integrated with 'Mode' or arrow buttons) to set the desired wake-up time.
- Confirm Alarm: Press the 'Alarm 1' or 'Alarm 2' button again to confirm the setting and activate the alarm. An alarm icon will appear on the display.
- Snooze Function: When the alarm sounds, press the large 'Snooze' bar on the top of the clock to temporarily silence the alarm. The alarm will sound again after a set interval (typically 9 minutes).
- Turn Off Alarm: To turn off a sounding alarm, press the corresponding 'Alarm 1' or 'Alarm 2' button. To disable an alarm completely, press its button until the alarm icon disappears from the display.
Adjusting Backlight Brightness
The display backlight has five adjustable settings.
- Press and hold the 'Snooze' button for approximately 3 seconds.
- The backlight will cycle through its five brightness levels (High, Medium, Low, Dim, Off). Release the button when the desired brightness is reached.
Using the AUX Input
You can connect external audio devices to your alarm clock.
- Connect a 3.5mm audio cable (not included) from your audio device's headphone jack or line-out to the 'AUX' input port on the back of the alarm clock.
- The clock will automatically switch to AUX mode, or you may need to press the 'Mode' button to select AUX.
- Control playback and volume from your connected audio device.
Maintenance
Proper care will ensure the longevity of your alarm clock.
- Cleaning: Wipe the clock's exterior with a soft, dry cloth. Do not use abrasive cleaners, waxes, or solvents.
- Power: Always disconnect the power adapter before cleaning or if the unit will be unused for an extended period.
- Placement: Place the clock on a stable, flat surface away from direct sunlight, heat sources, and excessive moisture.
- Battery Replacement: If using backup batteries, replace them periodically (e.g., every 5 years or as needed) to ensure continuous timekeeping during power outages.
Troubleshooting
| Problem | Possible Cause | Solution |
|---|---|---|
| Clock does not power on. | Power adapter not connected or outlet is not active. | Ensure the power adapter is securely plugged into the clock and a working electrical outlet. Test the outlet with another device. |
| Time is incorrect. | Incorrect time zone selected or initial setup incomplete. | Verify your time zone setting. If recently moved or after a long power outage, the clock may need a moment to re-sync. |
| Alarm does not sound. | Alarm not activated, volume too low, or incorrect alarm time set. | Ensure the alarm is enabled (alarm icon visible). Check the alarm time. Ensure the alarm volume is not set to minimum (if adjustable). |
| Display is too bright/dim. | Backlight setting needs adjustment. | Press and hold the 'Snooze' button for 3 seconds to cycle through backlight brightness levels. |
Specifications
- Model: Brookstone TimeSmart Auto-Setting Alarm Clock (B002MB89GW)
- Power Source: AC Adapter (included), Battery Backup (not included)
- Display: Large Digital LED with adjustable backlight
- Alarm Features: Dual crescendo alarms, Snooze function
- Time Adjustment: Automatic time setting, auto-adjusts for Daylight Saving Time
- Connectivity: AUX Input (3.5mm)
- Dimensions: Approximately 15.24 x 7.62 x 6.35 cm (6 x 3 x 2.5 inches)
- Weight: Approximately 612.35 g (1.35 lbs)
Warranty and Support
For warranty information or technical support, please refer to the official Brookstone website or contact their customer service directly. Keep your purchase receipt as proof of purchase.
Note: This manual provides general guidance. Specific features and operations may vary slightly.
Ask a question about this manual
Ask about setup, troubleshooting, compatibility, parts, safety, or missing instructions. Manuals+ will review the question and use this page’s manual context to help answer it.