
Lewmar Windlass-V1 GO 1/4in 12V Kit
Lewmar 12V/700-Watt V1 Gypsy Only Windlass User Manual
Model: Windlass-V1 GO 1/4in 12V Kit
Brand: Lewmar
1. Introduction
This manual provides comprehensive instructions for the installation, operation, and maintenance of your Lewmar 12V/700-Watt V1 Gypsy Only Windlass. Designed for power and sailboats ranging from 28 to 40 feet, this windlass simplifies anchoring with its robust and reliable design.
The Lewmar V1 windlass features a concealed drive train, worm gearbox, and splined shaft for maximum strength and control, all within a compact and durable stainless steel unit.

Figure 1.1: Lewmar V1 Gypsy Only Windlass, showcasing its chrome finish and compact design.
2. Product Features and Benefits
- Simplified Anchoring: Moves rode chain or all-chain anchor lines with a simple button touch. The deck unit effectively conceals the robust drive train, worm gearbox, and splined shaft for superior strength and control.
- Easy Installation: Features the FastFit system, allowing for quick and easy installation by a single person. The clamping system ensures perfect alignment of the deck unit and motor gearbox.
- Complete Kit: Includes the windlass unit, rocker switch, circuit breaker, two-direction solenoid, and a handle, providing all necessary components for a low-profile anchoring system.
- Compact & Durable: Designed to occupy minimal space on deck while stylishly concealing internal components. Constructed from tough stainless steel for long-lasting protection of your anchor lines.
- Trusted Quality: Manufactured by Lewmar, a leading global supplier of marine equipment known for innovative, high-quality control solutions since 1946.

Figure 2.1: Key features including cone clutch, stainless steel design, manual chain release, and fall-safe anchor lock.

Figure 2.2: The windlass is constructed from tough stainless steel for durability and protection.
3. Setup and Installation
The Lewmar V1 windlass is designed for straightforward installation, even by a single person, thanks to its FastFit feature. This system ensures precise alignment of the deck unit and motor gearbox.
3.1 Pre-Installation Checklist
- Ensure you have all components from the kit: windlass, rocker switch, circuit breaker, two-direction solenoid, and handle.
- Verify the deck thickness and material are suitable for windlass mounting.
- Confirm adequate space below deck for the motor and gearbox assembly.
- Gather necessary tools: drill, sealant, fasteners, wiring tools.
3.2 Installation Steps
- Positioning: Select an appropriate location on the deck that allows for clear chain run to the anchor roller and sufficient space for operation.
- Drilling: Use the provided template (if applicable) to mark and drill the necessary mounting holes and the main shaft hole through the deck.
- Mounting the Deck Unit: Apply marine sealant around the drilled holes to ensure a watertight seal. Place the deck unit onto the deck, aligning the shaft and mounting holes.
- FastFit Alignment: Utilize the FastFit clamping system to align the motor gearbox precisely with the deck unit from below. This feature simplifies the alignment process.
- Securing: Secure the windlass assembly using appropriate fasteners, ensuring a tight and stable mount.
- Electrical Wiring: Connect the windlass motor to the two-direction solenoid, rocker switch, and circuit breaker according to the wiring diagram provided in the full installation guide (not included in this summary). Ensure all electrical connections are secure and properly insulated.

Figure 3.1: The FastFit feature simplifies installation by aligning the deck unit and motor gearbox.

Figure 3.2: The built-in manual emergency system and simple push-button control make anchoring efficient.
4. Operating Instructions
Operating the Lewmar V1 windlass is designed to be intuitive, allowing for easy deployment and retrieval of your anchor.
4.1 Anchor Deployment
- Prepare Anchor: Ensure the anchor is clear of any obstructions and ready for deployment.
- Engage Windlass: If equipped with a clutch, ensure it is engaged.
- Lower Anchor: Press and hold the "DOWN" button on the rocker switch. The windlass will begin to pay out the anchor chain.
- Monitor Chain: Continuously monitor the amount of chain deployed and the anchor's position.
- Secure Anchor: Once the desired scope is achieved and the anchor is set, release the button. It is recommended to secure the anchor chain to a deck cleat or chain stopper to relieve strain on the windlass during anchoring.
4.2 Anchor Retrieval
- Prepare for Retrieval: Ensure the vessel is positioned directly over the anchor to minimize side loads on the windlass.
- Engage Windlass: If the chain was secured to a cleat, transfer the load back to the windlass.
- Raise Anchor: Press and hold the "UP" button on the rocker switch. The windlass will begin to retrieve the anchor chain.
- Assist if Necessary: If the anchor is heavily fouled, use the vessel's engine to assist in breaking it free, reducing strain on the windlass.
- Stow Anchor: Continue retrieval until the anchor is fully stowed in its roller or hawse pipe.
4.3 Manual Operation (Emergency)
In case of power failure or malfunction, the windlass can be operated manually using the provided handle. Refer to the full product manual for detailed instructions on engaging the manual override.

Figure 4.1: The windlass deck unit is designed to conceal the robust drive train for maximum strength and control during anchoring operations.
5. Maintenance
Regular maintenance ensures the longevity and reliable performance of your Lewmar V1 windlass.
- Rinse After Use: After each use, especially in saltwater environments, rinse the deck unit thoroughly with fresh water to remove salt residue and prevent corrosion.
- Inspect Chain/Rode: Regularly inspect your anchor chain and rode for wear, damage, or corrosion. Replace worn components as necessary.
- Check Fasteners: Periodically check all mounting fasteners for tightness. Re-tighten if any looseness is detected.
- Lubrication: Consult the full product manual for specific lubrication points and recommended lubricants for the gearbox and moving parts.
- Electrical Connections: Annually inspect all electrical connections for corrosion or loose terminals. Clean and apply dielectric grease if necessary.
For detailed maintenance schedules and procedures, refer to the comprehensive manual provided with your windlass.
6. Troubleshooting
This section provides general guidance for common issues. For complex problems, contact Lewmar customer support or a qualified marine technician.
| Problem | Possible Cause | Solution |
|---|---|---|
| Windlass does not operate. | No power, tripped circuit breaker, faulty switch, loose wiring. | Check battery connections, reset circuit breaker, inspect switch and wiring for damage or looseness. |
| Windlass operates slowly or weakly. | Low battery voltage, undersized wiring, excessive load, motor issue. | Charge batteries, verify wiring gauge, reduce load, consult technician if motor is suspected. |
| Chain/rode slips on gypsy. | Incorrect chain size, worn gypsy, insufficient tension. | Ensure correct chain/rode for gypsy, inspect gypsy for wear, check clutch adjustment. |
| Unusual noise during operation. | Lack of lubrication, foreign object, internal component wear. | Lubricate as per manual, inspect for obstructions, contact technician for internal inspection. |
7. Specifications
Detailed technical specifications for the Lewmar 12V/700-Watt V1 Gypsy Only Windlass.
| Specification | Value |
|---|---|
| Model Name | Windlass-V1 GO 1/4in 12V Kit |
| Part Number | 6671011107-138 |
| Motor Power | 700 Watt |
| Motor Voltage | 12V |
| Maximum Pull | 1,653 lbs (750 kg) |
| Working Load Limit | 414 lbs (188 kg) |
| Maximum Line Speed | 65 ft/min (19 m/min) |
| Normal Current Draw | 80 Amp |
| Circuit Breaker | 90 Amp |
| Compatible Chain Size | 1/4" G4 Chain |
| Recommended Boat Size | 28' - 40' Power/Sailboats |
| Item Dimensions (LxWxH) | 18 x 12 x 8 inches |
| Item Package Dimensions (LxWxH) | 18.2 x 15.4 x 13.8 inches |
| Package Weight | 21.27 Kilograms (46.9 lbs) |
| Material | Stainless Steel (Chrome finish) |
| Included Components | Windlass, Rocker Switch, Breaker, Two-direction Solenoid, Handle |
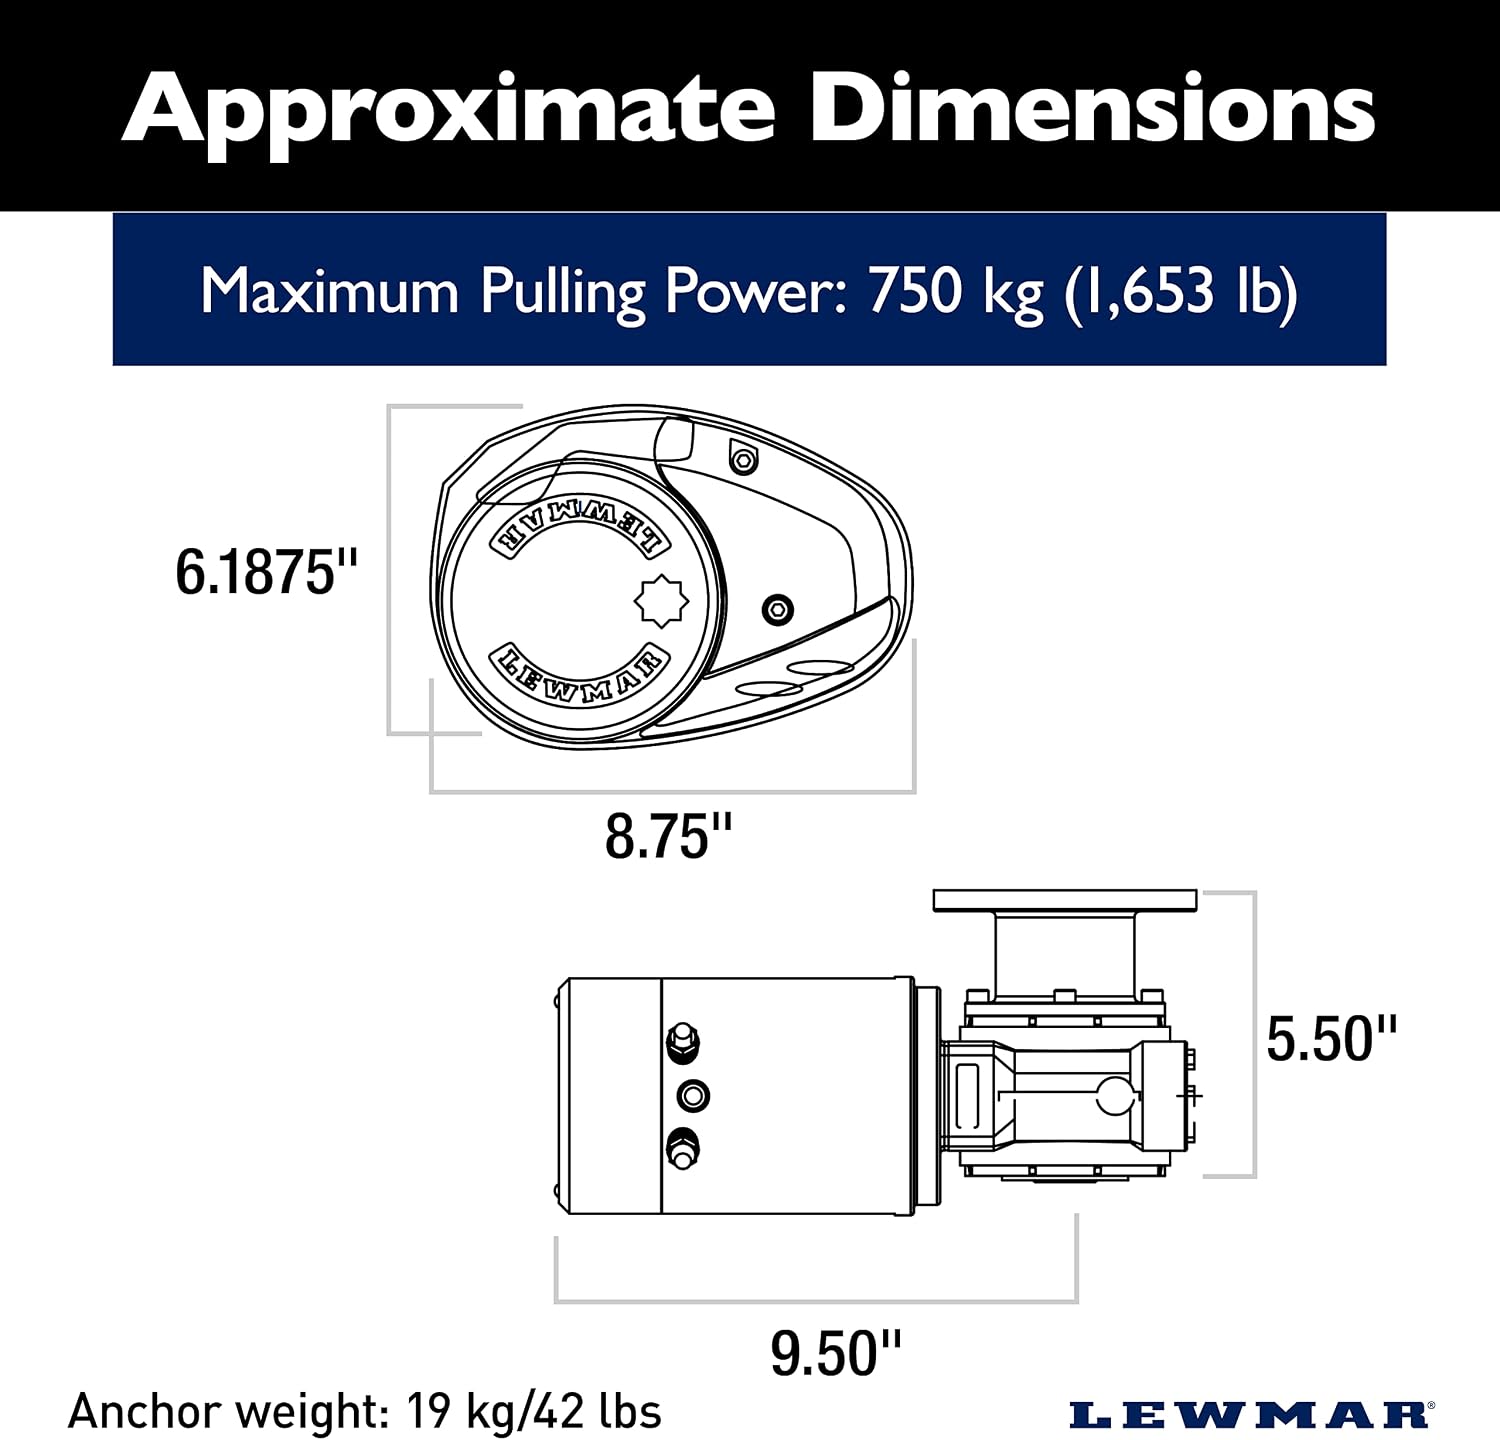
Figure 7.1: Approximate dimensions of the Lewmar V1 Windlass, including height, width, and length measurements.

Figure 7.2: Selection guide table detailing specifications like max chain, motor supply, motor power, maximum pull, and weight for the V1 model.
8. Warranty and Support
Your Lewmar V1 Windlass is backed by a manufacturer's warranty.
- Warranty Description: 5 Year Manufacturer Warranty.
- Customer Support: For technical assistance, warranty claims, or to purchase replacement parts, please contact Lewmar customer service. Visit the official Lewmar website or refer to the contact information provided in your product packaging.
- Online Resources: Additional resources, FAQs, and detailed installation guides may be available on the Lewmar brand store or official website: Lewmar Amazon Store.
Ask a question about this manual
Ask about setup, troubleshooting, compatibility, parts, safety, or missing instructions. Manuals+ will review the question and use this page’s manual context to help answer it.