Introduction
This manual provides detailed instructions for the installation, operation, and maintenance of your Elite Screens Manual Series M135XWH2 projector screen. Please read this manual thoroughly before installation and use to ensure proper function and longevity of your product.

Image: Elite Screens Manual Series M135XWH2 projector screen, fully extended, displaying the Elite Screens logo and 'Manual Series'.
Safety Information
Observe the following safety precautions to prevent damage to the product and personal injury:
- Ensure the screen is securely mounted to a structurally sound surface.
- Do not attempt to disassemble or modify the screen mechanism.
- Keep hands and fingers clear of the screen casing and retraction mechanism during operation.
- Avoid exposing the screen material to direct sunlight for prolonged periods or extreme temperatures.
- This product is not recommended for Ultra Short Throw or Short Throw Projectors.
Setup and Installation
The Elite Screens Manual Series M135XWH2 is designed for dual wall or ceiling installation. Proper installation is crucial for safe and reliable operation.
Tools and Materials Required:
- Drill
- Measuring Tape
- Level
- Pencil
- Stud Finder (for wall installation)
- Screwdriver
- Wood screws and drywall anchors (included)
- Optional: 6" and 12" L-brackets (sold separately) for extended mounting options.
Installation Steps:
- Determine Mounting Location: Choose a location on a wall or ceiling that is structurally sound and can support the weight of the screen (approximately 31.1 pounds). Ensure there are no electrical wires or plumbing in the drilling path.
- Mark Drilling Points: Hold the screen in the desired position and use a level to ensure it is straight. Mark the drilling points for the mounting brackets. For wall installation, locate wall studs for secure attachment.
- Drill Pilot Holes: Drill pilot holes at the marked locations. Use appropriate drill bit size for the provided wood screws or drywall anchors.
- Attach Mounting Hardware: Securely fasten the mounting brackets to the wall or ceiling using the provided screws and anchors. If using optional L-brackets, attach them according to their instructions.
- Mount the Screen: Carefully lift the screen and hook it onto the installed mounting brackets. Ensure the screen is seated firmly and securely. It is recommended to have at least two people for this step due to the screen's length and weight.

Image: Elite Screens Manual Series projector screen casing with arrows indicating dual wall or ceiling installation options and an auto-locking system.

Image: Diagram showing the Elite Screens Manual Series projector screen with features like dual wall and ceiling installation, auto-locking system, and optional L-brackets.
Operating Instructions
The Manual Series screen features an auto-locking mechanism for easy height adjustment and a screen lanyard for convenient operation.
Extending the Screen:
- Gently pull down the screen handle or the attached lanyard.
- Continue pulling until the screen reaches the desired viewing height.
- Once at the desired height, release the handle. The auto-locking mechanism will engage, holding the screen in place.
- The screen offers aspect ratio versatility, allowing you to stop it at various heights.
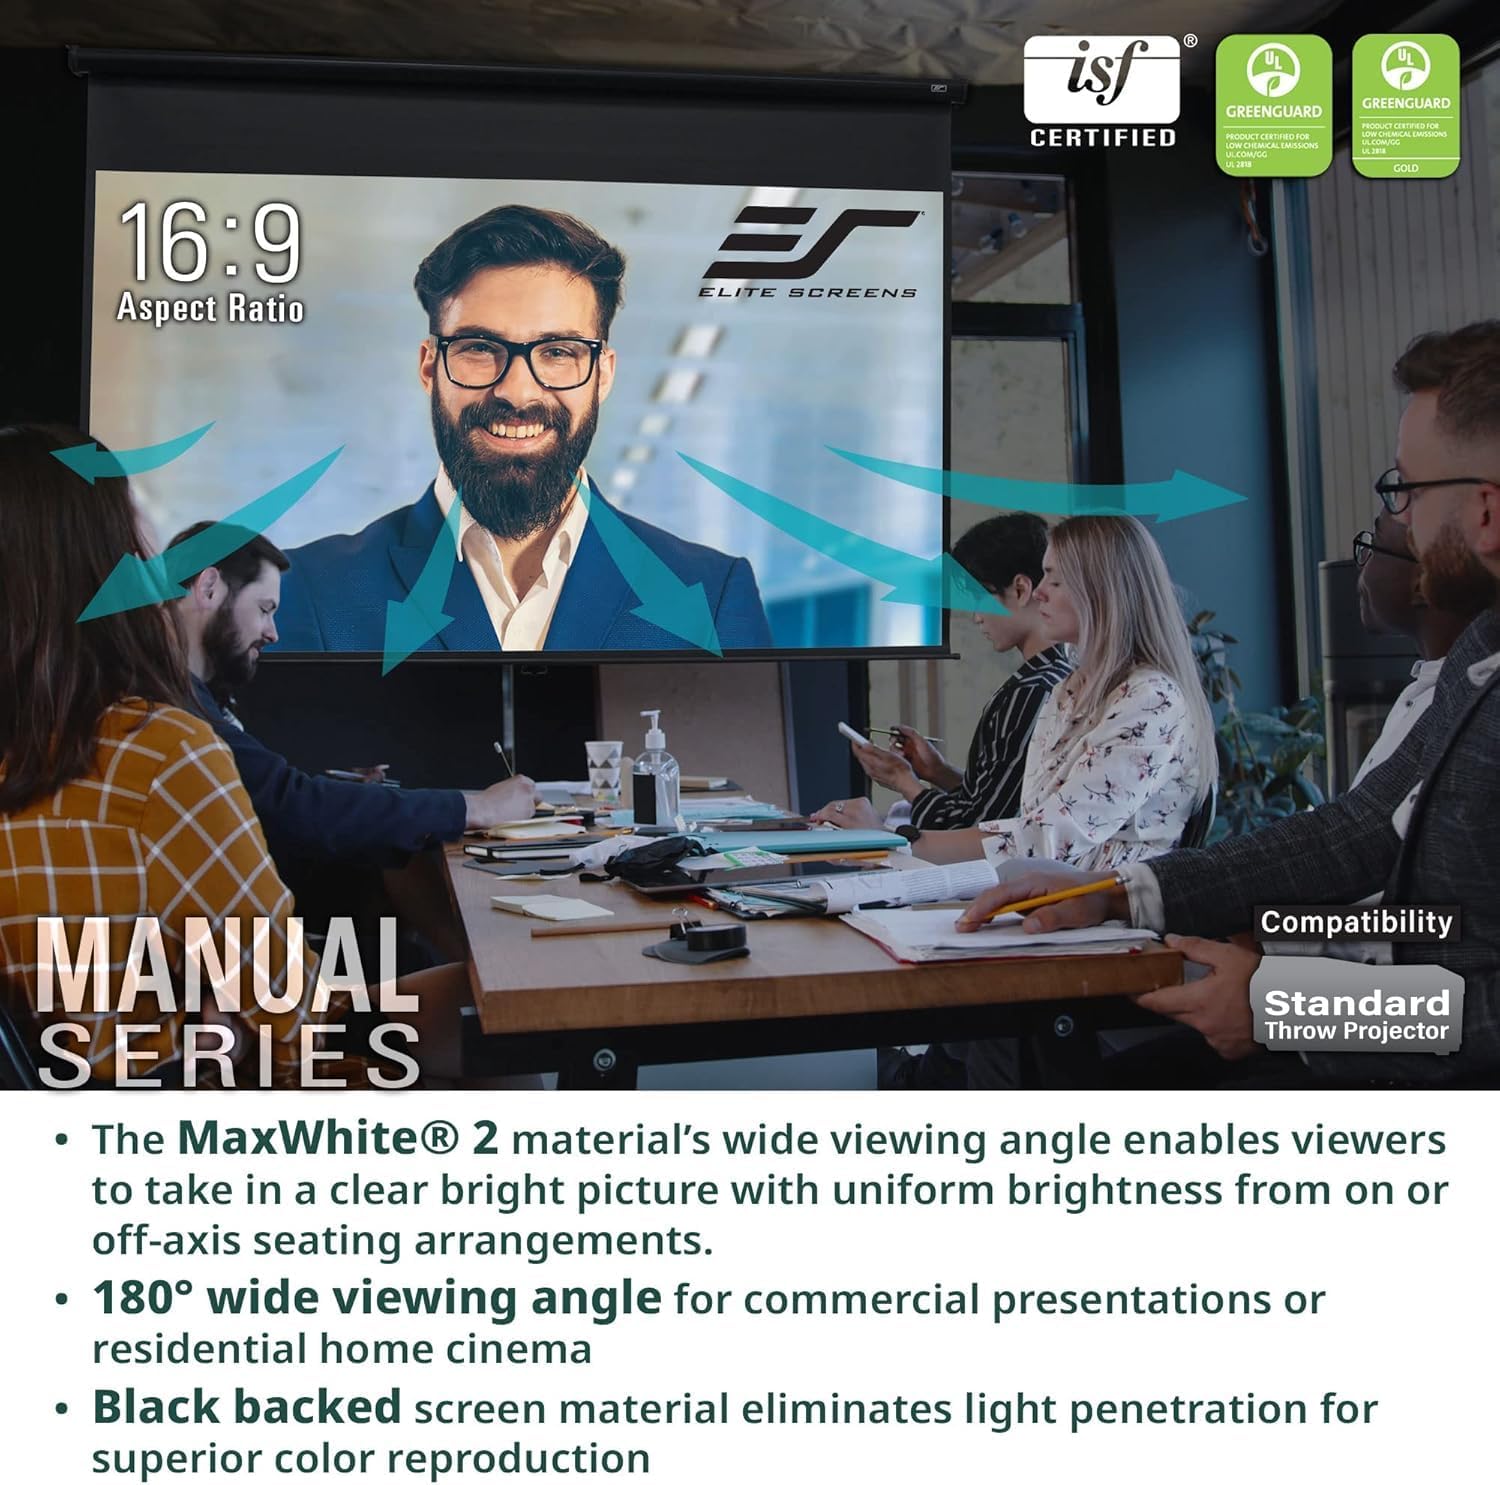
Image: Close-up of the Elite Screens Manual Series projector screen's pull-down handle and lanyard, highlighting the auto-locking mechanism for height adjustment.
Retracting the Screen:
- Pull the screen handle or lanyard down slightly (approximately 1-2 inches) to disengage the auto-locking mechanism.
- Slowly guide the screen upwards. Do not release the handle abruptly, as this can cause the screen to retract too quickly and potentially damage the mechanism or screen material.
- Continue guiding the screen until it is fully retracted into its casing.

Image: Various aspect ratios available with the Manual Series projector screen.
Maintenance
Proper care and maintenance will extend the life and performance of your projector screen.
Cleaning the Screen Material (MaxWhite 2):
- Use a soft, damp cloth with mild soap and water to gently clean the screen surface.
- Do not use abrasive cleaners, solvents, or harsh chemicals, as these can damage the screen material.
- Wipe gently in one direction to avoid streaking.
- Allow the screen to air dry completely before retracting it.
General Care:
- Regularly inspect the mounting hardware to ensure it remains secure.
- Keep the screen casing free from dust and debris.
- Avoid touching the screen surface directly with bare hands to prevent oil transfer.

Image: MaxWhite 2 screen material features and certifications.
Troubleshooting
This section addresses common issues you might encounter with your projector screen.
Screen Does Not Retract Fully:
- Ensure you have pulled the screen down slightly to disengage the auto-locking mechanism before attempting to retract.
- Gently nudge the screen upwards if it stops before fully retracting. This can sometimes help the mechanism reset.
- If the issue persists, contact customer support.
Screen Does Not Stay Down (Auto-Lock Not Engaging):
- Ensure the screen is pulled down firmly to the desired position before releasing the handle. The auto-lock mechanism requires a complete pull and release to engage properly.
- If the mechanism is faulty, contact customer support.
Wrinkles or Distortions on Screen Surface:
- The MaxWhite 2 material is designed to be flat. Minor ripples at the edges are sometimes observed but typically do not affect image quality.
- Ensure the screen is installed on a flat, even surface and not under tension that could cause warping.
- If significant wrinkles are present upon unboxing, allow the screen to hang fully extended for a few days. If they persist, contact customer support.
Specifications
| Feature | Detail |
|---|---|
| Model Number | M135XWH2 |
| Screen Size (Diagonal) | 135 inches (343 cm) |
| Aspect Ratio | 16:9 |
| Viewable Area (H x W) | 66.2" H x 117.7" W |
| Overall Dimensions (H x W x D) | 78.1" H x 124.0" W x 2.7" D |
| Screen Material | MaxWhite 2, 1.1 Gain, Multi-layer Weave, Black-backed |
| Viewing Angle | 180 degrees |
| Compatibility | 4K Ultra HD, 8K, HDR, Active 3D Ready (Not recommended for Ultra Short Throw or Short Throw Projectors) |
| Certifications | Greenguard, Greenguard Gold, UL 2818, ISF Certified |
| Casing Color | White |
| Mounting Type | Wall/Ceiling Mount |
| Item Weight | 31.1 pounds |
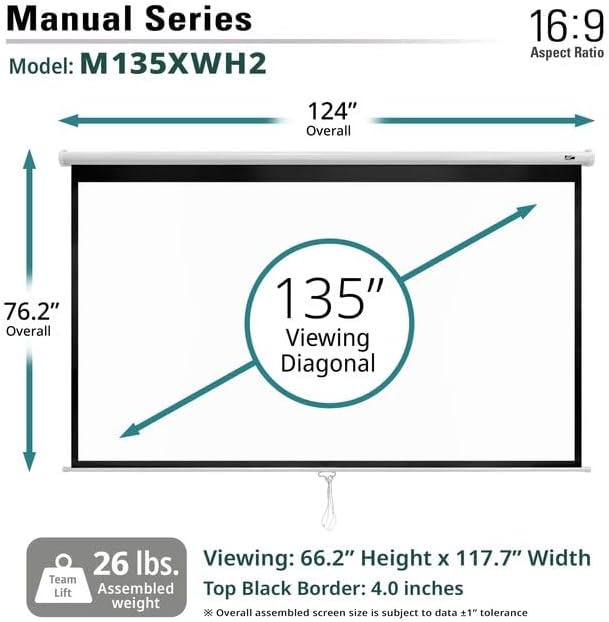
Image: Dimensions of the Elite Screens Manual Series M135XWH2 projector screen.
Warranty Information
Elite Screens provides the following warranty for the Manual Series M135XWH2 projector screen:
- Standard Manufacturer's Warranty: 2-Year
- ENR-G Enhanced Warranty: 3-Year (by Elite Screens, an ISO9001 manufacturer since 2004)
Please retain your proof of purchase for warranty claims. The warranty covers defects in materials and workmanship under normal use.
Customer Support
For technical assistance, troubleshooting, or warranty inquiries, Elite Screens offers lifetime technical support through various channels:
- Email Support: Contact Elite Screens via email for detailed inquiries.
- Web Chat: Visit the Elite Screens website for live chat support.
- Toll-Free Phone: Speak directly with Elite Screens' professional service team.
Refer to the official Elite Screens website for the most current contact information.


