1. Introduction
The Power Acoustik PCX-5F 5-Farad Capacitor is designed to provide stable voltage to your car audio amplifier, enhancing sound quality and system performance. This manual provides essential information for the safe installation, operation, and maintenance of your capacitor.
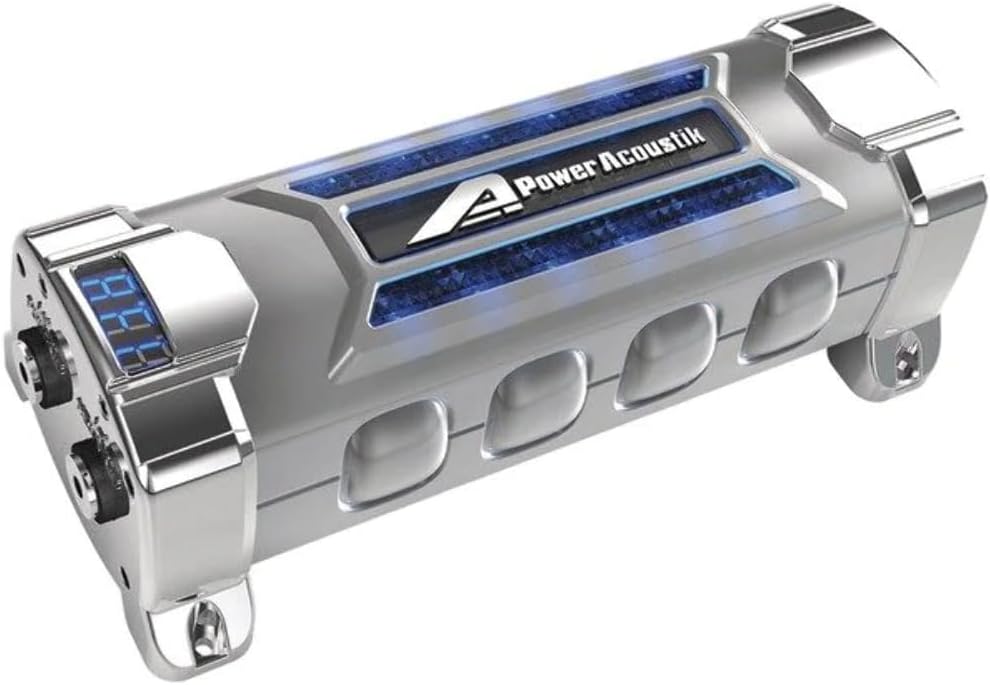
Image 1.1: The Power Acoustik PCX-5F 5-Farad Capacitor. This image displays the capacitor's cylindrical design, digital voltage meter, and terminal posts, highlighting its satin finish with chrome accents.
2. Safety Information
WARNING: This product contains chemicals known to the State of California to cause cancer and birth defects or other reproductive harm. Handle with care and wash hands after use.
- Always disconnect the vehicle's battery before installation.
- Ensure proper polarity during connection to prevent damage to the capacitor or other components.
- Avoid short circuits.
- Do not expose the capacitor to excessive moisture or extreme temperatures.
- Consult a professional car audio installer if you are unsure about any installation steps.
3. Product Features
- Capacitance: 5 Farad for stable power delivery.
- Operating Voltage: Designed for 12-16 DC Volts operation.
- Digital Voltage Meter: Integrated display for real-time voltage monitoring.
- Terminal Posts: Equipped with terminal posts suitable for ring terminals.
- Protection Indicators: Features polarity and voltage protection alert indicators.
- Aesthetic Design: LED accent lighting with a satin finish and chrome accents.
4. What's in the Box
Upon unpacking, ensure all items are present:
- Power Acoustik PCX-5F 5-Farad Capacitor
- Instruction Manual (this document)
5. Setup and Installation
Proper installation is crucial for the capacitor's performance and safety. Follow these general guidelines:
- Disconnect Battery: Before starting, disconnect the negative terminal of your vehicle's battery to prevent electrical shorts.
- Mounting Location: Choose a secure, dry location close to your amplifier, ensuring good ventilation and away from heat sources. Use appropriate mounting hardware (not included) to firmly secure the capacitor.
- Wiring:
- Connect the positive (+) terminal of the capacitor to the positive (+) terminal of your amplifier using a short, heavy-gauge power cable.
- Connect the negative (-) terminal of the capacitor to a solid chassis ground point or the negative (-) terminal of your amplifier using a short, heavy-gauge ground cable.
- Connect the main power cable from the vehicle's battery (with an inline fuse) to the positive (+) terminal of the capacitor.
- Charging the Capacitor:
Before connecting the capacitor directly to the power source, it must be charged to prevent a sudden current surge. Use a resistor (typically 1000 ohm, 1/2 watt) connected in series between the positive battery cable and the capacitor's positive terminal. Wait approximately 30-60 seconds until the voltage display stabilizes, then remove the resistor and make the final direct connection.
- Reconnect Battery: Once all connections are secure and the capacitor is charged, reconnect the vehicle's negative battery terminal.
Note: Detailed wiring diagrams and resistor specifications may vary. Refer to your amplifier's manual and consult a professional if needed.
6. Operation
The PCX-5F capacitor operates automatically once installed and charged. Its primary function is to store and release electrical energy rapidly to stabilize the voltage supplied to your amplifier, especially during high-demand bass notes.
- Digital Voltage Meter: The integrated digital display shows the current voltage of your car's electrical system at the capacitor. This allows for real-time monitoring of your system's stability.
- LED Accent Lighting: The LED lighting provides a visual indication of operation and adds to the aesthetic appeal of your car audio setup.
- Protection Indicators: The polarity and voltage protection alert indicators will activate if an incorrect connection or an unsafe voltage level is detected, helping to prevent damage.
7. Maintenance
The Power Acoustik PCX-5F capacitor requires minimal maintenance to ensure long-term performance.
- Regular Inspection: Periodically check all wiring connections to ensure they are tight and free from corrosion.
- Cleaning: Keep the capacitor clean and free of dust and debris. Use a soft, dry cloth for cleaning. Do not use harsh chemicals or abrasive cleaners.
- Environmental Conditions: Ensure the capacitor remains in a dry environment and is not exposed to extreme temperatures, which can affect its lifespan.
- Discharging: If you need to remove the capacitor, it must be safely discharged first. Use the same resistor method as for charging, connecting it across the positive and negative terminals until the voltage display reads zero.
8. Troubleshooting
If you experience issues with your PCX-5F capacitor or car audio system, consider the following troubleshooting steps:
- Headlight Dimming Persists:
- Check Wiring: Ensure all power and ground connections are secure and of adequate gauge for your system's power requirements. Loose or undersized wiring can impede current flow.
- Capacitor Charge: Verify the capacitor is fully charged. The digital display should show a stable voltage.
- System Power Demand: If your audio system's power demand significantly exceeds the capacitor's capacity or your vehicle's charging system capabilities, dimming may still occur. Consider upgrading your vehicle's alternator or battery.
- Capacitor Not Displaying Voltage:
- Check Power Connections: Ensure the positive and negative terminals are correctly connected and receiving power.
- Fuse Check: Verify that any inline fuses in the power circuit are intact.
- Polarity Protection: The protection indicator might be active due to incorrect polarity. Recheck connections.
- Capacitor Overheating:
- Ventilation: Ensure the capacitor has adequate airflow around it.
- Overload: An amplifier drawing excessive current can cause the capacitor to work harder and generate heat. Review your amplifier's specifications and system impedance.
If problems persist after troubleshooting, contact Power Acoustik customer support or a qualified car audio technician.
9. Specifications
| Feature | Specification |
|---|---|
| Brand | Power Acoustik |
| Model | PCX-5F |
| Capacitance | 5 Farad |
| Operating Voltage | 12-16 Volts DC |
| Maximum Voltage | 16 Volts |
| Material | Carbon |
| Shape | Round |
| Item Weight | 3.7 Pounds |
| Mounting Type | Pole Mount |
10. Warranty and Support
Warranty: The Power Acoustik PCX-5F 5-Farad Capacitor comes with a 1-year limited warranty from the date of purchase. This warranty covers manufacturing defects under normal use. It does not cover damage resulting from improper installation, accident, misuse, abuse, or unauthorized modification.
Customer Support: For technical assistance, warranty claims, or further information, please contact Power Acoustik customer support. Refer to the official Power Acoustik website for current contact details.
Manufacturer: Power Acoustik


