Introduction
This manual provides detailed instructions for the installation, operation, and maintenance of your Kicker 48KXMA8008 KXMA800.8 8-Channel Full-Range Class-D Marine Amplifier. Please read this manual thoroughly before attempting installation or operation to ensure proper function and safety.
Safety Information
Observe the following safety precautions to prevent injury or damage to the amplifier or vehicle:
- Always disconnect the vehicle's battery negative terminal before installing or servicing any audio components.
- Ensure all wiring is properly routed and secured to prevent pinching or damage.
- Use appropriate gauge wiring for power and ground connections to prevent overheating.
- Avoid mounting the amplifier in locations exposed to direct sunlight, excessive heat, or moisture.
- If you are unsure about any part of the installation process, consult a professional installer.
Product Overview
Key Features
- Conformal-Coated Circuit Boards to Repel Moisture
- 316L Stainless-Steel, No-Rust Hardware
- Small Footprint for Flexible Placement
- Built-In Variable Crossovers for Precise Speaker Performance Matching
- Designed for High-End Tower Speakers or to Augment Existing Systems
Component Identification
Familiarize yourself with the various parts of your Kicker KXMA800.8 amplifier:

Figure 1: Top view of the Kicker KXMA800.8 amplifier, showing the KICKER logo and model number.

Figure 2: Rear panel of the Kicker KXMA800.8 amplifier, detailing power, ground, remote, and RCA input connections for eight channels.
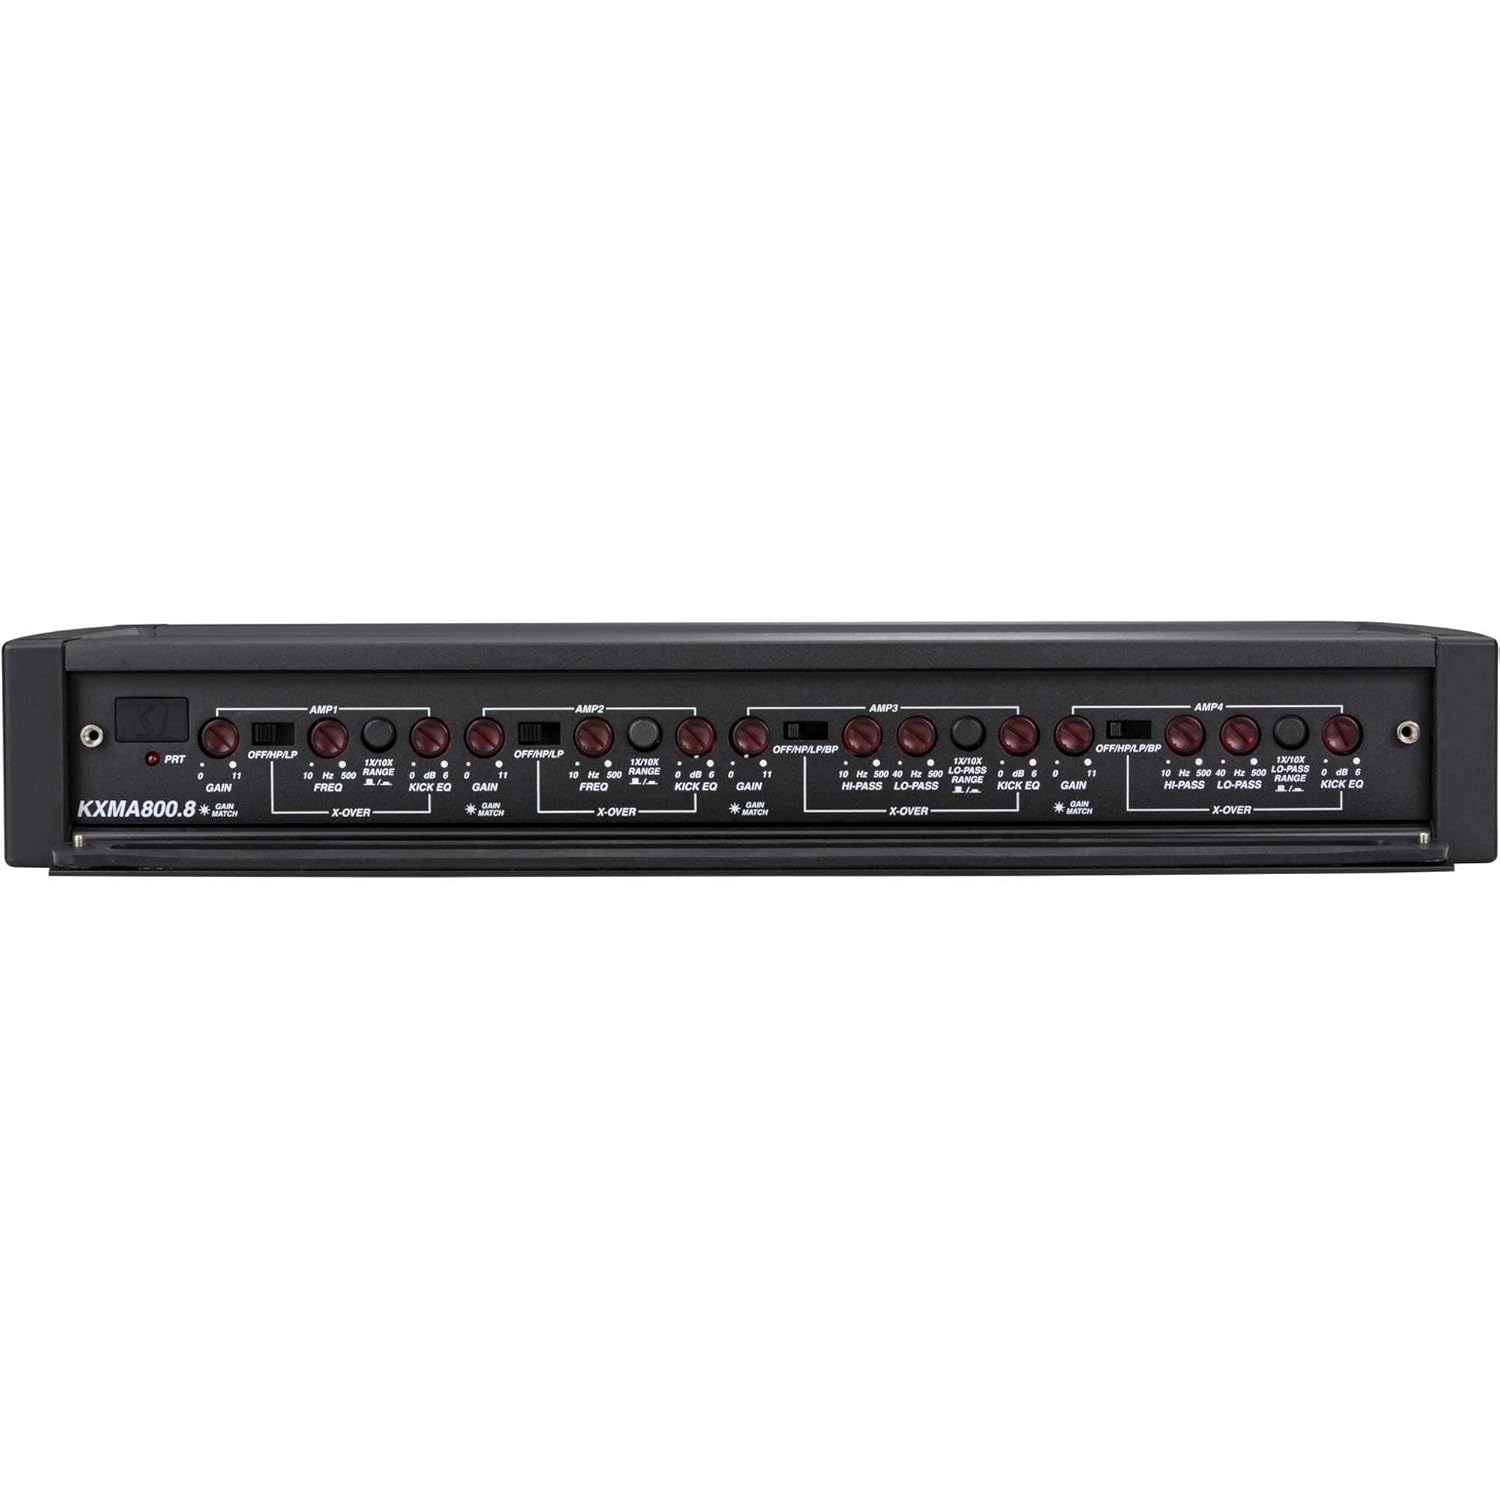
Figure 3: Front panel of the Kicker KXMA800.8 amplifier, displaying the gain, crossover, and Kick EQ controls for each amplifier section.

Figure 4: Side view of the Kicker KXMA800.8 amplifier, featuring the illuminated "KX" logo.
Setup and Installation
Mounting
The Kicker KXMA800.8 amplifier is designed for marine environments and can be mounted on boats or boards. Choose a location that is:
- Secure and stable, away from moving parts.
- Protected from direct water spray, though the unit features conformal-coated circuit boards for moisture resistance.
- Accessible for wiring and adjustments, but also discreet if preferred due to its small footprint.
- Allows for adequate ventilation around the amplifier to prevent overheating.
Use the provided stainless-steel hardware for mounting. Ensure the mounting surface is strong enough to support the amplifier's weight.
Wiring Connections
Refer to Figure 2 for the location of all wiring terminals. Proper wiring is crucial for performance and safety.
- Power (BATT +12V): Connect a direct wire from the positive terminal of your vehicle's battery. Install an appropriate fuse (not included) within 18 inches of the battery.
- Ground (GND): Connect a wire of the same gauge as the power wire to a clean, solid metal chassis point. Ensure good electrical contact.
- Remote Turn-On (REM): Connect this to the remote turn-on lead from your head unit or other signal source.
- RCA Inputs (AMP1, AMP2, AMP3, AMP4): Connect your audio source (head unit) to these inputs using high-quality RCA cables. The amplifier supports 8 channels, typically using four stereo RCA pairs.
- Speaker Outputs: Connect your speakers to the designated speaker terminals. Pay close attention to polarity (+/-) for each speaker. The amplifier supports bridging for higher power output to specific channels; refer to the wiring diagram for bridging instructions.
Important: Before making any connections, ensure the vehicle's battery is disconnected.
Operating Instructions
The KXMA800.8 amplifier features various controls to optimize audio performance. These controls are located on the front panel (refer to Figure 3).

Figure 5: Detailed view of the gain, crossover, and Kick EQ adjustment knobs on the amplifier's control panel.
Gain Control
The Gain control matches the amplifier's input sensitivity to the output level of your source unit. To set the gain:
- Turn the gain knob all the way down (counter-clockwise).
- Turn your source unit up to about 75% of its maximum volume.
- Slowly turn the amplifier's gain knob up until you hear slight distortion, then back it down slightly.
- The "Gain Match" indicator (if present, refer to Figure 5) can assist in setting the optimal gain level.
Crossover Controls (OFF/HP/LP/BP)
The built-in variable crossovers allow you to filter frequencies sent to your speakers, optimizing their performance and protecting them from damaging frequencies.
- OFF: Disables the crossover.
- HP (High-Pass): Allows only frequencies above the set point to pass through. Useful for full-range speakers or tweeters.
- LP (Low-Pass): Allows only frequencies below the set point to pass through. Useful for subwoofers.
- BP (Band-Pass): Allows frequencies within a specific range (between HP and LP settings) to pass through.
Adjust the frequency knobs (FREQ) to select the desired crossover point for each amplifier section.
Kick EQ
The Kick EQ provides a bass boost feature. Use this control sparingly and adjust it carefully to avoid distortion or speaker damage. Start with the control at its minimum setting and increase gradually if desired.
Maintenance
Your Kicker KXMA800.8 amplifier requires minimal maintenance to ensure long-lasting performance:
- Cleaning: Periodically wipe the amplifier's exterior with a soft, dry cloth. Avoid using harsh chemicals or abrasive cleaners.
- Connections: Occasionally check all wiring connections to ensure they are secure and free from corrosion, especially in marine environments.
- Ventilation: Ensure that the amplifier's cooling fins are free from obstructions to allow for proper heat dissipation.
Troubleshooting
If you experience issues with your amplifier, consult the following table before contacting support:
| Symptom | Possible Cause | Solution |
|---|---|---|
| No Power / No Indicator Light |
|
|
| No Sound Output |
|
|
| Distorted Sound |
|
|
| Amplifier Overheating |
|
|
Specifications
| Feature | Detail |
|---|---|
| Brand | KICKER |
| Model Number | 48KXMA8008 |
| Product Dimensions (L x W x H) | 15 x 21 x 10 inches |
| Item Weight | 8.4 Pounds |
| Maximum Supply Voltage | 14.1 Volts |
| Mounting Type | Boat Mount, Boards |
| Date First Available | November 13, 2020 |
| Manufacturer | Kicker |
Warranty and Support
Kicker products are engineered for reliable performance. For specific warranty information, including coverage duration and terms, please refer to the official Kicker website or contact Kicker customer support directly. Keep your purchase receipt as proof of purchase.
For technical assistance or further inquiries, please visit the official Kicker support page or contact their customer service department.


