
Elite Screens M120XWH2
Elite Screens Manual Series M120XWH2 Projector Screen User Manual
Your guide to setting up, operating, and maintaining your Elite Screens Manual Series M120XWH2 projector screen.
1. Setup and Installation
1.1 Unpacking
Carefully unpack the screen from its packaging. Always handle the screen in a level position on a clean, flat surface to prevent damage to the screen material or casing.

Image: A person carefully removes the projector screen from its protective packaging.
1.2 Included Hardware
The following hardware is typically included for installation. Please note that the provided wall screws are complimentary and may not be adequate for all mounting surfaces. It is recommended to consult with a professional installer or a hardware store for proper mounting screws and anchors suitable for your specific wall or ceiling type.
- Pull Cord (1pc)
- M5x50 Screws (2 pcs)
- Wall Anchor (2 pcs)

Image: The standard hardware kit for the Manual Series screen, including a pull cord, screws, and wall anchors.
1.3 Mounting Options
The Manual Series screen is designed for dual wall and ceiling installation. Regardless of the mounting method, the screen must be securely supported to ensure that vibration or pulling on the viewing surface will not cause the screen case to become loose or fall.
For detailed visual instructions on installation, please refer to the official installation video below.
Video: Official installation guide for the Elite Screens Manual Series, demonstrating proper mounting procedures.

Image: Illustration of the versatile dual wall and ceiling installation design.

Image: Optional 6" and 12" L-brackets are available for specific mounting requirements.
2. Operating Your Projector Screen
2.1 Pulling Down the Screen
To pull down the screen, use the included screen lanyard or the handle. Always pull the screen down only in a 90-degree vertical angle. Do not attempt to pull the screen down by the surface or touch the screen, as this will damage the screen material and void the warranty.

Image: The screen lanyard allows the pull-down handle to be reached from high areas for easy operation.
2.2 Auto-Lock Mechanism
The Manual Series features an internal auto-lock mechanism. This system will cause the screen to stop and lock on the desired position at intervals. To engage the lock, simply pull the screen down to your preferred height and release it gently. The screen will lock in place.
2.3 Retracting the Screen
To retract the screen, pull it down more than 2 inches from its current position. Then, quickly and smoothly release it up gently. The screen should retract back into its casing. Do not let go of the handle until the screen is entirely inside the case to avoid damage from slamming up.
Retraction Tip: If you are unable to pull the screen down two inches when attempting to retract it, give the screen a quick yank downwards with a little bit of force. Please be sure to not stand directly under the housing of the unit when yanking down on the screen.
Note: Always release at a 90-degree angle and do not let go until the screen is entirely inside the case. If the screen feels stuck, keep in mind that the screen's mechanism is new and needs to be run up/down a few times to loosen up. If this happens, carefully with a little force yank the screen straight down to unlock the screen. Improperly bringing the screen up/down will damage the screen material or rolling system.
Video: A short preview demonstrating the screen's auto-lock and retraction mechanism.
3. Care and Maintenance
To ensure the longevity and optimal performance of your Elite Screens Manual Series projector screen, follow these care and maintenance guidelines:
- Cleaning the Screen Surface: Use a soft, lint-free cloth lightly dampened with water. For stubborn spots, a mild soap solution can be used. Gently wipe the screen surface in one direction. Avoid using harsh chemicals, abrasive cleaners, or excessive force, as these can damage the screen material.
- Cleaning the Casing: Wipe the metal casing with a soft, dry cloth to remove dust.
- Regular Inspection: Periodically check all mounting hardware (screws, anchors, brackets) to ensure they remain secure. Tighten any loose components.
- Storage: When not in use for extended periods, ensure the screen is fully retracted into its casing to protect the viewing surface from dust and potential damage.
- Environmental Conditions: Avoid exposing the screen to extreme temperatures, high humidity, or direct sunlight for prolonged periods, as this can affect the screen material.
4. Troubleshooting Common Issues
4.1 Screen Does Not Retract
- Solution: Pull the screen down an additional 2 inches from its current position and then quickly release it upwards. This often resets the retraction mechanism.
- New Mechanism: If the screen is new, the retraction mechanism may be stiff. Operate the screen up and down a few times to loosen it.
- Caution: Do not stand directly under the housing of the unit when yanking down on the screen.
4.2 Screen Appears Twisted or Uneven
- Solution: Ensure the screen is hanging perfectly level. If mounted on a wall, verify that both D-rings are on the same horizontal plane.
- Non-Tensioned Screen: Minor waves or slight curvature can be normal for non-tensioned manual screens. This typically does not affect viewing quality significantly.
- Re-check Installation: If the issue is severe, re-check the installation points for proper alignment and secure fastening.
4.3 Image Quality Issues (e.g., Hotspotting)
- Projector Compatibility: The Manual Series screens are designed for standard throw projectors. They are NOT recommended for Ultra Short Throw or Short Throw projectors, which can cause hotspotting or uneven brightness.
- Ambient Light: Ensure the viewing environment has controlled ambient light for optimal image quality.
5. Product Specifications
| Feature | Description |
|---|---|
| Model Number | M120XWH2 |
| Screen Size | 120-inch Diagonal |
| Aspect Ratio | 16:9 |
| View Size (H x W) | 59.1" H x 104.7" W |
| Overall Size (H x W) | 76.1" H x 111.9" W |
| Case Color | White |
| Screen Material | MaxWhite 2 (1.1 Gain, Multi-layer weave, 180-degree wide viewing angle, black-backed, textured surface) |
| Compatibility | 4K Ultra HD, Active 3D, HDR Ready. Designed for Standard Throw Projectors (Not recommended for Ultra Short Throw or Short Throw) |
| Certifications | GREENGUARD & GREENGUARD GOLD Certified (UL 2818), ISF Certified |
| Mounting Type | Dual Wall / Ceiling Mount |
| Item Weight | 23.1 pounds |

Image: Key dimensions and specifications for the M120XWH2 model.

Image: Details of the MaxWhite 2 matte white front screen material, featuring 1.1 gain, 180-degree viewing angle, and compatibility with 8K/4K UHD and HDR.

Image: Guide to aspect ratios and tips for selecting the appropriate screen format.
6. Warranty Information
The Elite Screens Manual Series M120XWH2 projector screen comes with a 2-Year / 3-Year ENR-G Manufacturer's Warranty. Elite Screens has been an ISO9001 manufacturer since 2004, ensuring high-quality standards.
For detailed information regarding warranty terms, conditions, and how to make a claim, please refer to the official Elite Screens website or contact their customer support directly.
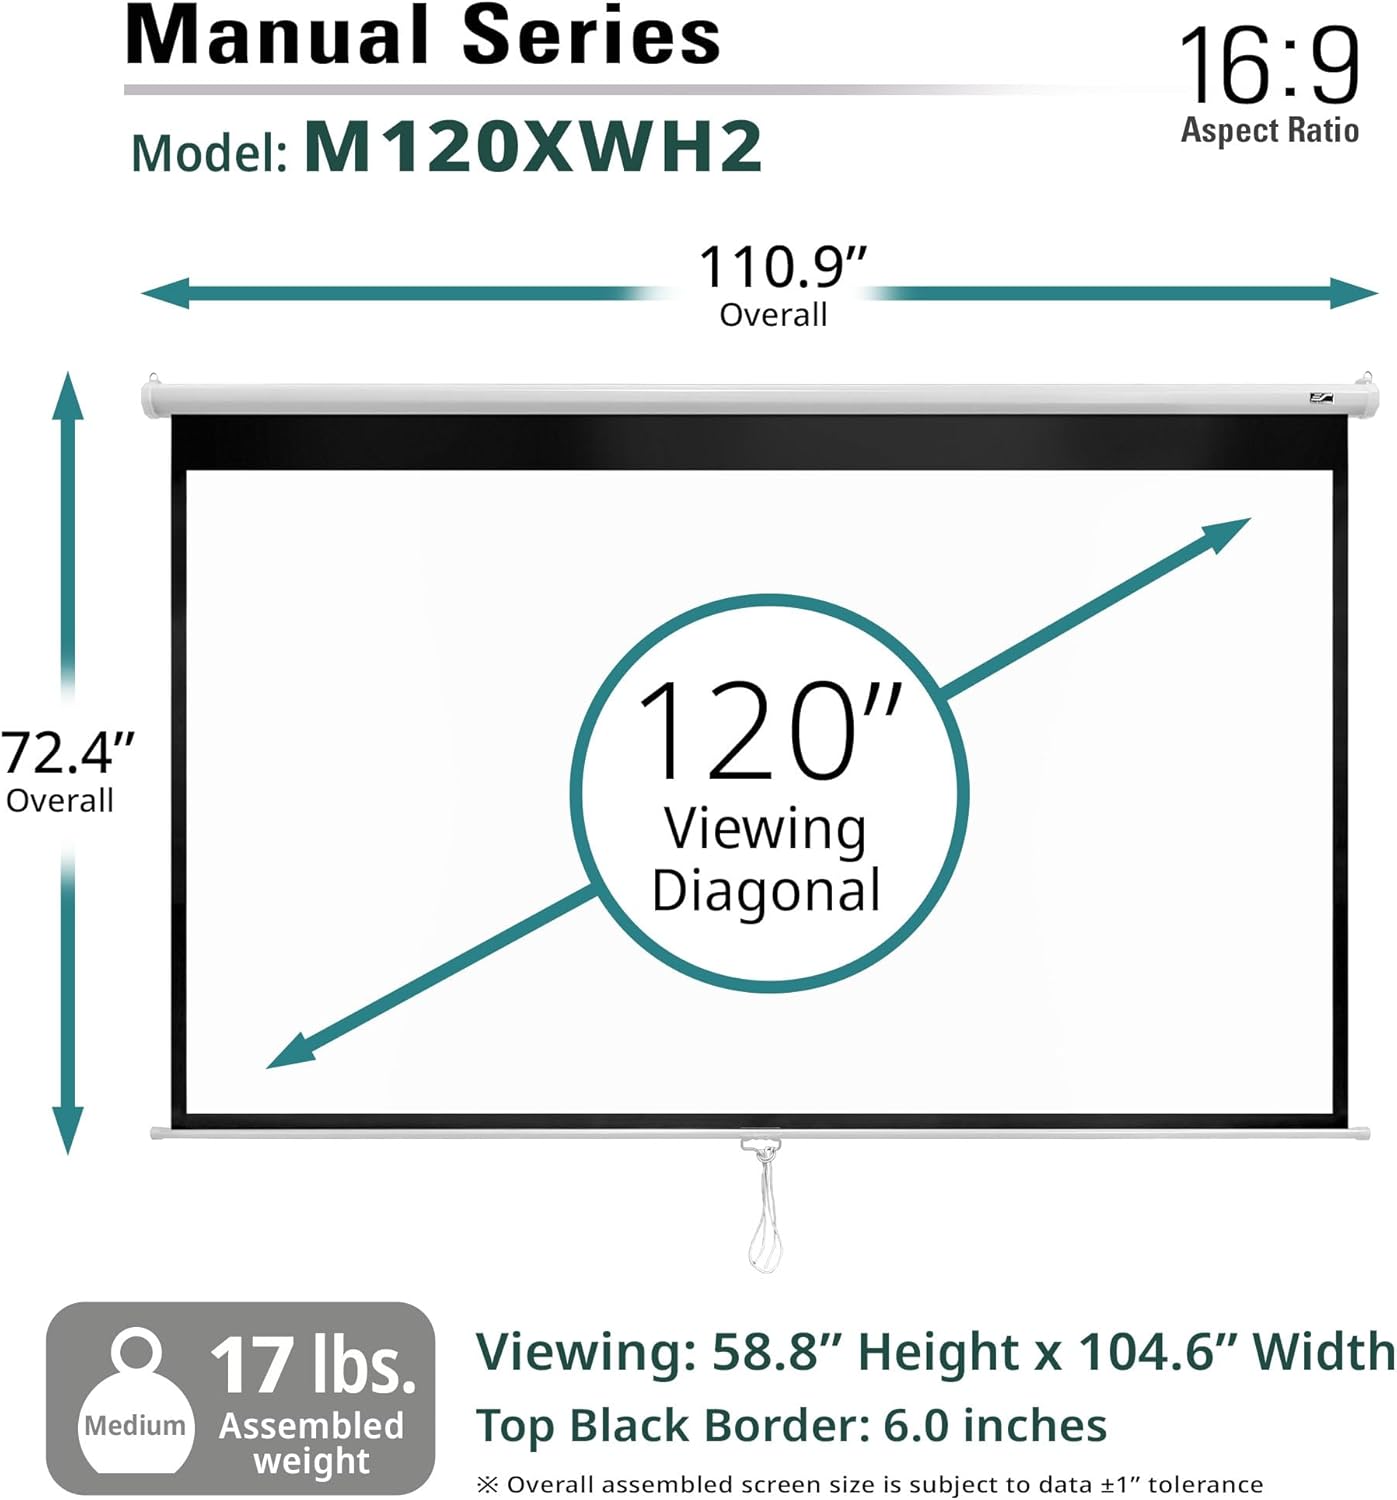
Image: The ISF Certified logo, indicating the screen's ability for image fidelity.
7. Customer Support
For any technical assistance, product inquiries, or support needs, Elite Screens offers lifetime technical support. You can reach their professional service team via:
- Web Chat
- Toll-Free Phone Call
Please refer to the product packaging or the official Elite Screens website (www.elitescreens.com) for the most current contact information and operating hours.

Image: Elite Screens customer support details, including a toll-free number and operating hours.
Related documentsM120XWH2


Ask a question about this manual
Ask about setup, troubleshooting, compatibility, parts, safety, or missing instructions. Manuals+ will review the question and use this page’s manual context to help answer it.