
1. Introduction
The Equus 4340 Digital Engine Analyzer is a versatile diagnostic tool designed for safely troubleshooting a variety of automotive electrical problems. This manual provides detailed instructions for the proper setup, operation, and maintenance of your device, ensuring accurate readings and safe usage.
2. Safety Information
Always observe basic safety precautions when using this device to reduce the risk of fire, electric shock, or personal injury. Read all instructions carefully before use.
- Eye Protection: Always wear approved eye protection when working on vehicles.
- Insulated Leads: Use only the provided insulated test leads. Inspect them for damage before each use.
- Vehicle Safety: Ensure the vehicle is in park/neutral with the parking brake engaged. Turn off the ignition unless instructed otherwise for specific tests.
- High Voltage: Be aware of high voltage circuits in automotive systems, especially ignition systems.
- Overload Protection: The device features full overload protection, but avoid exceeding specified input limits.
- Battery Acid: Avoid contact with battery acid. Wear protective gloves.
3. Product Overview
3.1 Features
- 3 1/2-digit digital display with large 1/2" digits for clear readings.
- Full overload protection across all ranges.
- Automotive polarity indicator.
- "Low battery" indicator to signal when battery replacement is needed.
- Includes insulated test leads with detachable alligator clips.
- 10 MegOhm input impedance for safely testing computerized vehicles without damaging sensitive electronics.
3.2 Components
The Equus 4340 consists of a main unit with a digital display, a rotary function switch, and input jacks for test leads. The included test leads have detachable alligator clips for versatile connections.
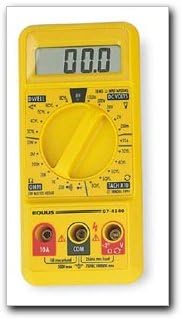
Figure 1: Front view of the Equus 4340 Digital Engine Analyzer. This image shows the digital display, the central rotary dial for function selection, and the three input jacks at the bottom for connecting test leads.
4. Setup
4.1 Battery Installation
The Equus 4340 is battery-powered. Before first use, or when the "low battery" indicator appears, install or replace the battery. Refer to the battery compartment cover on the back of the unit for specific instructions and battery type (typically a 9V battery).
- Locate the battery compartment on the back of the analyzer.
- Remove the screw(s) securing the cover, if present, and open the compartment.
- Insert a new 9V battery, observing correct polarity (+/-).
- Replace the cover and secure it with the screw(s).
4.2 Connecting Test Leads
Connect the test leads to the appropriate input jacks on the analyzer.
- Connect the black test lead to the COM (Common) jack.
- Connect the red test lead to the VΩmA jack for voltage, resistance, and low current measurements.
- For high current (10A) measurements, connect the red test lead to the 10A jack.
- Attach the detachable alligator clips to the test lead probes if needed for secure connections.
5. Operating Instructions
To operate the Equus 4340, select the desired function and range using the rotary switch, then connect the test leads to the circuit under test.
5.1 Function Selection
Turn the rotary switch to the desired measurement function and range. The display will show "0.00" or a similar reading when no input is present.
5.2 Measurement Functions
- DC Volts (VDC): Measures direct current voltage.
Ranges: 200mV, 2V, 20V, 200V, 1000V. Connect leads in parallel with the circuit. - DC Amps (A): Measures direct current.
Range: 10A. Connect leads in series with the circuit. Use the 10A jack for this measurement. - Tach (x10): Measures engine RPM (revolutions per minute).
Supported Cylinders: 3, 4, 5, 6, 8. Range: 0-10,000 RPM. Connect the red lead to the ignition coil negative terminal or a suitable tachometer signal wire. - Ohms (Ω): Measures electrical resistance.
Ranges: 200Ω, 2KΩ, 20KΩ, 200KΩ, 2MΩ, 20MΩ. Ensure the circuit is de-energized before measuring resistance. - Dwell: Measures ignition dwell angle.
Supported Cylinders: 3 Cyl. (0-120°), 4 Cyl. (0-90°), 5 Cyl. (0-72°), 6 Cyl. (0-60°), 8 Cyl. (0-45°). Connect the red lead to the ignition coil negative terminal. - Diode Check: Tests the functionality of diodes.
- Continuity Test: Checks for an open or closed circuit, often with an audible tone for continuity.
Note: The 10 MegOhm input impedance ensures safe testing on computerized vehicles, preventing damage to sensitive electronic control units (ECUs).
6. Maintenance
6.1 Cleaning
Wipe the analyzer with a soft, damp cloth. Do not use abrasive cleaners or solvents. Ensure the device is dry before storage or next use.
6.2 Battery Replacement
Replace the 9V battery when the "low battery" indicator appears on the display. Refer to Section 4.1 for battery installation instructions.
6.3 Storage
Store the analyzer in a clean, dry environment away from extreme temperatures and direct sunlight. Disconnect test leads and remove the battery if storing for extended periods to prevent leakage.
7. Troubleshooting
- No Display: Check battery installation and ensure the battery is not depleted. Replace if necessary.
- "Low Battery" Indicator: Replace the 9V battery immediately to ensure accurate readings.
- Incorrect Readings:
- Ensure the correct function and range are selected for the measurement.
- Verify test lead connections are secure and to the correct input jacks.
- Check test leads for damage or breaks.
- Ensure the circuit under test is properly prepared (e.g., de-energized for resistance).
- No Continuity Tone: Ensure the continuity function is selected and the circuit is closed.
8. Specifications
| Parameter | Value |
|---|---|
| Display | 3 1/2-digit digital, 1/2" digits |
| DC Voltage Ranges | 200mV, 2V, 20V, 200V, 1000V |
| DC Current Range | 10A |
| Tachometer Range | 0-10,000 RPM (x10) |
| Resistance Ranges | 200Ω, 2KΩ, 20KΩ, 200KΩ, 2MΩ, 20MΩ |
| Dwell Angle Ranges | 3 Cyl. 0-120°, 4 Cyl. 0-90°, 5 Cyl. 0-72°, 6 Cyl. 0-60°, 8 Cyl. 0-45° |
| Input Impedance | 10 MegOhm |
| Power Source | Battery Powered (9V recommended) |
| Item Weight | 454 g |
| Dimensions (Parcel) | 24.13 x 13.97 x 5.08 cm |
9. Warranty and Support
For warranty information or technical support, please refer to the documentation included with your purchase or contact Equus customer service. Keep your purchase receipt as proof of purchase.
