
Celestron 21061
Celestron AstroMaster 70AZ Telescope Instruction Manual
Model: 21061
Introduction
The Celestron AstroMaster 70AZ is a user-friendly refractor telescope designed for both astronomical and terrestrial viewing. Its robust construction and intuitive controls make it an excellent choice for beginners and experienced users alike. This manual provides comprehensive instructions for setting up, operating, and maintaining your telescope to ensure optimal performance and longevity.

Figure 1: Celestron AstroMaster 70AZ Telescope with included accessories.
Setup
Setting up your AstroMaster 70AZ telescope is quick and requires no tools. Follow these steps to get started:
- Unpack Components: Carefully remove all components from the packaging. Verify that all parts listed in the 'What's in the Box' section are present.
- Set Up the Tripod: Extend the tripod legs to your desired height. The adjustable full-height tripod ensures a stable base and can be customized for comfortable viewing for adults or children, whether standing or seated. Secure the legs using the locking clamps.
- Attach the Optical Tube: Mount the telescope's optical tube onto the alt-azimuth mount. Ensure it is securely fastened.
- Install the StarPointer Red Dot Finderscope: Slide the finderscope into its bracket on the optical tube and tighten the retaining screw.
- Insert the Erect Image Diagonal: Place the 90° erect image diagonal into the focuser. This accessory provides a right-side-up image, making the telescope suitable for both astronomical and terrestrial observations.
- Insert an Eyepiece: Choose either the 20mm (45x magnification) or 10mm (90x magnification) eyepiece and insert it into the diagonal. Secure it with the thumbscrew.
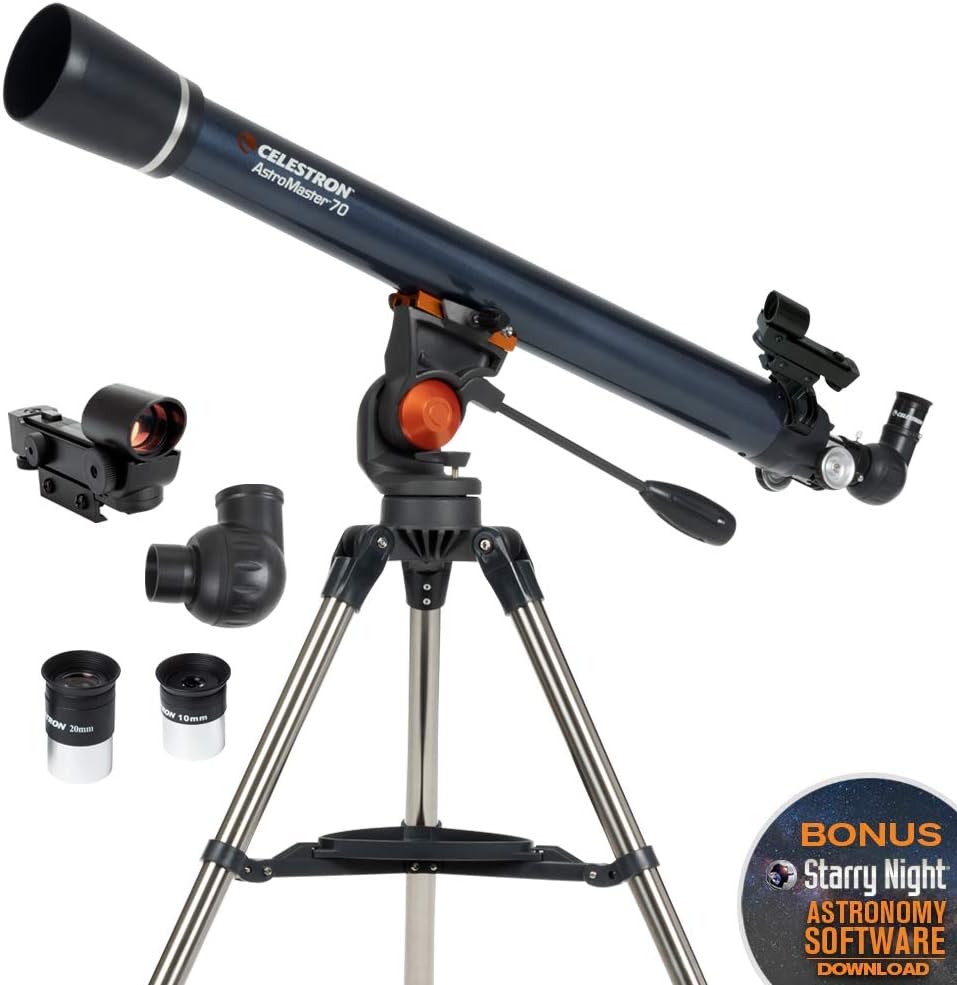
Figure 2: All components of the AstroMaster 70AZ telescope.
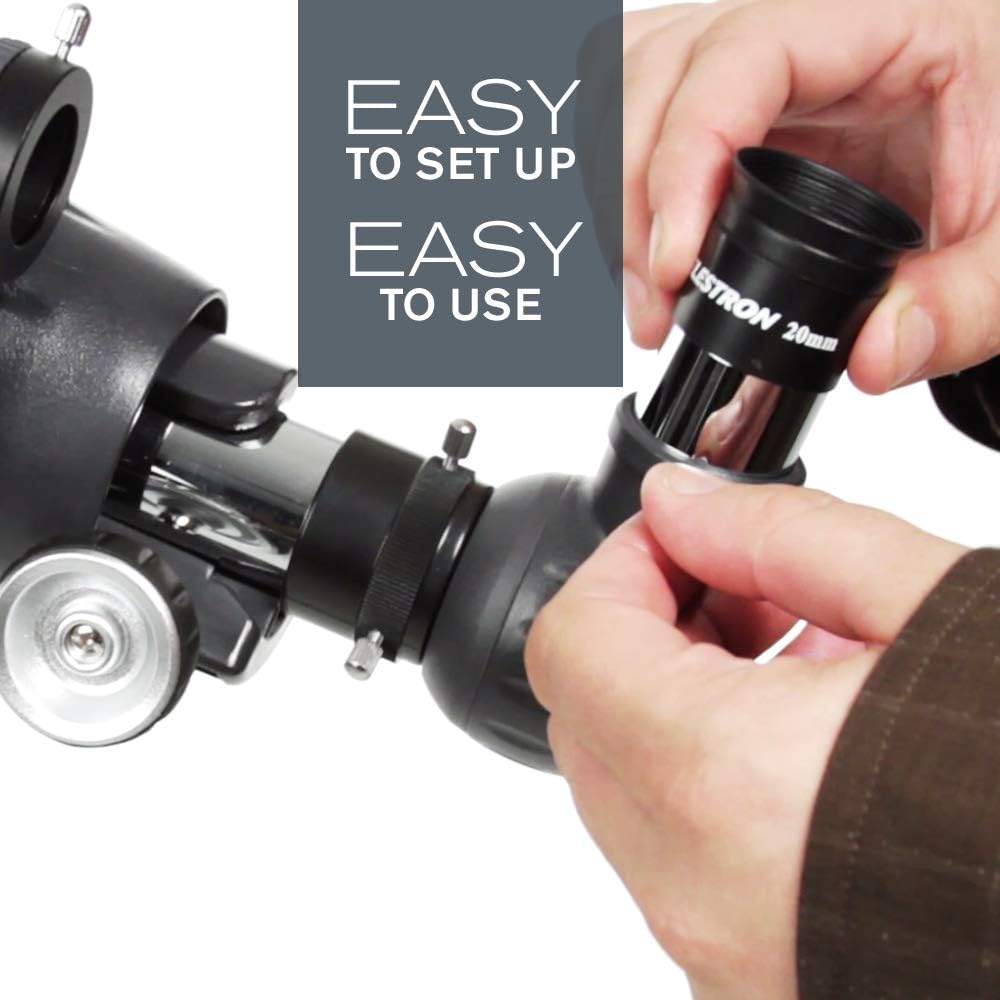
Figure 3: Proper insertion of an eyepiece into the diagonal.

Figure 4: The adjustable tripod allows for comfortable viewing at various heights.
Operating the Telescope
The AstroMaster 70AZ features an intuitive alt-azimuth mount with a smooth panhandle, allowing effortless pointing and tracking.
Aligning the StarPointer Finderscope
Before observing, align the StarPointer finderscope with the main telescope. This makes locating objects much easier.
- Point the main telescope at a distant, easily identifiable object (e.g., a street light or tree top) during the day.
- Look through the main telescope's eyepiece and center the object in the field of view.
- Turn on the StarPointer finderscope. Look through the finderscope and use its adjustment knobs to move the red dot until it is centered on the same object you see in the main eyepiece.
Viewing Objects
Once aligned, use the finderscope to quickly point your telescope at desired objects. Then, look through the main eyepiece and use the focuser knob to bring the image into sharp focus.
- Daytime Viewing: The erect image diagonal provides a correct orientation, making it ideal for observing land-based objects like wildlife, landscapes, or distant scenery.
- Nighttime Viewing: Explore celestial objects such as the Moon, planets (Jupiter, Saturn, Venus), and bright star clusters. The 70mm objective lens delivers bright, sharp views.

Figure 5: The AstroMaster 70AZ is suitable for both daytime terrestrial viewing and nighttime astronomical observation.

Figure 6: The telescope is designed for easy use by both adults and children.

Figure 7: The included 20mm and 10mm eyepieces provide 45x and 90x magnification respectively.
Bonus Astronomy Software
Your telescope includes a free download of top-rated astronomy software, Starry Night. This software can help you plan your observing sessions and learn more about celestial objects.

Figure 8: Starry Night educational software for enhanced learning and planning.
Maintenance
Proper care and maintenance will ensure your telescope provides years of enjoyment.
- Cleaning Optics: Use a soft, lint-free cloth or a specialized optical cleaning solution to gently clean the objective lens and eyepieces. Avoid touching optical surfaces with bare hands.
- Dust Protection: Always replace the lens caps when the telescope is not in use to prevent dust accumulation.
- Storage: Store the telescope in a dry, dust-free environment. If storing for extended periods, consider disassembling it and returning components to their original packaging.
- Tripod Care: Keep the tripod legs and adjustment mechanisms clean and free of debris to ensure smooth operation.
Troubleshooting
If you encounter issues with your telescope, refer to the table below for common problems and their solutions.
| Problem | Possible Cause | Solution |
|---|---|---|
| Image is blurry or out of focus | Focuser not adjusted; Eyepiece not fully inserted | Adjust the focuser knob; Ensure eyepiece is fully seated and secured |
| Cannot find objects easily | Finderscope is not aligned | Align the StarPointer finderscope with the main telescope (refer to 'Aligning the StarPointer Finderscope' section) |
| Image is upside down or reversed | No erect image diagonal used (for terrestrial viewing) | Ensure the erect image diagonal is installed for correct image orientation during terrestrial viewing. For astronomical viewing, inverted images are normal. |
| Telescope shakes or is unstable | Tripod legs not fully extended or secured; Uneven surface | Ensure tripod legs are fully extended and locking clamps are tight; Place telescope on a stable, level surface. |
Specifications
| Feature | Detail |
|---|---|
| Model Name | AstroMaster 70AZ Telescope |
| Optical Tube Length | 685 Millimeters |
| Objective Lens Diameter | 70 Millimeters |
| Eyepiece Lenses | 20mm and 10mm |
| Telescope Mount | Altazimuth Mount |
| Finderscope | StarPointer™ red dot finderscope |
| Focus Type | Manual Focus |
| Power Source | Manual |
| Item Weight | 10.8 pounds (4.9 kg) |
| Product Dimensions | 27 x 32 x 51 inches (68.58 x 81.28 x 129.54 cm) |
| Manufacturer | Celestron Acquisition LLC |
| Country of Origin | China |
Warranty and Support
Your Celestron AstroMaster 70AZ Telescope is backed by Celestron’s 2-Year US Warranty. This warranty covers defects in materials and workmanship under normal use. For any technical assistance or warranty claims, please contact Celestron's US-based technical support team. They are available to provide unlimited support and guidance.
For more information, you may also refer to the official Celestron website or the user guide PDF available online.
Related documents21061


Ask a question about this manual
Ask about setup, troubleshooting, compatibility, parts, safety, or missing instructions. Manuals+ will review the question and use this page’s manual context to help answer it.