1. Introduction and Overview
The HawkEye DepthTrax 2B is a sophisticated in-dash digital depth finder designed to provide accurate and reliable depth readings for various marine applications. This manual provides comprehensive instructions for the installation, operation, and maintenance of your DepthTrax 2B unit, ensuring optimal performance and longevity.

Figure 1.1: HawkEye DepthTrax 2B Digital Depth Finder (Black and White Models)
2. Key Features
- Wide Depth Range: Delivers uninterrupted depth readings from 2.5 to 600 feet, even at speeds up to 60 mph. Transducer Frequency: 200 kHz.
- Versatile Transducer: Includes a dual-mount transducer that can be installed via transom mount or glue-in method. Capable of shooting through solid fiberglass hulls and aluminum hulls up to 1/8-inch thick.
- Advanced Warning System: Features a 3-stage system that signals alarm conditions with an audible alarm, an ultra-bright red LED warning light, and LCD alarm indicators.
- Clear Display: Equipped with a no-glare, polarized LCD icon display and a storage sun cover, ensuring clear viewing with or without sunglasses.
- Precision Programming: Algorithmic programming significantly reduces false readings, providing unmatched precision in depth measurement.
- Customizable Appearance: Includes various bezels and display faces for aesthetic customization.

Figure 2.1: Detailed Feature Overview
3. Setup and Installation
The DepthTrax 2B is designed for straightforward installation. Please follow these steps carefully for optimal performance.
3.1 Transducer Installation
The unit comes with a dual-mount transducer, allowing for either transom or glue-in installation.
- Transom Mount: Secure the transducer to the boat's transom using the provided mounting bracket and hardware. Ensure it is positioned correctly to avoid interference and maintain consistent water contact at speed.
- Glue-In Mount: This method is suitable for NON-CORED fiberglass hulls or aluminum hulls thinner than 1/8 inch ONLY. It is crucial to test the transducer's performance in the desired location before permanent adhesion. Use marine-grade epoxy for a secure and watertight bond.
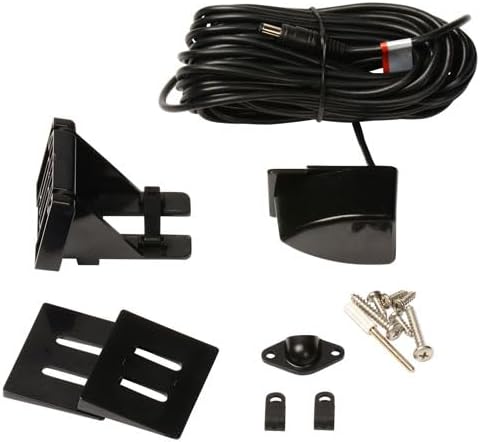
Figure 3.1: Transducer and Mounting Hardware

Figure 3.2: Transducer Sonar Beam Illustration
3.2 Display Unit Installation
The DepthTrax 2B is designed for in-dash mounting, fitting seamlessly into a standard 2-inch gauge opening.
- Prepare Opening: Use a 2-inch hole saw to create the mounting hole in your boat's dash.
- Connect Wiring: Connect the transducer cable and power supply (DC power) to the back of the display unit according to the wiring diagram provided in the full manual (available online).
- Secure Unit: Insert the display unit into the opening and secure it with the provided mounting hardware. Apply marine sealant under the bezel for a watertight seal.
- Customize Appearance: Select your preferred bezel (black or white) and display face to match your boat's aesthetics.

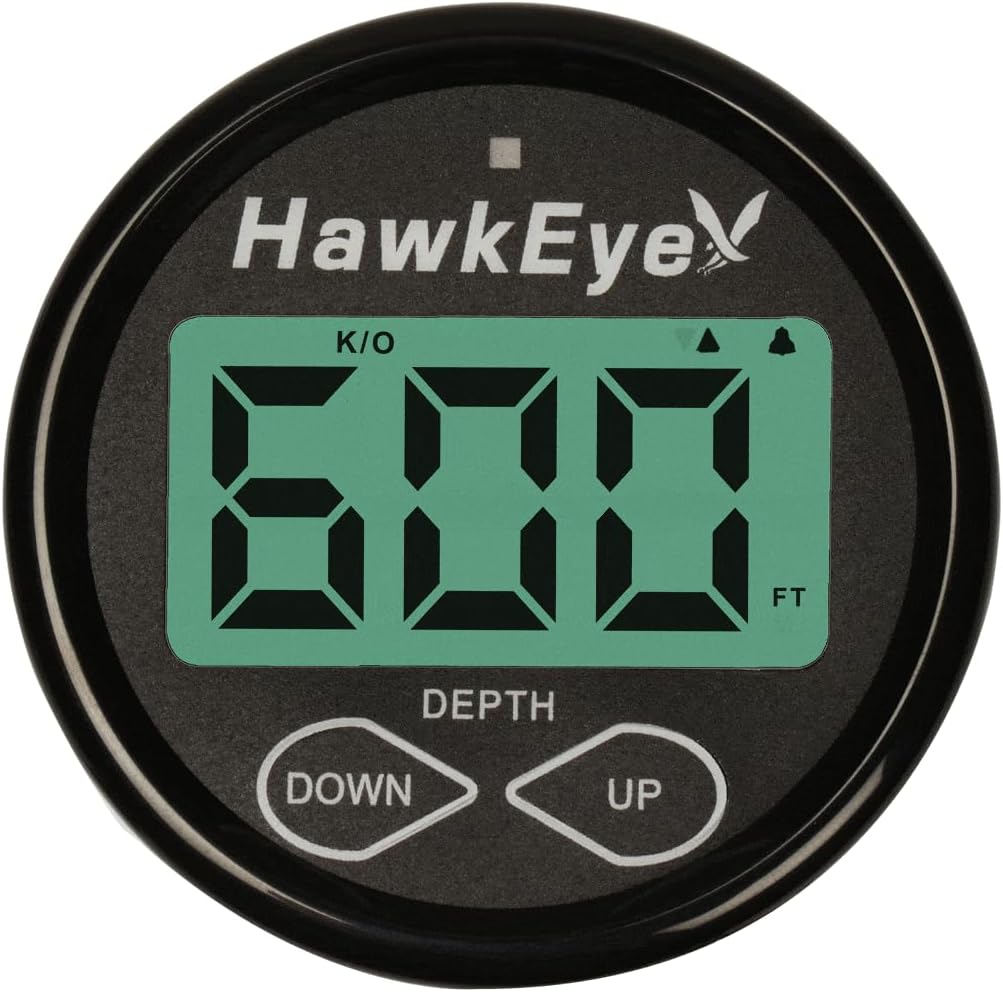
Figure 3.3: Front and Side Views of the Display Unit

Figure 3.4: Customizable Bezel and Display Face Options
4. Operating Instructions
The DepthTrax 2B is designed for intuitive operation, providing essential depth information at a glance.
4.1 Power On/Off
The unit typically powers on with the boat's main power or a dedicated instrument switch, as it does not feature a separate on/off switch. Ensure proper wiring during installation to control power via your boat's electrical system.
4.2 Reading the Display
The large LCD display provides clear depth readings. The polarized screen ensures visibility even in direct sunlight.
4.3 Setting Alarms and Units
Utilize the "DOWN" and "UP" buttons to navigate settings and adjust parameters.
- Units: Toggle between feet and meters for depth readings.
- Offset: Adjust the depth offset to account for the transducer's installation depth below the waterline, ensuring true depth readings.
- Shallow Water Alarm: Set a minimum depth threshold. If the water depth falls below this, the 3-stage alarm system will activate.
- Deep Water Alarm: Set a maximum depth threshold. If the water depth exceeds this, the 3-stage alarm system will activate.
- 1-Touch Mute: Temporarily silence alarms with a single touch.
5. Maintenance
Proper maintenance ensures the longevity and continued accuracy of your DepthTrax 2B.
- Cleaning: Regularly wipe the display screen with a soft, damp cloth. Avoid abrasive cleaners that could damage the polarized surface.
- Transducer Inspection: Periodically inspect the transducer for marine growth or damage. Clean gently with a soft brush if necessary.
- Storage: When not in use, especially during off-season storage, utilize the provided storage sun cover to protect the display from UV exposure and physical damage.
- Connections: Ensure all electrical connections remain secure and free from corrosion.
6. Troubleshooting
If you encounter issues with your DepthTrax 2B, refer to the following common troubleshooting tips:
| Problem | Possible Cause | Solution |
|---|---|---|
| No Depth Reading / Erratic Readings |
|
|
| Display Not Powering On |
|
|
| Alarms Not Functioning |
|
|
For more detailed troubleshooting or issues not listed here, please refer to the complete online manual or contact HawkEye customer support.
7. Specifications
| Attribute | Detail |
|---|---|
| Brand | HawkEye |
| Model Name | DT2B-TM |
| Part Number | DF10D |
| Power Source | DC power supply |
| Screen Size | 1.86 Inches |
| Display Type | LCD |
| Item Weight | 1.7 Pounds |
| Product Dimensions (LxWxH) | 4"L x 2"W x 6"H |
| Maximum Measuring Depth | 600 Feet |
| Mounting Type | Transom Mount (also supports Glue-In) |
| Color | Black/White |
| Material | Aluminum |
| Manufacturer | NorCross Marine Products |
| Country of Origin | China |
| Included Components | DepthTrax 2B Boat Mount In Dash Digital Depth Finder |
| Sport Type | Boating, Fishing |
8. Warranty and Support
The HawkEye DepthTrax 2B comes with a manufacturer's warranty. For specific details regarding warranty coverage, duration, and terms, please refer to the warranty documentation included with your product or visit the official HawkEye website.
For technical assistance, troubleshooting not covered in this manual, or warranty claims, please contact HawkEye customer support. Contact information can typically be found on the product packaging or the official brand website.

Figure 8.1: Designed and Supported in the USA


