Introduction
The Norman ML-600 is a robust 600 watt-second monolight designed for professional photography. It combines Norman's renowned durability with advanced electronic controls, offering precise power adjustments and versatile operation. This manual provides essential information for the safe and effective use of your ML-600 monolight.
Safety Instructions
- Always ensure the monolight is powered off and unplugged before making any adjustments or attaching accessories.
- Do not operate the monolight in wet or damp conditions.
- Avoid direct eye exposure to the flash tube.
- Ensure proper ventilation around the unit during operation to prevent overheating.
- Use only Norman-approved accessories and replacement parts.
Setup
1. Unpacking and Inspection
Carefully remove all components from the packaging. Verify that the 'Light Kit' contents are complete and free from damage. Retain original packaging for future transport or storage.
2. Mounting the Monolight
Attach the ML-600 monolight securely to a standard light stand using the integrated mounting bracket. Ensure the bracket's locking mechanism is tightened to prevent accidental movement.
3. Attaching Light Modifiers
The ML-600 is compatible with a wide range of Norman accessories and light modifiers, including softboxes, reflectors, grids, snoots, and barn doors. These require the R9113 Adapter Ring for attachment. The unit is also compatible with Photogenic reflectors and light modifiers.

Figure 1: Norman ML-600 Monolight with a standard reflector mounted. This image shows the front and side profile of the monolight, highlighting the reflector attachment point and the main body.
4. Power Connection
Connect the power cord to the monolight's power input and then to a suitable AC power outlet. Ensure the power switch on the unit is in the 'OFF' position before connecting to power.
Operating Instructions
1. Control Panel Overview

Figure 2: Close-up view of the Norman ML-600 control panel. This image details the digital readout, power adjustment buttons, modeling lamp controls, flash verification indicator, sync jack, and test button.
The ML-600 features a user-friendly control panel with a digital readout for precise settings. Key controls include:
- Digital Display: Shows current power settings in watt-seconds or f/stops.
- Power Adjustment Buttons: Use '+' and '-' buttons to increase or decrease flash output.
- Modeling Lamp Switch: Controls the 250-watt modeling lamp with 'Full', 'Ratio', and 'Off' settings.
- Flash Verification: An indicator light confirms successful flash firing.
- Sync Jack: A 1/4 inch jack for wired synchronization with your camera.
- Test Button: Manually fires the flash for testing purposes.
- Photo Eye: Built-in optical slave for wireless triggering by another flash.
2. Power Adjustment
The ML-600 allows power adjustments from 18 to 600 watt-seconds. Settings are displayed on the digital readout and can be adjusted in 1/10 stop increments for fine control over light output.
3. Modeling Lamp Operation
The 250-watt modeling lamp assists in visualizing light patterns before firing the flash. Use the modeling lamp switch to select:
- Full: Modeling lamp operates at full brightness.
- Ratio: Modeling lamp brightness adjusts proportionally to the flash output setting.
- Off: Modeling lamp is turned off.
4. Flash Synchronization
The monolight can be triggered in several ways:
- Sync Cable: Connect a standard 1/4 inch sync cable from your camera or trigger to the 'SYNC' jack on the control panel.
- Photo Eye (Optical Slave): The built-in photo eye detects another flash firing and triggers the ML-600 simultaneously. Ensure the photo eye is clear and enabled.
- Test Button: Press the 'TEST' button to manually fire the flash.
5. Recycle Time
The ML-600 features a fast recycle time of approximately two seconds at full power, indicated by the 'READY' light on the control panel.
Maintenance
1. Cleaning
Regularly clean the exterior of the monolight with a soft, dry cloth. For stubborn dirt, a slightly damp cloth can be used, ensuring no moisture enters the unit. Do not use abrasive cleaners or solvents.
2. Flash Tube and Modeling Lamp Replacement
The flash tube and modeling lamp are user-replaceable components. Always ensure the unit is unplugged and cooled down before attempting replacement. Refer to the specific instructions provided with replacement parts for proper installation. Handle flash tubes by their base to avoid touching the glass.
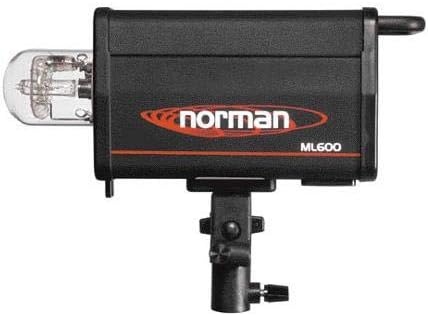
Figure 3: Rear view of the Norman ML-600 Monolight, illustrating the exposed flash tube and its housing. This view is relevant for maintenance and replacement procedures.
3. Storage
When not in use, store the monolight in a cool, dry place, away from direct sunlight and excessive dust. Use the original packaging or a padded case for protection during storage or transport.
Troubleshooting
| Problem | Possible Cause | Solution |
|---|---|---|
| Monolight does not power on | No power from outlet; Power cord not connected; Unit switch off | Check power outlet; Ensure power cord is securely connected; Turn power switch to 'ON' |
| Flash does not fire | Sync cable loose/faulty; Photo eye obstructed/off; Flash tube faulty; Power setting too low | Check sync cable connection; Ensure photo eye is clear and enabled; Replace flash tube if necessary; Increase power setting |
| Modeling lamp not working | Lamp switch off; Modeling lamp faulty | Set modeling lamp switch to 'Full' or 'Ratio'; Replace modeling lamp |
| Slow recycle time | Operating at full power; Unit overheating | This is normal at full power (approx. 2 seconds); Allow unit to cool if continuously firing |
If troubleshooting steps do not resolve the issue, contact Norman customer support for further assistance.
Specifications
| Feature | Detail |
|---|---|
| Model Number | ML-600 |
| Power Output | 600 Watt-Seconds |
| Power Adjustment | 18 to 600 Watt-Seconds (1/10 stop increments) |
| Modeling Lamp | 250 Watt (Full, Ratio, Off settings) |
| Recycle Time | Approximately 2 seconds at full power |
| Synchronization | 1/4 inch Sync Jack, Built-in Photo Eye |
| Flash Sync Speed | 1/250 or 1/200 (camera dependent) |
| Item Weight | 8.95 pounds |
| Included Components | Light Kit |
| Manufacturer | Norman |
| Date First Available | June 17, 2003 |
Warranty and Support
For warranty information, technical support, or service inquiries, please contact Norman customer service directly. Keep your purchase receipt as proof of purchase.
Manufacturer: Norman
Website: www.normanlights.com (Note: This is a placeholder URL as no official support link was provided in the product data. Please refer to your product documentation for the correct support contact.)


