1. Introduction and Overview
This manual provides detailed instructions for the safe and efficient operation of your Sanyo Fisher DCS-DA350 Executive Microsystem. Please read this manual thoroughly before using the unit and retain it for future reference.
The DCS-DA350 is a compact audio system featuring a top-loading CD player, a full logic cassette deck, and integrated speakers, designed for versatile audio playback.
Key Features:
- Top-loading CD player with 24-track programmability, repeat, and random play functions.
- 1-bit Digital-to-Analog Converter for enhanced audio quality.
- Full logic cassette deck with auto reverse capability.
- Synchronous CD dubbing for easy recording from CD to cassette.
- Jog dial electronic volume control for precise audio level adjustment.
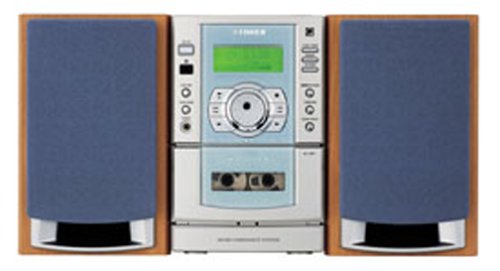
Figure 1: Front view of the Sanyo Fisher DCS-DA350 Executive Microsystem. The central unit features a display, CD compartment, and cassette deck, flanked by two detachable speakers with blue grilles.
2. Setup
2.1 Unpacking
Carefully remove all components from the packaging. Ensure all parts are present: main unit, two speakers, power cord, and remote control (if included). Retain packaging for potential future transport or service.
2.2 Speaker Connection
Connect the speaker wires from each speaker to the corresponding speaker terminals on the rear of the main unit. Ensure correct polarity (positive to positive, negative to negative) for optimal sound reproduction.
2.3 Power Connection
Plug the power cord into the AC inlet on the rear of the main unit, then plug the other end into a standard AC wall outlet (120V AC, 60Hz). The unit is now ready for operation.
2.4 Battery Installation (Remote Control)
If your unit includes a remote control, open the battery compartment on the back of the remote. Insert two AA batteries, ensuring correct polarity (+ and -). Close the compartment securely.
3. Operating Instructions
3.1 Basic Operation
- Power On/Off: Press the POWER button on the front panel or remote control to turn the unit on or off.
- Function Selection: Press the FUNCTION button to cycle through available modes: CD, TAPE, TUNER (if applicable), AUX (if applicable).
- Volume Control: Rotate the JOG DIAL on the front panel or use the VOLUME +/- buttons on the remote to adjust the sound level.
3.2 CD Player Operation
- Press the FUNCTION button until "CD" is selected.
- Open the top-loading CD compartment cover.
- Place a CD with the label side facing up onto the spindle.
- Close the CD compartment cover. The display will show the total number of tracks.
- Press the PLAY/PAUSE (►/−) button to begin playback.
- Use the SKIP (►►| / |◄◄) buttons to skip tracks.
- Press the STOP (■) button to stop playback.
Program Play: While in stop mode, press the PROGRAM button to select tracks in a desired order. Refer to the display for programming steps.
Repeat/Random Play: Press the REPEAT or RANDOM button to activate these playback modes.
3.3 Cassette Deck Operation
- Press the FUNCTION button until "TAPE" is selected.
- Press the OPEN/EJECT button to open the cassette compartment.
- Insert a cassette tape with the open edge facing upwards.
- Close the cassette compartment.
- Press the PLAY (►) button to begin playback.
- Use the FAST FORWARD (►►) or REWIND (◄◄) buttons to quickly advance or rewind the tape.
- Press the STOP (■) button to stop playback.
Auto Reverse: The cassette deck features auto reverse, allowing continuous playback of both sides of a tape without manual flipping.
Synchronous CD Dubbing: To record from a CD to a cassette, ensure a blank tape is inserted. Select the CD function, then press the CD SYNC DUBBING button (or similar, refer to unit controls) while the CD is playing. The unit will automatically start recording.
4. Maintenance
4.1 Cleaning the Unit
Wipe the exterior of the unit with a soft, dry cloth. For stubborn stains, use a cloth lightly dampened with a mild detergent solution, then wipe dry. Do not use abrasive cleaners, waxes, or solvents as they can damage the finish.
4.2 CD and Cassette Care
- Handle CDs by their edges to avoid fingerprints. Clean CDs with a soft, lint-free cloth, wiping from the center outwards.
- Store cassette tapes away from direct sunlight, heat, and magnetic fields. Periodically clean the cassette deck's heads and pinch rollers with a specialized cleaning kit for optimal performance.
5. Troubleshooting
Before contacting service, please check the following common issues and solutions:
| Problem | Possible Cause | Solution |
|---|---|---|
| No power | Power cord not securely connected. | Ensure the power cord is firmly plugged into the unit and the wall outlet. |
| No sound | Volume is too low or muted. Speakers not connected correctly. | Increase volume. Check speaker connections and polarity. |
| CD not playing | CD inserted incorrectly or dirty/scratched. | Reinsert CD correctly. Clean CD. Try another CD. |
| Cassette not playing/recording | Tape inserted incorrectly. Tape heads are dirty. | Reinsert tape correctly. Clean tape heads and pinch rollers. |
| Remote control not working | Batteries are depleted or inserted incorrectly. Obstruction between remote and unit. | Replace batteries. Ensure correct polarity. Remove obstructions. Point remote directly at the unit's sensor. |
6. Specifications
| Feature | Detail |
|---|---|
| Brand | Sanyo |
| Model Number | DCS-DA350 |
| Product Dimensions (LxWxH) | 32 x 21.6 x 24.9 cm (12.6 x 8.5 x 9.8 inches) |
| Item Weight | 8.66 kg (19.1 lbs) |
| CD Player | Top-loading, 24-track programmability, repeat/random play, 1-bit D/A Converter |
| Cassette Deck | Full logic, auto reverse, synchronous CD dubbing |
| Volume Control | Jog dial electronic control |
| Batteries (for remote) | 2 AA batteries (included) |
7. Warranty and Support
For detailed warranty information and customer support, please refer to the warranty card included with your product or visit the official Sanyo website. Keep your purchase receipt as proof of purchase for warranty claims.


