ZENDURE D0 Smart Meter User Manual

Please scan the QR code to visit the Zendure Help Center or claim the product warranty.

https://zendure.com/pages/zendure-global-warranty
Scan the QR code to access the complete user manual.

https://zendure.com/pages/zendure-download-center
![]() EU Importer: Zendure DE GmbH
EU Importer: Zendure DE GmbH
Address: Rheinallee 1,40549 Düsseldorf
E-mail: support@zendure.com
Phone: 0049-800-627-3067
Zendure USA Inc.
ZENDURE TECHNOLOGY CO., LIMITED
Hours: Mon – Fri 9:00 – 17:00 Pacific
Phone: 001-800-991-6148 (US)
0049-800-627-3067 (DE)
Support / Contact:
https://zendure.de/pages/contact
https://eu.zendure.com/pages/contact-us
https://zendure.com/pages/contact
Website:
https://zendure.de
https://eu.zendure.com
https://zendure.com
Manufacturer: Zendure Technology Co.,Limited
Address: Office 92, 15th Floor, Lee Garden Two,
28 Yun Ping Road, Causeway Bay, Hong Kong
© 2025 Zendure USA Inc.All Rights Reserved.
Printed on recycled materials. Made in China
![]()
Disclaimer
Read all safety guidelines, warnings and other product information in this manual carefully, and read any labels or stickers attached to the product before using. Users take full responsibility for the safe usage and operation of this product. Familiarize yourself with relevant regulations in your area. You are solely responsible for being aware of all relevant regulations and using Zendure products in a way that is compliant. Keep this manual for future reference.
Safety Instructions
Usage
- Before accessing the meter cabinet, carefully inspect the meter and surrounding area for any hazards, such as loose cables, exposed copper, or other objects that could cause electrical shock. If you identify any of these risks, halt the installation of our product immediately and contact a licensed electrician.
- Please check the product for any damage before using. If any issues are found, stop using the product and contact our customer service.
- Do not disassemble the product by yourself. If the product is not functioning properly, please contact our customer service.
- The device is NOT waterproof. If the product accidentally falls into water during use, it should not be used again.
- The device should be kept out of reach for children and persons with limited perception.
EC DECLARATION OF CONFORMITY
ZENDURE TECHNOLOGY CO., LIMITED declares that the device complies with directive 2014/53/EU (RED), 2011/65/EU(RoHS), 2015/863/EU(RoHS). The full text of the Declaration of Conformity is available at the following web address: https://zendure.de/pages/download-center
![]() Declaration of conformity
Declaration of conformity
The EU Declaration of Conformity can be requested at this address: https://zendure.de/pages/download-center
![]() Disposal and Recycling
Disposal and Recycling
Disposal of packaging: dispose of the packaging separately by type of material.
![]() Disposal of old equipment (applies in the European Union and other European countries with separate collection (waste collection) Old equipment must not be disposed of in household waste. Every consumer is legally obligated to dispose of old equipment that can no longer be used separately from household waste, for example at a collection point for recyclables. To ensure proper recycling and avoid negative impact on the environment, electronic devices must be taken to an appropriate collection site. For this reason, electronic devices are marked with the symbol shown to the left.
Disposal of old equipment (applies in the European Union and other European countries with separate collection (waste collection) Old equipment must not be disposed of in household waste. Every consumer is legally obligated to dispose of old equipment that can no longer be used separately from household waste, for example at a collection point for recyclables. To ensure proper recycling and avoid negative impact on the environment, electronic devices must be taken to an appropriate collection site. For this reason, electronic devices are marked with the symbol shown to the left.
What’s in the Box

Product Overview

- Optical port
- USB-C Port
- Indicator
- AA battery compartment
- Indicator of Bridge
- Button
- Bridge Plug
Reset/Restart

LED Display

Installation
- Obtaining the PIN Code of the Electricity Meter
(1) Check the display screen of the electricity meter. If the real-time power in watts is displayed on the second line, it means the interface is open.
(2) If this data is not displayed on the screen, you need to obtain a 4-digit PIN code from your electricity meter operator via email or phone (you can find their contact information on your old bill) to activate the optical interface of the electricity meter so that it can transmit real-time active power data. - Entering the PIN Code into the Meter
- Confirm the Input Method : Check the meter’s surface to identify the PIN entry method (button/optical interface).
● Meter with a button: Briefly press the button (<2s) to enter the PIN.
● Meter without a button: Use your phone’s flashlight to shine short light pulses (<2s) on the optical interface.

- Enter PIN input mode: Briefly press the button or send short light pulses (<2s) to access the PIN entry interface.
- Enter the PIN code:
● The meter will indicate the current input position by displaying “0” or flashing.
● Each digit must be entered by sending the corresponding number of light pulses or button presses. For example, to enter “3,” send 3 short light pulses or press the button 3 times.
● After entering one digit, wait briefly until the next digit position activates. Then repeat the process for the remaining digits.

- Confirm the Input Method : Check the meter’s surface to identify the PIN entry method (button/optical interface).
- Activate the Menu
Once the PIN is successfully entered, the meter’s display menu will be activated. Follow these steps to configure the settings:- Enable the Info Option
● Use short button presses or brief light pulses (<2s) to navigate the menu until you locate the “Info OFF” option (typically in the bottom-left corner).
● Switch it to “Info ON” by holding the button or using a prolonged light pulse (>3s).

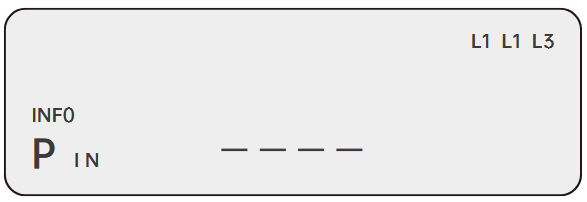
- Disable PIN Lock
● Find the “PIN ON” option and similarly use a long press or sustained light pulse (>3s) to set it to “PIN OFF”.

- Success Verification:
● After completing the setup, the system will return to the main screen. Now, in addition to the meter reading, the second line will display real- time power consumption (in watts).

- Enable the Info Option
- Prepare the Reader
- Open the Reader’s top cover and locate the two included AA batteries.
- Remove the protective film from the batteries.
Note: If your meter has a nearby power outlet, we recommend using USB-C to power the Reader to avoid future battery replacements.

- Install the D0 Reader
- Align the Optical Interface
● Position the D0 Reader’s optical interface directly onto the meter’s optical interface.
● Note: Improper alignment may prevent data reading. If issues occur, try rotating the optical interface counterclockwise, wait 30 seconds, then recheck the data in the app. - Secure the Reader
● Peel off the 3M adhesive backing on the D0 Reader.
● Firmly attach the Reader to the side or top of the meter using the adhesive.

- Align the Optical Interface
- Power On the Bridge
- Plug the Bridge into a power socket.
- The LED indicator will flash rapidly, confirming it’s in pairing mode.
Note: For optimal performance, place the Bridge between the P1 Reader and your wireless router to ensure strong signal reception and reliable data forwarding.
Zendure App Setup
- To download the Zendure app, scan the QR code or search “Zendure” in the Apple App Store® or Google Play Store.
- Open the Zendure app. Log In or sign up.
- Follow the in-app instructions to add your device.
- Please update the firmware to the latest version in the settings before using.

https://app.zendure.com/download/
Technical Specifications

Documents / Resources
 |
ZENDURE D0 Smart Meter [pdf] User Manual D0 Smart Meter, Smart Meter, Meter |