DusunIoT DSGW-290 IoT Edge Computer Gateway

ọja Alaye
| Olupese | Hangzhou Roombanker Technology Co., Ltd. | ||
|---|---|---|---|
| Orukọ awoṣe | DSGW-290 | ||
| Àtúnyẹwò History | |||
| Ọjọ Ìṣí | Apakan. | Apejuwe imudojuiwọn | By |
| 1.0 | 2022-08-06 | Titun ti ikede | |
| 1.1 | 2023-02-06 | Fi asopọ tẹlentẹle kun | |
| Awọn ifọwọsi | |||
| Ajo | Oruko | Akọle | Ọjọ |
| Hangzhou Roombanker Technology Co., Ltd. | Ile-iṣẹ DUSUN kan |
Awọn ilana Lilo ọja
To use the IoT Edge Computer Gateway (Model Name: DSGW-290), please follow the instructions below:
- Ensure that the gateway is connected to a power source.
- Connect the gateway to your local network using either the Wi-Fi or SUB-G interface.
- If using Wi-Fi, refer to section 8.6 for further instructions.
- If using SUB-G, refer to section 8.7 for further instructions.
- If LTE connectivity is required, refer to section 8.8 for further instructions.
- For hardware interface development, refer to section 9 for information on HDMI, headphone, SATA, and beeper interfaces.
- To perform an image upgrade, follow the steps in section 10.1 using the provided Upgrade Tool.
For more detailed information and specifications, please refer to the user manual provided by Hangzhou Roombanker Technology Co., Ltd.
Orukọ ọja: IoT eti Kọmputa Gateway
Orukọ awoṣe: DSGW-290
Àtúnyẹwò History
| Sipesifikesonu |
Apakan. |
Apejuwe imudojuiwọn |
By |
|
| Rev | Ọjọ | |||
| 1.0 | 2022-08-06 | Titun ti ikede | ||
| 1.1 | 2023-02-06 | Fi asopọ tẹlentẹle kun | ||
Awọn ifọwọsi
| Ajo | Oruko | Akọle | Ọjọ |
Ọrọ Iṣaaju
- Itọsọna Ibẹrẹ Yiyara ṣe alaye awọn ipilẹ: bi o ṣe le sopọ ati ṣeto ibi-afẹde rẹ lori nẹtiwọọki; Bii o ṣe le fi SDK sori ẹrọ; ati bi o ṣe le kọ awọn aworan famuwia.
- Ohun elo Olùgbéejáde Sọfitiwia Linux (SDK) jẹ ohun elo ifibọ ati suite sọfitiwia ti o fun laaye awọn olupilẹṣẹ Linux lati ṣẹda awọn ohun elo lori ẹnu-ọna Dusun's DSGW-290.
- Base on the 4.19.232 Linux kernel, and leveraging existing open source software, the SDK simplifies the process of adding custom applications. Device drivers, GNU toolchain, Pre-defined configuration profiles, ati sample ohun elo ti wa ni gbogbo ninu.
Gateway Alaye
Alaye ipilẹ
- SOC: RK3568
- Quad-mojuto ARM kotesi-A53
- Mali-450MP2 GPU
- Power Supply: DC-12V
- LTE module: EG95 (LET CAT-4)
- Wi-Fi module: 6221A (Wi-Fi chip: RTL8821CS)
- Zigbee: EFR32MG1B232F256GM32
- Z-wave: ZGM130S037HGN
- Bluetooth: EFR32BG21A020F768IM32
- Lora:SX1302
- SUB-G:EFR32FG23A020F256IM32-C
- eMMC: 64GB
- SDRAM: 8BG
Ni wiwo
Eto afojusun
Abala yii ṣapejuwe bi o ṣe le sopọ ẹnu-ọna sinu kọnputa agbalejo rẹ ati nẹtiwọọki.
Nsopọ ẹnu-ọna kan - Agbara
- Rii daju pe ohun ti nmu badọgba agbara jẹ 12V/3A.
- Yan ohun ti nmu badọgba plug agbara ti o yẹ fun ipo agbegbe rẹ. Fi sii sinu Iho lori awọn Universal Power Ipese; lẹhinna pulọọgi ipese agbara sinu iṣan.
- So plug o wu ti ipese agbara si ẹnu-ọna
Connecting a gateway – Network interface
- Connect one end of the network cable to the network port on the laptop or desktop
- Connect the other end of network cable to the network port on the gateway.
- SSH login gateway ip address,username is root passwd is root.

Ṣe akopọ Ayika lati Kọ
Please use ubuntu 18.04 .iso image to setup your build environment. You can use a virtual machine or a physical PC to install ubuntu 18.04
Ẹrọ foju
A ṣe iṣeduro pe awọn olumulo alakobere lo awọn ẹrọ foju, fi Ubuntu 18.04 sori ẹrọ foju, ki o fi aaye disk to (o kere ju 100G) fun ẹrọ foju.
Ubuntu PC Compile the Environment to Build
Lilo awọn olumulo akojọpọ ẹrọ ti ara le lo PC ubuntu kan.
SDK Akomora ati igbaradi
Ṣe igbasilẹ koodu orisun lati Dusun FTP
The source package name will be rk356x_linux-*.tar.gz, get it from Dusun FTP.
Ṣayẹwo Package funmorawon koodu
Igbesẹ ti o tẹle le ṣee ṣe nikan lẹhin ti o ṣẹda iye MD5 ti package funmorawon orisun ati ifiwera iye MD5 ti ọrọ MD5 .txt lati jẹrisi pe iye MD5 jẹ kanna, ati pe ti iye MD5 ko ba jẹ kanna, agbara naa idii koodu ti bajẹ, jọwọ ṣe igbasilẹ lẹẹkansii.![]()
Package Funmorawon Orisun ti wa ni Unzipped
Daakọ koodu orisun si itọsọna ti o baamu ki o si ṣii idii idii koodu orisun naa.

Akopọ koodu
Bibẹrẹ, Akopọ agbaye
Mura Gbongbo naa File ipilẹ eto
Abala yii wa fun kikọ ubuntu tabi debian file eto. Ti o ba fẹ kọ buildroot file eto, foo yi apakan.
Ṣe akopọ Ubuntu
Gba awọn root file system compression package ubuntu.tar.gz
The Root file system compresses the package directory:
Unzip the compression package
Da root file eto si awọn pàtó kan ona
Change the build config

Ṣe akopọ Debian
Gba awọn root file package funmorawon eto debian.tar.gz Unzip awọn funmorawon package![]()
Da root file eto si awọn pàtó kan ona
Change the bulidconfig

Bẹrẹ Iṣakojọpọ
Kọ kan pipe liana ti famuwia files: rockdev/pack/AIO- 3568J_Rk356x*.img and other separate images, AIO-3568J_Rk356x*.img includes all firmware for full upgrade.
- $ ./build.sh
Ikọle naa yoo gba akoko pipẹ, jọwọ duro ṣinṣin.
After AIO-3568J_Rk356x*.img is built, burn it to the board according to chapter 7.
Ṣiṣe Aworan lori ọkọ
Connect the RK3568 board serial port to the PC via a USB to UART Bridge.
Lo Putty tabi sọfitiwia Terminal miiran bi ohun elo console rẹ,
Awọn eto console ni tẹlentẹle:
- 115200/8N1
- Ẹdun: 115200
- Data Bits: 8
- Parity Bit: Rara
- Duro Duro: 1
Fi agbara soke igbimọ, o le wo akọọlẹ bata lori console:
 Ko si ọrọigbaniwọle aiyipada fun wiwọle eto.
Compiled Kọọkan Image Apa lọtọ
Awọn Kọ eto ati awọn aworan be
- The AIO-3568J_Rk356x*.img is composed of several parts. Main parts are uboot.img, boot.img, recovery.img, rootfs.img. uboot.img contains bootloader uboot boot.img contains the device tree .dtb image, Linux kernel image recovery.img:
- The system can boot up to recovery mode, recovery.img is the rootfs used in recovery mode. rootfs.img: The normal rootfs image. In normal mode, system boot and mount this rootfs image.
- O le nilo lati kọ awọn aworan lọtọ, paapaa nigbati o ba dojukọ module ẹyọkan (fun apẹẹrẹ uboot tabi awakọ kernel) idagbasoke. Lẹhinna o le kọ apakan ti aworan nikan ki o ṣe imudojuiwọn ipin yẹn ni filasi.
Kọ Uboot nikan
- $ ./build.sh uboot
Kọ Linux Kernel Nikan
- $ ./build.sh ekuro
Kọ Ìgbàpadà File Eto Nikan
- $ ./build.sh imularada
Kọ File Eto Nikan
- $ ./build.sh rootfs
Apoti Aworan Ik
- $ ./build.sh updateimg
Yi aṣẹ ṣiṣe rockdev / * .img sit famuwia apoti duro ninu liana update.img
Wireless development
(Zigbee, Z-Wave, BLE, LoRaWAN, WIFI,Thread,SUB-G,LTE)
Jọwọ kọ eto debian lati ṣe awọn igbesẹ wọnyi. Awọn koodu yoo wa ni compiled lori awọn ọkọ, ko lori ogun.
Zigbee
Zigbee interface is /dev/ttyS3.
Exec command: AmberGwZ3 -n1 -p /dev/ttyS3 -b115200 -d
Z-Igbi
Z-Wave interface is /dev/ttyS4 .
Exec command: zwdevd -b115200 -d/dev/ttyS4
Z-igbi ekun
If for default Dusun built, Z-Wave frequency can be configured in vi /etc/config/dusun/zwdev/region
Default is 0x00: EU
- 0x01 – US
- 0x05 – India
- 0x20 – Japan
- 0x02 – ANZ
- 0x06 – Israeli
- 0x21 – Koria
- 0x03 – HK
- 0x07 – Russia
- 0x04 – Malaysia
- 0x08 – China
BLE
BLE interface is /dev/ttyS7.
Exec command: bul -d /dev/ttyS7 -b115200

LoRaWAN
Yan wiwo to tọ fun LoRaWAN, fun example / dev/spidev1.0. Iṣeto ni file for it is in /root/sx1302_hal/packet_forwarder/global_conf.json.
Opo
Akiyesi:
- Jọwọ kọ eto debian lati ṣe awọn igbesẹ wọnyi. Awọn koodu yoo wa ni compiled lori awọn ọkọ, ko lori ogun.
- The thread here is based on the OpenThread .
What you need to prepare
If you want to run with thread-network correctly, the following steps should be care:
- a thread module on the board which has been flashed the OT-RCP firmware;
- build OTBR and its operating environment; 8.5.2 Build OT-RCP
The OT-RCP is a application running on the thread module, which may contain bootloader.
How to build OT-RCP based on the module brand and model you choose, please refer to their documents.
Burning the OT-RCP and ensure that it can run normally.
Build OTBR
Install dependence:
Install mDNSResponder:
- #wget -4 –no-check-certificate https://opensource.apple.com/tarballs/mDNSResponder/mDNSResponder-1310.80.1.tar.gz#tarxvfmDNSResponder-1310.80.1.tar.gz-C/tmp
- # cd /tmp/mDNSResponder-1310.80.1/Clients
- # sed -i ‘/#include <ctype.h>/a #include <stdarg.h>’ dns-sd.c
- # sed -i ‘/#include <ctype.h>/a #include <sys/param.h>’ dns-sd.c
- # cd /tmp/mDNSResponder-1310.80.1/mDNSPosix
- # make os=linux
- #sudo make install os=linux
- #cp mdnsd.sh /etc/init.d/mdns
- #chmod ugo+x /etc/init.d/mdns
- #ln -s -f /etc/init.d/mdns /etc/rc2.d/S52mdns
- #ln -s -f /etc/init.d/mdns /etc/rc3.d/S52mdns
- #ln -s -f /etc/init.d/mdns /etc/rc4.d/S52mdns
- #ln -s -f /etc/init.d/mdns /etc/rc5.d/S52mdns
- #ln -s -f /etc/init.d/mdns /etc/rc0.d/K16mdns
- #ln -s -f /etc/init.d/mdns /etc/rc6.d/K16mdns
- #cp build/prod/mdnsd /usr/sbin/mdnsd
- #cp ../Clients/build/dns-sd /usr/bin/dns-sd
Clone source code :
- #cd you_thread_path/ot-br-posix
- #git init
- #git clone https://github.com/openthread/ot-br-posix
If need support web:
- #cd you_thread_pathot-br-posix
- #WEB_GUI=1 ./script/bootstrap
Build (INFRA_IF_NAME is based on your Ethernet network on your system, it may be eth1 or other;
and if you are using wifi-network, INFRA_IF_NAME may be wlan0 or other; set WEB_GUI value to 1 if you need web, or 0):
- #INFRA_IF_NAME=eth0 WEB_GUI=1 ./script/setup
Building success:
You will find Executable program:
- otbr-agent : you_thread_path/ot-br-posix/build/otbr/src/agent/
- otbr-web(If you have enabled web): you_thread_path/ot-br-posix/build/otbr/src/web/
- ot-ctl: you_thread_path/ot-br-posix/build/otbr/third_party/openthread/repo/src/posix/
Configure otbr
The default path of configure file : /etc/default/otbr-agent
The content is like:
- OTBR_AGENT_OPTS=”-I wpan0 -B eth0 spinel+hdlc+uart:///dev/ttyACM0 trel://OTBR_INFRA_IF_NAME” OTBR_NO_AUTO_ATTACH=0
The eth0 is same to before.
The /dev/ttyACM0 is the device name of your thread module which has burned OT-RCP firmware. So you have to change to the device name of your own equipment.
Akiyesi: After modifying, reboot your gateway !!!
The otbr-agent will connect OT-RCP automatically after rebooting.
Start/Stop/Status otbr

Wọle

Debug thread-network with ot-ctl
Other command about ot-ctl, you can input help to learn.
WIFI
WIFI is used by desktop system.
SUB-G
SUB-G interface is /dev/ttyS9.
Exec command: microcom -s 115200 -p /dev/ttyS9
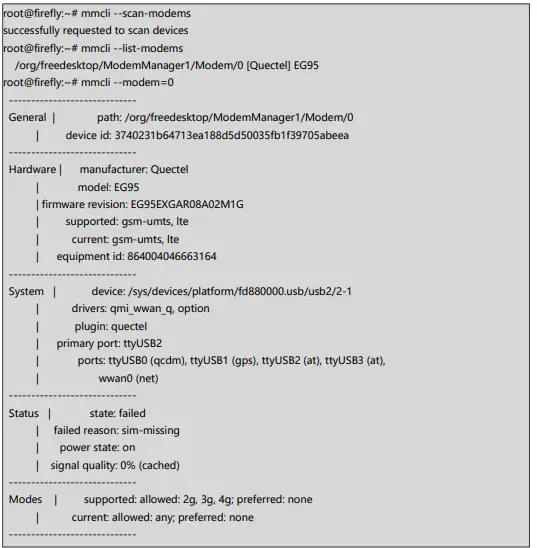
LTE
LTE used by ModemManager.
- Print general mmcli help message: mmcli –help
- ModemManager normally listen, probes and detects cellular devices automatically when operating correctly but a forced scan can be triggered with command: mmcli –scan-modems << successfully requested to scan devices
- To list detected cellular devices use command: mmcli –list-modems << /org/freedesktop/ModemManager1/Modem/0 [Sierra Wireless, Incorporated]
- Here ModemManager have detected a Sierra Wireless cellular device and it has here been given the the identifier number 0 by ModemManager.
- To acquire more device information and status use the –modem command and identifier value. mmcli –modem=0
Hardware interface development
HDMI
Access to HDMI can display the desktop system.
Agbekọri
Codec can be show by command: arecord -l
Sound can be recording and play
Sata
If you use a SSD,the following operations are required
Beeper
Beeper can be open and close.
Open beeper: echo 0 > /sys/class/leds/firefly\:beeper/brightness Close beeper: echo 1 > /sys/class/leds/firefly\:beeper/brightness
Igbesoke Aworan
Igbesoke Ọpa
Upgrade tool:AndroidTool_Release_v2.84.
Lọ si Ipo Igbesoke
- So ibudo OTG pọ si ibudo USB kọnputa ti o njo, o tun ṣiṣẹ bi ipese agbara 12V
- Press “reboot loader” when ssh login:

- system reboot the board into LOADER mode, for a complete “update.img” upgrade.

The Entire Package of Firmware “XXX*.img” Upgrade
Ṣe igbesoke Famuwia Lọtọ
Tel:86-571-86769027/8 8810480
Webojula: www.dusuniot.com
www.dusunremotes.com
Ilẹ 8, ile A, Wantong aarin, Hangzhou 310004, china
www.dusunlock.com
Awọn iwe aṣẹ / Awọn orisun
 |
DusunIoT DSGW-290 IoT Edge Computer Gateway [pdf] Itọsọna olumulo DSGW-290 IoT Edge Computer Gateway, DSGW-290, IoT Edge Computer Gateway, Edge Computer Gateway, Computer Gateway, Gateway |