cinegy Convert 22.12 Server Based Transcoding and Batch Processing Service
ọja Alaye
Awọn pato
- Product: Cinegy Convert 22.12
ọja Alaye
Cinegy Convert is a software solution designed for media conversion and processing tasks. It offers a range of features for seamless content transformation.
Awọn ilana Lilo ọja
Igbesẹ 1: Cinegy PCS Installation
- Follow the instructions provided in the user manual to install Cinegy PCS on your system.
Igbesẹ 2: Cinegy PCS Configuration
- Configure Cinegy PCS settings according to your requirements by following the guidelines in the manual.
Igbesẹ 3: Cinegy Convert Installation
- Install Cinegy Convert software on your system by running the setup file and following the installation wizard steps.
Igbesẹ 4: Cinegy PCS Connection Configuration
- Set up the connection between Cinegy PCS and Cinegy Convert by configuring the connection settings as detailed in the manual.
Igbesẹ 5: Cinegy PCS Explorer
- Explore the capabilities and resources available in Cinegy PCS as described in the manual.
FAQ
- Q: How do I create manual tasks in Cinegy Convert?
- A: To create manual tasks, follow the steps outlined in the “Manual Tasks Creation” section of the user manual.
“`
Àsọyé
Cinegy Convert is Cinegy’s server-based transcoding and batch-processing service. Designed to function like a networkbased print server, it can be used to perform repetitive import, export, and conversion tasks by “printing” material to predefined formats and destinations. Available in both standalone and Cinegy Archive integrated variants, Cinegy Convert saves time that can be applied to more important activities by automating repetitive tasks. Processing is performed on dedicated Cinegy Convert servers that act as a print queue/spooler, processing tasks in order.
Quick Bẹrẹ Itọsọna
Cinegy Convert performs the entire export and import job process in multiple formats. This gives you the power of centralized management, storage, and processing while lowering the client hardware requirements.
The Cinegy Convert system structure is based on the following components:
· Cinegy Process Coordination Service This component provides centralized storage for all resources types used in your media processing workflow and also acts as a central discovery service.
· Cinegy Convert Agent Manager This component provides actual processing powers for Cinegy Convert. It launches and manages local agents to execute tasks from the Cinegy Process Coordination Service.
· Cinegy Convert Watch Service This component is responsible for looking in configured file system directories and/or Cinegy Archive job drop targets and registering tasks inside the Cinegy Process Coordination Service for Cinegy Convert Agent Manager to pick up.
· Cinegy Convert Monitor This application allows operators to watch what the Cinegy Convert estate is working on, as well as create jobs manually.
· Cinegy Convert Profile Editor This utility provides the means for creating and adjusting target profiles that are used in Cinegy Convert for transcoding tasks processing.
· Cinegy Convert Client This application provides a user-friendly mechanism for manual convert tasks submission. It allows the user to browse storages and devices for the media to be processed, review the actual media in the preview player, check item metadata with an option to modify it prior to importing and submit the task for processing.
For a simple demo, install all components on one machine.
This quick guide takes you through the steps to get your Cinegy Convert software up and running:
· Step 1: Cinegy PCS Installation ·
Step 2: Cinegy PCS Configuration · Step 3: Cinegy Convert Installation · Step 4: Cinegy PCS Connection Configuration · Step 5: Cinegy PCS Explorer · Step 6: Cinegy Convert Agent Manager · Step 7: Manual Tasks Creation
Page 2 | Document version: a5c2704
Chapter 1. Step 1: Cinegy PCS Installation
It is required to install critical Windows updates before the application installation.
Installation of .NET Framework 4.6.1 or later is required before Cinegy PCS installation. In case online
installation takes place, the web installer will update the system components, if necessary. The offline
installer can be used if the web installer is unavailable due to a lack of Internet connection. In this case, make sure the .NET Framework 4.5 is activated as a Windows feature, then download the corresponding
offline installer package directly from the Microsoft website. After the .NET Framework 4.6.1 is installed,
the OS reboot is required. Otherwise, the installation may fail.
Please note that Cinegy Convert requires the use of an SQL Server. For basic installations and test
purposes, you can use Microsoft SQL Server Express with advanced services features that can be downloaded for free from the Microsoft website. Please follow the basic Microsoft hardware and
software requirements to install and run SQL Server.
The machine running the Cinegy PCS is the central system component used as a storage for all the task processing resources. It allows monitoring of all registered tasks and their statuses. If any Cinegy Convert components are installed on other machines, they should have access to this machine to be able to report on the performed tasks.
To install the Cinegy PCS on your machine, follow these steps:
1. Run the Cinegy.Process.Coordination.Service.Setup.exe file from your installation package. The setup wizard will be launched. Press “Next”.
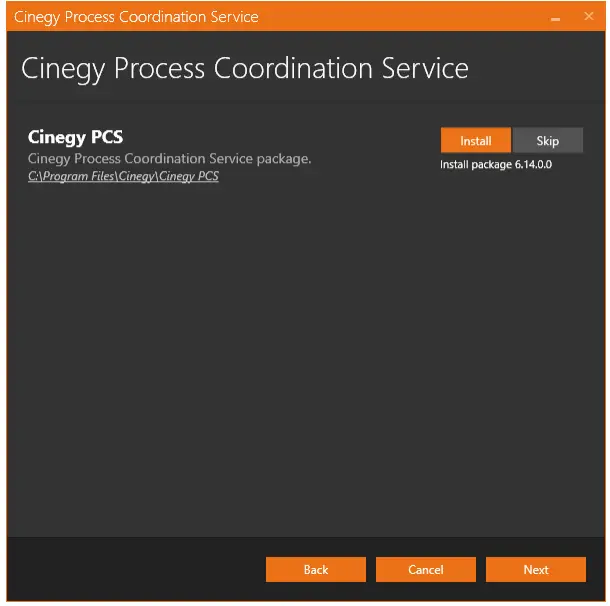
2. Read and accept the license Agreement and press “Next”. 3. All the package components are listed in the following dialog:
Page 3 | Document version: a5c2704
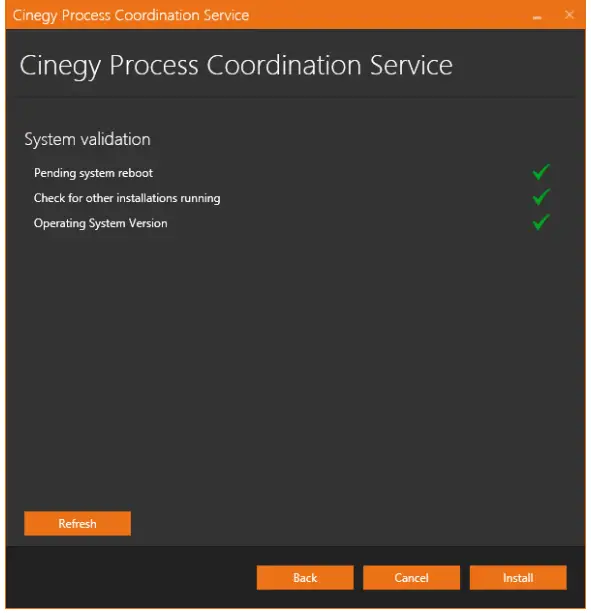
The default installation directory, which is indicated underneath the package component name, can be changed by clicking the path and choosing the desired folder. Press “Next” to proceed with the installation. 4. Check whether your system is ready for installation in the following dialog:
Page 4 | Document version: a5c2704
The green tick indicates that the system resources are ready and no other processes may prevent installation. If any validation reveals that installation cannot be started, the respective field becomes highlighted and the red cross is displayed with detailed information on the reason. Once the reason for prevention is excluded, press the “Refresh” button for the system to recheck installation availability. If it is successful, you can proceed with the installation. 5. Press the “Install” button to begin the installation. The progress bar indicates the progress of the installation process. The following dialog informs that the installation is completed successfully:
Page 5 | Document version: a5c2704
With the “Launch service configurator” option selected, the Cinegy Process Coordination Service configuration tool will be launched automatically immediately after you quit the installation wizard. Press “Close” to exit the wizard.
Page 6 | Document version: a5c2704
Chapter 2. Step 2: Cinegy PCS Configuration
With the “Launch service configurator” option selected, the Cinegy PCS configurator is launched automatically immediately after the installation is complete.
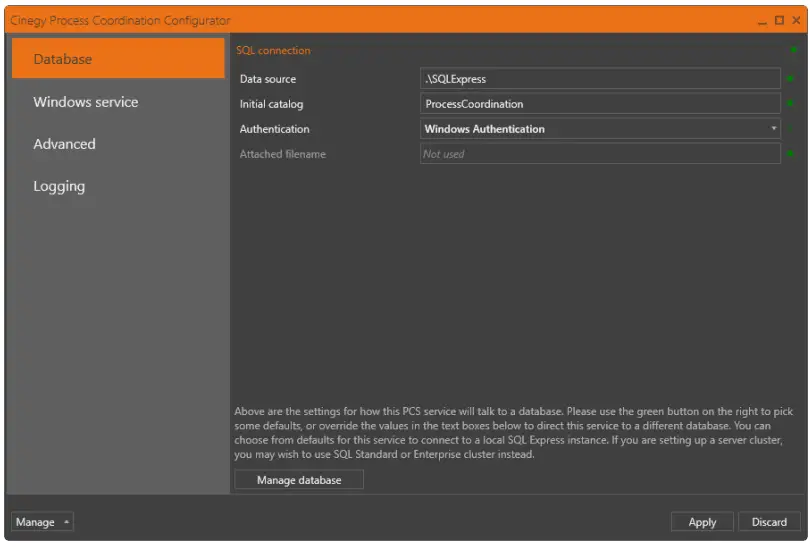
In the “Database” tab, the SQL connection settings should be set.
The Cinegy PCS uses its own database for storing the processing-related data: configuration settings, tasks queues, tasks metadata, etc. This database is independent and has no relation to Cinegy Archive.
You can also change the values to direct this service to a different database. If you are setting up a server cluster, you can use SQL Standard or Enterprise cluster instead. Here configure the following parameters:
· Data source specify the existing SQL Server instance name using the keyboard. For example, for Microsoft SQL Server Express you can leave the default .SQLExpress value; otherwise, define the localhost or the instance name.
· Initial catalog define the database name. · Authentication use the drop-down list to select whether the Windows or SQL Server authentication will be used for
access to the created database. With the “SQL Server Authentication” option selected, the required field becomes highlighted with a red frame; press the
button to expand the “Authentication” settings. Type in the username and password in the corresponding fields.
Page 7 | Document version: a5c2704
Having specified the database parameters, press the “Manage database” button. The following window will appear performing the database validation steps:
During the first run, the database validation will detect the database does not exist yet.
Page 8 | Document version: a5c2704
Press the “Create a database” button. Press “Yes” in the confirmation dialog to continue with the database creation. In the next window, the database creation stages are listed. Once the database is created, press “OK” to exit the window. Having specified the database settings, press the “Apply” button to save them. Go to the “Windows service” tab to proceed with configuration. Press the “Install” button to install the Cinegy PCS as a Windows service.
Page 9 | Document version: a5c2704
Once the service is installed, it should be started manually by pressing the “Start” button. The status indicator will turn green meaning that the service is running.
In the settings section, define the login parameters and service start mode.
It is recommended to use the “Automatic (Delayed)” service start mode, which enables automatic service to start immediately after all the main system services have been started.
Page 10 | Document version: a5c2704
Chapter 3. Step 3: Cinegy Convert Installation
Cinegy Convert has a unified installer that allows installing all the components you need.
It is required to install critical Windows updates before the application installation.
Installation of .NET Framework 4.6.1 or later is required before Cinegy Convert installation. In case online
installation takes place, the web installer will update the system components, if necessary. The offline
installer can be used if the web installer is unavailable due to a lack of Internet connection. In this case, make sure the .NET Framework 4.5 is activated as a Windows feature, then download the corresponding
offline installer package directly from the Microsoft website. After the .NET Framework 4.6.1 is installed,
the OS reboot is required. Otherwise, the installation may fail.
1. To start the installation, run the Cinegy.Convert.Setup.exe file from the Cinegy Convert installation package. The setup wizard will be launched. Read the License Agreement and check the box to accept its terms and proceed to the next step:
Page 11 | Document version: a5c2704
2. Select “All-in-one”, all product components will be installed with their default settings. Press “Next” to proceed. 3. Check whether your system is ready for installation in the following dialog:
The green tick indicates that the system resources are ready and no other processes may prevent installation. If any validation reveals that installation cannot be started, the respective field becomes highlighted and the red cross is displayed with detailed information on the failure reason below. Resolve the reason that prevents the installation process and press the “Refresh” button. If validation is successful, you can proceed with installation. 4. If you prefer to perform custom installation, select “Custom” and choose the package components available for selected installation mode in the following dialog:
Page 12 | Document version: a5c2704
5. Press the “Next” button to begin the installation. The progress bar indicates the progress of the installation process. 6. The final dialog will inform you that the installation is completed successfully. Press “Close” to exit the wizard. The shortcuts of all the installed Cinegy Convert components will appear on your Windows desktop.
Page 13 | Document version: a5c2704
Chapter 4. Step 4: Cinegy PCS Connection Configuration
Cinegy Convert components require a valid established connection to the Cinegy Process Coordination service. By default, the configuration is set to connect to the Cinegy PCS installed locally on the same machine (localhost) and use the default port 8555. In case the Cinegy PCS is installed on another machine or another port should be used please change the corresponding parameter in the settings XML file.
If the Cinegy PCS and Cinegy Convert are installed on the same computer, you need to skip this step.
To launch the Cinegy PCS Explorer, go to Start > Cinegy > Process Coordination Service Explorer.
Press the button on the bottom right part of the window. Choose the “Settings” command:
The “Endpoint” parameter should be modified:
http://[machine name]:[port]/CinegyProcessCoordinationService/ICinegyProcessCoordinationService/soap
nibo:
machine name specifies the name or IP machine of the machine where the Cinegy PCS is installed;
port specifies the connection port configured in the Cinegy PCS settings.
Cinegy Convert Agent Manager should be configured in the same way.
Page 14 | Document version: a5c2704
Chapter 5. Step 5: Cinegy PCS Explorer
To perform a conversion task, a transcoding profile is required. Profiles are created via the Cinegy Convert Profile Editor application. With the Cinegy Convert installation, a set of sample profiles is added to the following location on your computer by default: C:UsersPublicPublic DocumentsCinegyConvert Profile Editor The profile package file has CRTB format Convert.DefaultProfiles.crtb. These sample profiles can be imported to your newly created database and used during the transcoding tasks creation. To do this, launch the Cinegy Process Coordination Service Explorer application and switch to the “Batch operations” tab:
Press the “Batch import” button:
Page 15 | Document version: a5c2704
In this dialog, press the button.
button, navigate to the file(s) to be used for import in the following dialog, and press the “Open”
The selected resources will be listed in the “Batch import” dialog:
Press “Next” to proceed. In the next dialog, leave the “Create Missing Descriptors” option selected and press “Next” to continue. The export validation check is performed:
Page 16 | Document version: a5c2704
Press the “Import” button to launch the operation. The following dialog informs about all the batch import operation-related processes execution:
Press “Finish” to complete and quit the dialog. The imported profiles will be added to the profiles list on the “Resources” tab of the Cinegy Process Coordination Service Explorer.
Page 17 | Document version: a5c2704
5.1. Capability Resources
It is possible to add a symbolic definition of the capability resources so that the Cinegy PCS could identify which agent of all the connected and available ones shall pick up the task and start its processing.
Go to the “Capability Resources” tab and press the resource:
button. In the appearing dialog box you can add a new capability
Enter the resource name and description according to your preferences in the corresponding fields and press “OK”. You can add as many resources to the list as required for your purposes.
Page 18 | Document version: a5c2704
Page 19 | Document version: a5c2704
Chapter 6. Step 6: Cinegy Convert Agent Manager
Cinegy Convert Agent Manager provides actual processing powers for Cinegy Convert. It launches and manages local agents to execute tasks from the Cinegy Process Coordination Service.
To enable task processing, the Cinegy Convert Agent Manager application should be configured. To start this application, use the icon on the Windows desktop or launch it from Start > Cinegy > Convert Agent Manager configurator.
Go to the “Windows service” tab of the configurator, install and start the Cinegy Convert Manager service:
Page 20 | Document version: a5c2704
As soon as a new transcoding task is added to the queue, Cinegy Convert Agent Manager starts its processing. Read the next step to find out how to manually create a transcoding task.
Page 21 | Document version: a5c2704
Chapter 7. Step 7: Manual Tasks Creation
This article describes the use of Cinegy Convert Client for manual task creation.
Cinegy Convert Client provides a user-friendly mechanism for manual conversion task submission. To start this application, use the icon on the Windows desktop or launch it from Start > Cinegy > Convert Client.
7.1. Eto soke
The first step is to set up a connection to the Cinegy PCS. Press the “Settings” button on the toolbar to launch the following configuration window:
Page 22 | Document version: a5c2704
In the “General” tab, define the following settings: · PCS host specifies the name or IP address of the machine where the Cinegy Process Coordination Service is installed; · Heartbeat frequency time interval for the Cinegy PCS to report it is running properly. · PCS services update frequency time interval for the Cinegy PCS to update information about the internal services used by clients.
Also, here you can check the “Join clips” option to enable the combining of multiple clips into a single file with common metadata during transcoding.
7.2. Selecting Media
In the “Path” field of the Location Explorer, manually enter the path to the media storage (video files or virtual clips from Panasonic P2, Canon, or XDCAM devices) or navigate to the desired folder in the tree. The media files contained in this folder will be listed in the Clip Explorer. Select a file si view it and manage its In and Out points in the media player:
Page 23 | Document version: a5c2704
Optionally, you can define the metadata for the currently selected media file or virtual clip in the Metadata panel.
By holding down the Ctrl key, you can select multiple files / virtual clips at once to include them in a single transcoding task.
7.3. Task Creation
The transcoding task properties should be managed in the processing panel:
The number of the currently selected media items is displayed in the “Source(s)” field.
Press the “Browse” button in the “Target” field to choose a transcoding target added to the database in Step 5. The parameters of the selected target profile can be managed in the “Profile Details panel”:
Page 24 | Document version: a5c2704
Press the button in the “Task resources” field to select the capability resources created in Step 5. Optionally, you can edit the task name generated automatically and define the task priority in the corresponding fields.
Once the task to be processed is configured, press the “Queue task” button to add tasks to the Cinegy PCS queue for processing.
When the task is created, it will be added to the queue of active transcoding tasks in Cinegy Convert Monitor.
Multiple tasks can be processed simultaneously and this is limited by the license available for Cinegy Convert Agent Manager.
Page 25 | Document version: a5c2704
Cinegy Convert Installation
Cinegy Convert has a unified installer that allows installing all the components you need.
It is required to install critical Windows updates before the application installation.
Installation of .NET Framework 4.6.1 or later is required before the Cinegy Convert installation. In the case
of online installation, the web installer will update the system components, if necessary. The offline installer
can be used if the web installer is unavailable due to a lack of Internet connection. In this case, make sure the .NET Framework 4.5 is activated as a Windows feature, then download the corresponding offline
installer package directly from the Microsoft website. After the .NET Framework 4.6.1 is installed, the OS
reboot is required. Otherwise, the installation may fail.
To start the installation, run the Cinegy.Convert.Setup.exe file. The setup wizard will be launched:
Read the License Agreement and check the box to accept its terms. Select the installation mode depending on the purpose of using Cinegy Convert on the given machine:
Page 26 | Document version: a5c2704
· All-in-one all product components will be installed with their default settings. · Client configuration the product components for client workstations will be installed with their default settings. · Server configuration the product components for server workstations will be installed with their default settings. · Custom this installation mode allows choosing the components to be installed, their locations, and settings, and is
recommended for advanced users. All the package components available for the selected installation mode are listed in the following dialog:
Page 27 | Document version: a5c2704
Enabled installation of the Cinegy Convert component(s) is indicated by the “Install” option selected and highlighted with green. Select the “Skip” option next to the relevant component to disable its installation. The default installation directory, which is indicated underneath the package component name, can be changed by clicking the path:
Page 28 | Document version: a5c2704
In the “Browse for folder” dialog that appears, select the required folder for your installation. You can also create a new folder by pressing the “Make New Folder” button and entering a new folder name. Once the folder is selected, press “OK”.
Press “Next” to proceed with the installation. Check whether your system is ready for installation in the following dialog:
Page 29 | Document version: a5c2704
The green tick indicates that the system resources are ready and no other processes may prevent installation. Clicking the validation entry field displays its detailed information.
While the system performs verification of any parameter, the checking progress is displayed.
If any validation reveals that installation cannot be started, the respective field becomes highlighted and the red cross is displayed with detailed information on the failure reason below.
The explanation differs depending on the reason why the installation cannot proceed.
Press the “Refresh” button for the system to recheck installation availability. Once the reason for prevention is excluded, you can proceed with the installation.
Press “Back” to change the installation settings or “Cancel” to abort and exit the setup wizard.
Page 30 | Document version: a5c2704
Press the “Next” button to begin the installation. The progress bar indicates the progress of the installation process. The following dialog informs that the installation is completed successfully:
Press “Close” to exit the wizard. The shortcuts of all the installed Cinegy Convert components will appear on your Windows desktop.
Page 31 | Document version: a5c2704
Chapter 8. Sample Profiles
With the Cinegy Convert installation, a set of sample profiles in CRTB format is added to the following location on your computer by default: C:UsersPublicPublic DocumentsCinegyConvert Profile Editor. This set of profiles can be imported into your database and used during the transcoding tasks creation. Refer to the Batch Import paragraph for a detailed description of how to import the whole pack of sample profiles. Awọn Profiles can be imported individually. Refer to the “Importing Resources” paragraph for an import procedure description.
Page 32 | Document version: a5c2704
Cinegy Convert Agent Manager
Cinegy Convert Agent Manager manages local agents to execute tasks from the Cinegy Process Coordination Service. It runs as a Windows service with settings configured by the Cinegy Convert Agent Manager configurator.
Chapter 9. User Manual
9.1. Iṣeto ni
Oluṣeto
Cinegy Convert Agent Manager manages local agents to execute tasks from the Cinegy Process Coordination Service. It runs as a Windows service with settings configured by the Cinegy Convert Agent Manager configurator.
To start the Cinegy Convert Agent Manager configurator, use the icon on the Windows desktop or launch it from Start > Cinegy > Convert Agent Manager configurator. The application will be started:
It contains the following tabs: · General · Licensing · Windows service · Logging
Gbogbogbo Eto
Use the tab to define current agent settings.
Page 34 | Document version: a5c2704
General · API Endpoint – define parameters for host endpoint and port.
By default, the configuration is set to connect to API installed locally on the same machine (localhost) and use the default port 7601.
· Enable preview enables/disables the preview ti awọn media file which is currently being processed.
· Agent hang timeout timeout for a response from the agent in the hours:minutes:seconds format. In case the agent fails to report its progress, it is forcedly stopped and marked as failed on the “Queue” tab.
· Ṣaajuview update frequency preview update rate for a task being currently processed (in the hours:minutes:seconds.frames format).
· Cleanup tasks older than defines the delay in minutes before the completed task will be removed from the internal Agent Manager database.
· Max database size defines the limit of the internal Convert Agent Manager database that can be set in the range from 256 MB to 4091 MB.
PCS
Cinegy Convert Agent Manager requires a valid established connection to the Cinegy Process Coordination Service.
· Endpoint by default, the configuration is set to connect to the Cinegy PCS installed locally on the same machine (localhost) and use the default port 8555. In case the Cinegy PCS is installed on another machine or another port should be used, the endpoint value should be modified:
http://[machine name]:[port]/CinegyProcessCoordinationService/ICinegyProcessCoordinationService/soap
Page 35 | Document version: a5c2704
nibo:
machine name specifies the name or IP address of the machine where the Cinegy PCS is installed; port specifies the connection port configured in the Cinegy PCS settings. · Heartbeat frequency time interval for the Cinegy PCS to report it is running properly. · Consume task frequency time interval for an agent to report to the Cinegy PCS it is ready to take on a new task for processing. · Services update frequency time interval for the Cinegy PCS to update information about the internal services used by clients. · Task sync frequency time interval in which the Cinegy PCS and the agent are exchanging information about tasks being processed.
Load Balancing · Balance tasks by priority with this option selected, the agent will receive a new task if it has free slots and there is enough CPU capacity available for processing. When the CPU limit defined by the “CPU Threshold” parameter is reached, the agent will receive only tasks having a priority higher than those being currently processed. The sign will appear on the bottom of the window, and the tooltip will be displayed with the mouse pointer hovered over it:
With this option disabled, no new tasks will be taken by the agent if the CPU limit is reached.
Tasks with a lower priority will be automatically suspended so that tasks with a higher priority will
consume all possible processing resources. Once tasks with a higher priority are completed, the
processing of tasks with a lower priority will automatically resume.
· CPU threshold the highest value of the CPU load in %, at which the agent can take a new task with the same priority as those being currently processed.
· Capability resources define the appropriate capability resource(s) for the current Cinegy Convert agent. Tasks tagged with such capability resource(s) will be taken for processing by this agent. This helps to balance consumption and processing based on specific agent capability resources.
The capability resources are added via Cinegy Process Coordination Explorer. Refer to this article for detailed information about the creation of capability resources.
· Free memory limit the minimum free memory in MB required for the agent to process tasks rapidly and smoothly. When free memory falls shorter than this value, the sign will appear at the bottom of the window, and the tooltip will be displayed with the mouse pointer hovered over it:
The memory load check is performed every 30 seconds, and in case the limit is exceeded, task requests will be blocked and can be resumed only if the next check records that memory is within the limit. The respective message is added to the log
Page 36 | Document version: a5c2704
file each time the limit is exceeded.
Iwe-aṣẹ
This tab lets you specify and see which licensing options Cinegy Convert Agent Manager will acquire once it’s started:
The Base license is required on each server to enable Cinegy Convert tasks processing.
· Mode – use the drop-down list to select “Generic” or “Desktop Edition” Agent Manager mode.
For Cinegy Convert Desktop Edition mode to be enabled, a separate corresponding software Desktop license is required.
· Allowed Convert licenses choose the maximum number of licenses allowed for the agent, the default value is 4. · Allow archive integration with this checkbox selected, the agent can process tasks in integration with a Cinegy
Archive database.
The recording can be initiated on condition that Cinegy Desktop is installed and running on the same machine. Once the Cinegy Desktop application is not detected or is not running on the machine, Cinegy Convert Agent Manager does not initiate any new recording and aborts an existing recording session, if any.
· Linear Acoustic UpMax – select this checkbox if you have an additional Linear Acoustic UpMax license for processing tasks with Linear Acoustic Upmixing.
Refer to the Linear Acoustic UpMax Installation and Setup article for details regarding Linear Acoustics UpMax functionality deployment.
· Linear Acoustic License Server – define the address of the available Linear Acoustic license server.
Page 37 | Document version: a5c2704
Iṣẹ Windows
To run Cinegy Agent Manager as a Windows service, go to the “Windows service” tab of the configurator and specify all the necessary parameters:
Service The service display name and description are filled in by the system. The status indication uses the following coloring:
Itọkasi awọ
Ipo iṣẹ
Service is not installed.
Service is not started.
Service start is pending.
Service is running.
Press the “Install” button in the “Installation” field.
Once the service is installed, it should be started manually by pressing the “Start” button in the “State” field.
In case of a failure to start the service, an error message with the reason for the failure and a link to the log file farahan:
Page 38 | Document version: a5c2704
Click the link to open the log and view the details of the failure. The service can be uninstalled, stopped, or restarted by pressing the corresponding buttons:
For your convenience, the information is duplicated in the configurator tab; it can also be monitored as a standard Windows service:
Settings The following Windows service settings are available:
· Log on as use the drop-down list to define the service logon mode:
This option should be selected depending on the user’s permissions assigned locally by the system
administrator. Configurator requests elevated permissions where necessary (to reserve endpoint, for
example). Otherwise, it should be run under a normal user.
With the “User” option selected, the required field becomes highlighted with a red frame; press the button to expand the “Log on as” settings and enter the user name and password in the corresponding fields:
Page 39 | Document version: a5c2704
Please mind that the Windows service settings cannot be saved until all required fields are filled in; the red indicator shows a tooltip explaining the reason why settings cannot be applied.
· Start mode use the drop-down list to define service start mode.
It is recommended to use “Automatic (Delayed)” service start mode, which enables automatic service to start immediately after all the main system services have been started.
wíwọlé
The Cinegy Convert Agent Manager logging parameters are defined on the “Logging” tab of the configurator:
The following logging parameters are displayed:
Page 40 | Document version: a5c2704
File wíwọlé
Defines the settings for a log report saved to a text file.
· Logging level use the drop-down list to define one of the following available log levels, ordered from highest to least severity: Off disable file logging. Fatal logs for failures like data loss scenarios that require immediate attention and can lead the application to abort. Error logs for errors, non-application-wide failures, exceptions, and failures in the current activity or operation, that might still allow the application to continue running. Warn logs for unexpected events in the application flow like errors, exceptions, or conditions that do not cause an application crash. It is the default log level. Info logs for general application flow and progress tracking with long-term value. Debug logs for short-term and fine-grained information used for development and debugging. Trace logs for information used for debugging that may contain sensitive application data.
· Log folder define the destination folder for storing log files. By default, logs are written to the C:ProgramDataCinegyCinegy Convert22.12.xxx.xxxxLogs. You can change the directory by entering a new path via the keyboard or using the button to select the required folder:
Telemetry File wíwọlé
Defines the settings for a log report saved to a text file by using the telemetry cluster.
The Administrative user rights are required to set up the Telemetry logging functionality.
To configure the telemetry file logging, define the following parameters: · Logging level use the drop-down list to define one of the following available log levels, ordered from highest to least severity: Off, Fatal, Error, Warn, Info, Debug, and Trace. · Log folder define the destination folder for storing log files. By default, logs are written to the folder where the Cinegy
Page 41 | Document version: a5c2704
Process Coordination Service is installed. You can change the directory by entering a new path via the keyboard or using the button to select the required folder. Telemetry The telemetry notifications are logged into the Grafana portal deployed inside the Cinegy Telemetry cluster, which allows securing customer data by organization ID and provides direct access to the exact data stored.
To access the telemetry portal, specify the following parameters: · Logging level use the drop-down list to define one of the following available log levels, ordered from highest to least severity: Off, Fatal, Error, Warn, Info, Debug, and Trace. · Organization ID specify the Organization ID, unique for each customer. · Tags set the system tags to filter telemetry results. · Url enter the link to access the telemetry portal. The default value is https://telemetry.cinegy.com · Credentials use the drop-down list to define the credentials to access the telemetry portal: None no credentials are required. Basic authentication select this option and enter the username and the password to access the telemetry portal:
Having specified all the required parameters, press the “Apply” button to save changes.
Page 42 | Document version: a5c2704
Cinegy Convert Monitor
Cinegy Convert Monitor is the primary UI to allow operators to watch what the Cinegy Convert estate is working on, as well as create jobs manually.
Page 43 | Document version: a5c2704
Chapter 10. User Manual
10.1. Ni wiwo
Cinegy Convert Monitor provides remote control of transcoding tasks and agents processing them. Cinegy Convert Monitor is an application that allows an operator to monitor and control transcoding tasks. It requires no computation resources to be available, so it can be started virtually on any machine in the network. The main functions of Cinegy Convert Monitor are:
· system status monitoring; · tasks status monitoring; · manual task submission; · tasks management.
To start Cinegy Convert Monitor use the icon on the Windows desktop or launch it from Start > Cinegy > Convert Monitor. Cinegy Convert Monitor has the following interface:
The window contains three tabs: · Queue · Agent Managers · History
The green indicator in the bottom part of the window shows the successful connection of Cinegy Convert Monitor to the Cinegy PCS.
The status of the connection to the Cinegy PCS updates every 30 seconds so that in case of a connection loss you will know immediately. In case of failure, the indicator becomes red:
Page 44 | Document version: a5c2704
Clicking the See log link will open the log file gbigba o lati view the details about the connection failure.
Refer to the Cinegy Process Coordination Service Manual for details on running and configuring the Cinegy PCS.
Wọle
Cinegy Convert Monitor creates a log file where all activities are recorded. To open the log file, press the the “Open log file” command:
bọtini ati ki o lo
10.2. Cinegy PCS Connection Configuration
Cinegy Convert Monitor requires a valid established connection to the Cinegy Process Coordination Service. By default, the configuration is set to connect to the Cinegy PCS installed locally on the same machine (localhost) and use the default port 8555. In case the Cinegy PCS is installed on another machine or another port should be used, the corresponding parameter should be changed in the settings dialog. Press the button on the bottom right part of the window and choose the “Settings” command:
The following window will be opened:
Page 45 | Document version: a5c2704
Set up the following parameters:
· Endpoint parameter should be modified in the following format:
http://[machine name]:[port]/CinegyProcessCoordinationService/ICinegyProcessCoordinationService/soap
nibo:
machine name specifies the name or IP address of the machine where the Cinegy PCS is installed; port specifies the connection port configured in the Cinegy PCS settings. · Clients update frequency time interval for the Cinegy PCS to update information about the clients. · Heartbeat frequency time interval for the Cinegy PCS to report it is running properly. · Services update frequency time interval for the Cinegy PCS to update information about the internal services used by clients.
10.3. Processing Tasks
Task Submission
Cinegy Convert supports automatic tasks submission, when tasks are taken for processing by the Cinegy Watch Service via previously configured watch folders, as well as manual tasks submission when tasks are individually configured and submitted directly via Cinegy Convert Monitor or Cinegy Convert Client.
Laifọwọyi
The Cinegy Convert Watch Service is used to perform repetitive tasks automation. Several watch folders can be configured to monitor Windows OS network shares and Cinegy Archive job drop targets. These watch folders automatically submit transcoding tasks according to the pre-defined settings when new media are detected.
Please refer to the Cinegy Convert Watch Service Manual for details.
Page 46 | Document version: a5c2704
Manual To add a transcoding task manually, press the “Add task” button on the “Queue” tab:
The following “Task designer” window appears:
Define the required Cinegy Convert task properties that are described in detail below.
Orukọ Iṣẹ-ṣiṣe
In the “Task name” field, specify the name for a task to be displayed in the Cinegy Convert Monitor interface.
Page 47 | Document version: a5c2704
Task Priority
Set the task priority (high, medium, low, or lowest). Tasks with higher priority will be taken first by Cinegy Convert Agent.
Capability Resources
Press the button to open the window for capability resources selection:
The capability resources should be previously created via Cinegy Process Coordination Explorer. Refer to this article for detailed information about the creation of capability resources.
Here, select the name of the resource that is needed for the conversion job being created and press “OK”. It is possible to select multiple capability resources.
Alternatively, you can start typing in the name of the capability resource directly in the “Capability resources” field; while you are typing, the auto-complete feature provides suggestions starting from the letters you have already typed in:
Cinegy Convert Agent Manager will take the task with the defined capability resource(s).
Awọn orisun
Define the source materials to be converted by clicking the “+” button within the source panel:
Page 48 | Document version: a5c2704
You can also use the Ctrl+S keyboard shortcut for this action.
The “Source edit form” dialog appears:
Page 49 | Document version: a5c2704
A source can be loaded by pressing in the “File source” field over the preview monitor. Alternatively, press the “Open” button in the controls panel to load a media file.
The loaded source preview is shown on the preview atẹle:
Page 50 | Document version: a5c2704
Below the monitor, there are controls for setting In and Out points. This enables processing only the defined part of video material. To define the part of the video for transcoding, go to the desired starting point of the video either by pressing the “Play” button and stopping at the desired position or by entering the desired time value in the “IN” field:
Press the “Set mark In position” button. The appropriate timecode will be shown in the “IN” field. Then go to the desired end of the video fragment by pressing the “Play” button again and stopping at the desired position or by entering the desired timecode in the “OUT” field.
Page 51 | Document version: a5c2704
Press the “Set mark Out position” button. The appropriate timecode will be shown. The duration is calculated automatically.
Use the “Clear mark In position” and/or “Clear mark Out position” buttons to remove In and/or Out points respectively. Press “OK” to finish defining source media material; the source will be added to the list:
Page 52 | Document version: a5c2704
In case of error detection, e.g., unspecified target, a red indicator appears specifying their number. Hovering the mouse pointer over the indicator displays a tooltip describing the problem(s).
Several sources can be glued together during the transcoding task and can be added by clicking the “+” button and adding a source file ni ọna kanna.
Àkọlé Profiles
Set the targets defining the task output by clicking the “+” button within the target panel:
Page 53 | Document version: a5c2704
You can also use the Ctrl+T keyboard shortcut for this action.
The “Add transcoding target” dialog appears:
Page 54 | Document version: a5c2704
Here, from the list, choose the corresponding profile prepared using Cinegy Convert Profile Editor. Its settings will be open on the right-hand panel of the dialog allowing you to make changes in the selected profile, if needed. Then press the “OK” button.
Page 55 | Document version: a5c2704
Several output targets can be added to the transcoding task defining different output formats like MXF, MP4, SMPTE TT, etc. To do this, invoke the “Target edit form” dialog again and choose another profile.
It is possible to add any source with any target schema. The automatic mapping with resampling and rescaling will be applied to the source media to fit with the defined target schema.
If there are some inconsistencies between source and target media formats, the yellow indication will be displayed. Hovering the mouse pointer over the yellow indicator displays a tooltip with information on what changes will be applied to the source media:
To edit a source/target from the list, use the button on the right of the source/target name.
To delete a source/target, use the button.
The validation will be done at the start of the conversion task processing.
If direct transcoding is expected, all sources should have the same compressed stream format.
Page 56 | Document version: a5c2704
isinyi
The “Queue” tab lists all active transcoding tasks registered in the Process Coordination Service database with their statuses and progress:
When a task is being processed by Cinegy Convert, its progress bar displays two independent processes: · the top bar shows the progress of stages 1 to 7. · the bottom bar shows the progress of an individual stage lati 0% si 100%.
Task Status The color of the “Status” column indicator corresponds to the transcoding task state:
the task is in progress.
the task is paused.
task processing is completed.
the task is suspended.
When task processing is completed, its status turns green and after several seconds it is removed from the list of active tasks.
Task Priority
Tasks processing is performed in the order of task priorities. The priority of a task is displayed in the dedicated column.
If the task with higher priority is received for processing, all tasks with lower priorities will be automatically paused. When the higher-priority task processing is completed, the lower-priority task processing is automatically resumed.
Please note, that the license is active and the resources being allocated for the paused task are not
released. When the pause request is initiated, only CPU/GPU resources allocated for task processing are
tu silẹ.
Hover the mouse pointer over the status cell of the specified task to see its full status description:
Page 57 | Document version: a5c2704
Processing of the manually paused tasks is not automatically resumed. Use the “Resume task” command to proceed with manually paused task processing.
It is possible to change priority for tasks being currently processed by Cinegy Convert Agent Manager by right-clicking the desired task and choosing the required command from the “Priority” menu:
The tasks with lower priority will be suspended and higher priority ones will go to the top of the tasks list and continue being processed in the first instance.
Refer to the Watch Folders Tab description in the Cinegy Convert Watch Service Manual for more information on setting priority for automatically created tasks.
Isakoso awọn iṣẹ-ṣiṣe
Tasks being processed can be paused/resumed or canceled. To do this, right-click the desired task in the list and choose the corresponding command from the “State” menu:
Page 58 | Document version: a5c2704
In the case of cancelling a task of importing to Archive, the part of the media, that has already been imported by that task, will be removed from the Roll.
To resume the paused task processing, use the “Resume task” command.
If a task has not been taken for processing by any Cinegy Convert Agent Manager yet, it can be suspended. To do this, rightclick the desired task and use the “Suspend task” command from the “State” menu:
Select the “Queue task” command from the suspended task right-click menu to bring the task back to the queue.
Manually assigned tasks can be easily duplicated using the “Submit copy” context menu command from the “Maintenance” menu:
Due to the specifics of processing tasks automatically created from watch folders, please avoid copying them.
Creation of a copy is also available for the completed transcoding tasks on the “History” tab.
You can also create a copy of an already completed transcoding task in the “History” tab in a similar way. The “Reset task” command resets the task status.
Tasks Filtering Filtering of the task queue is supported, allowing users to hide tasks with specific statuses or narrow down the list by task
Page 59 | Document version: a5c2704
name. This functionality facilitates easier task management and retrieval. Tasks can be filtered either by status or by name. Use the icon in the table header of the corresponding column to set up the filtering parameters. The status filter window allows you to select specific statuses to display only the corresponding tasks:
Filtering by task name is configured in the following dialog box:
To remove the name filtering conditions, press the “Clear Filter” button.
10.4. Agent Managers
The “Agent Managers” tab lists all registered Cinegy Convert Agent Manager machines with their statuses. By default, Cinegy Convert Monitor takes the item status info from the Process Coordination Service database. The “Live” checkbox allows Cinegy Convert Monitor to connect directly to the corresponding Cinegy Convert Agent Manager and retrieve live status updates, including image preview, CPU/Memory resources graphs, etc. This tab contains a list of all machines that have Cinegy Convert Manager service installed and running which are connected to the Cinegy PCS used by Cinegy Convert Monitor. The list shows the machine name and the last access time. The last access time value updates continuously as long as the Cinegy Convert Manager service is running.
Page 60 | Document version: a5c2704
You can monitor each machine in “Live” tracking mode. To do this, select the “Live” checkbox for the corresponding machine:
The left-hand graph shows the CPU load, and the graph on the right displays the memory usage. It is a graphical representation of the CPU and memory state of the current processing agent, where the red area indicates the number of resources taken by Cinegy Convert, and the gray area is the total amount of the resources taken. When the Cinegy Convert Manager service is unavailable on the specified machine for several minutes or more, its status changes to yellow. This warns you about possible problems that may have occurred in the agent’s work:
If an agent does not respond for a long time, it is removed from the agents’ list automatically.
Page 61 | Document version: a5c2704
10.5. Itan
The “History” tab contains information about the completed transcoding jobs:
To narrow down the task history list by task name and/or processing server name, use the header of the respective column and configure the filtering parameters accordingly.
icon located in the table
You can create a copy of the completed task using the “Submit copy” command from the “Maintenance” context menu:
The duplicated task appears in the list in the “Queue” tab. Status The color of the indicator in the “Status” column corresponds to the state in which task transcoding was completed:
the task was completed successfully
the task was canceled by the user
the task processing failed
Hover the mouse pointer over a status icon to see the details.
Tasks History Cleanup
Administrative rights are required to perform history cleanup.
The history of completed transcoding jobs can be cleaned up. Set the required cleanup parameters in the Cinegy PCS Configurator and the transcoding jobs that correspond to the defined settings will be manually or automatically cleaned up.
Refer to the Tasks History Cleanup article within the Cinegy Process Coordination Service Manual for details on setting up the cleanup parameters.
Page 62 | Document version: a5c2704
Cinegy Convert Client
For a while Cinegy Convert Client is provided for initial preview purposes and does not expose all
functionality required. Support for Cinegy Archive as a source, selection of processing profiles, direct tasks
submission will be added in the next releases.
This new application is the modern standard for ease of use, intuitive and ergonomic design, and through the flexibility of add-on features, it creates superior revenue-generating workflow.
Cinegy Convert Client is going to replace the legacy Cinegy Desktop Import tool and provide user-friendly mechanism for manual convert tasks submission. It allows to browse storages and devices for the media to be processed with a convenient interface, review the actual media in the preview player, check item metadata with an option to modify it prior to importing and submit the task for processing.
Page 63 | Document version: a5c2704
Chapter 11. User Manual
11.1. Ni wiwo
To start Cinegy Convert Client, use the icon on the Windows desktop or launch it from Start > Cinegy > Convert Client. The client application will be started:
The interface consists of the following elements: · Toolbar for management of panel display and access to transcoding settings. · Location Explorer for navigating through hard drives and network connections. · Clip Explorer for browsing media files. · Processing panel for processing task profiles management and control. · Media player for playing media files. · Metadata panel to display the metadata of the selected media file. · Profile details panel for management of the selected target profile paramita.
Pẹpẹ irinṣẹ
The toolbar provides access to the transcoding settings and presents a set of buttons to show or hide panels:
The following table represents a quick toolbar overview:
Page 64 | Document version: a5c2704
Bọtini
Action Invokes the “Settings” configurator. Shows or hides (toggles) the “Location Explorer”. Shows or hides (toggles) the “Clip Explorer”. Shows or hides (toggles) the “Metadata panel”. Shows or hides (toggles) the “Processing panel”.
Shows or hides (toggles) the “Media Player”. Shows or hides (toggles) the “Profile Details panel”.
Location Explorer
Location Explorer allows users to navigate through the hard drives, network connections, and the Cinegy Archive database and then display the contents of the folders, subfolders, and Cinegy Archive objects in the Clip Explorer window.
Page 65 | Document version: a5c2704
Use the “Settings” configurator to specify which media sources are displayed in the Location Explorer.
Enter the path to the media storage manually in the “Path” field or select the folder or network share from the tree.
Clip Explorer
All media in the Clip Explorer are presented as a read-only list of files:
Page 66 | Document version: a5c2704
The “Back” button brings you one level higher. The “Refresh” button renews the folder content. The “Pin/Unpin” button adds/removes specific folders to/from the Quick Access list. This button is visible only when the checkbox for “Quick Access” media source is selected in “Sources settings”. The “Select all” button selects all available clips/master clips/Sequences. You can also use the Ctrl+A keyboard shortcut for this action. The “Select none” button clears the current selection of the objects, if any. Once “virtual clips” from Panasonic P2, Canon, or XDCAM devices are detected, the default “All media files” viewer mode switches to the one for that particular type of media and displays the files in the thumbnail mode:
Page 67 | Document version: a5c2704
The number of columns and correspondingly the size of the thumbnails are adjusted with a scale bar:
Media Player
Media player provides an easy-to-use interface for viewing video material selected in the Clip Explorer as well as tracking its timecode and setting the In/Out points.
Page 68 | Document version: a5c2704
Scrolling Through the Material
The ruler below the player screen allows the user to easily move to any desired position in the clip. To view any frame of the material, drag the time slider or simply click on any position on the ruler:
The current position of the clip is displayed on the “Position” indicator.
Page 69 | Document version: a5c2704
The actual duration of the selected clip is displayed on the “Duration” indicator. Controlling Zoom in the Player To scale the display size of the media player, change the window to floating and drag its borders:
Mute, Play/Pause and Jump Buttons The “Mute” button in the player toggles the playback audio on/off. The “Play/Pause” button in the player toggles the playback mode. The “Jump to clip event” buttons in the player are used to move from event to event. Events are: start, end of a clip, In and Out points.
Mark In and Mark Out These controls allow the user to select a defined segment of video material:
Page 70 | Document version: a5c2704
Press the “Mark In” button to set the In point on the current point of your video material. Alternatively, use the keyboard to enter the start timecode value. Press the “Clear mark In” button to delete the In point. Press the “Mark Out” button to set the Out point on the current point of your video material. Alternatively, use the keyboard to enter the end timecode. Press the “Clear mark Out” button to delete the Out point.
Metadata Panel
The metadata for the currently selected media file or virtual clip is displayed on the Metadata panel:
Page 71 | Document version: a5c2704
The list of metadata fields depends on the type of media.
The read-only metadata fields are grayed out.
Place the cursor on an editable metadata field to edit it. The editing interface depends on the type of the metadata field; for example, the calendar is opened for a date field:
Press this button next to the corresponding metadata field to reset your changes to defaults.
Processing Panel
The transcoding task properties can be managed here:
· Source(s) displays the number of currently selected media items. · Target press the “Browse” button to choose a transcoding target created via Cinegy Convert Profile Olootu:
Page 72 | Document version: a5c2704
· Task name the name for a task is generated automatically and can be changed to a new one via a keyboard. · Task priority set the task priority (high, medium, low, or lowest).
Tasks with higher priority will be processed first.
· Capability resources press the button to open the window for capability resources selection:
Page 73 | Document version: a5c2704
The capability resources should be previously created via Cinegy Process Coordination Explorer. Refer to this article for detailed information about the creation of capability resources.
Press the “Queue task” button to add tasks to the Cinegy PCS queue directly ignoring Cinegy Convert Watch folders.
The “Generate cinelink” button is used for the .CineLink files generation.
Refer to the Generating CineLink Files section for more details.
Profile Details Panel
The parameters of the target profile selected in the Processing panel can be managed here:
Page 74 | Document version: a5c2704
The list of metadata fields differs depending on the profile type being configured.
Refer to the Cinegy Convert Profile Editor chapter for details on creating and configuring target profiles and audio schemes which are then used for transcoding tasks processing.
Automatic macros substitution is supported. Please refer to the Macros article for a comprehensive explanation of how to use different macros and where they are applicable.
Panels Customization
Cinegy Convert Client is very easy to manage due to its fully customizable interface where all panels are scalable and most of them are collapsible.
Window Arrangement
You can change the window view to customize the application according to your needs using the following buttons located in the upper right corner of the panels:
From the drop-down menu you can select the following panel modes: floating, dockable, tabbed document, auto hide, and hide. Press this button or use the “Auto hide” context menu command to release the fixed size and position of the panel on the screen.
Press this button or use the “Hide” context menu command to make the current panel disappear from the screen.
The Clip Explorer has only the “Hide” button by design.
Lilefoofo
The panels are docked by default. Right-click the panel caption and select the “Floating” context menu command. The panel
Page 75 | Document version: a5c2704
becomes floating and can be dragged to the desired position.
Dockable
To return the floating panel to the docked position, select the “Dockable” command from its context menu. Then click the title bar of the panel and drag until you see the visual hints. When the desired position of the dragged panel is reached, move the pointer over the corresponding portion of the hint. The destination area will be shaded:
To dock the panel to the indicated position, release the mouse button.
Tabbed Document
With this option selected, the panels are arranged into tabs:
Page 76 | Document version: a5c2704
Ìbòmọlẹ Aifọwọyi
By default, the “Pin” button fixes the window size and position on the screen. To automatically hide the panel, click this button or choose the “Auto hide” context menu command.
In auto-hide mode, the panel appears only when you hover the mouse pointer over the tab:
Tọju
Using the “Hide” context menu command or the
button makes the panel disappear from the screen.
11.2. Eto
Pressing the “Settings” button on the toolbar launches the following configuration window:
Page 77 | Document version: a5c2704
This dialog contains two tabs: “General” and “Sources”.
Gbogbogbo Eto
Here you can define the following settings:
· Join clips when this option is disabled, multiple individual clips / CineLink files are created; when enabled, it allows combining multiple clips into a single file with common metadata during transcoding.
The initial timecode for the resulting file is taken from the first clip in the selection.
· PCS host specifies the name or IP address of the machine where the Cinegy Process Coordination Service is installed; · Heartbeat frequency time interval for the Cinegy PCS to report it is running properly. · PCS services update frequency time interval for the Cinegy PCS to update information about the internal services
used by clients.
Sources Settings
Here you can define which media sources should be displayed in the Location Explorer as the root elements similarly to those in Windows File Explorer:
Page 78 | Document version: a5c2704
Here you can control the display of the following media sources:
· Local PC · Quick access · Network · Archive
Archive Source
Using the Cinegy Archive source(s) is only available with the Cinegy Archive Service and the Cinegy MAM Service properly configured and running.
To configure the archive source which will be displayed in the Location Explorer, select the “Archive” option:
In the “MAMS host” field define the name of the server where the Cinegy MAM Service is launched. Then press this button to add a CAS profile. The following window appears displaying the list of all Cinegy Archive profiles created and registered in the Cinegy PCS:
Page 79 | Document version: a5c2704
Here select the required profile and press “OK”. Multiple CAS profiles can be selected; they will be displayed below the “MAMS host” field:
Press this button to edit the selected CAS profile; the following window appears:
Page 80 | Document version: a5c2704
All the Cinegy Archive Service parameters are split into groups:
Page 81 | Document version: a5c2704
Gbogboogbo
· Name the CAS profile name. · Description any text to be used as the profile apejuwe.
Aaye data
· SQLServer the SQL server name. · Database the required Cinegy Archive database name.
Wọle Lori
· Domain the name of the domain you are using. · Login the name under which the connection to Cinegy Archive will be established. · Password the login password. · SQL Server authentication select this checkbox to use the SQL Server authentication for access to the
database or leave it unchecked to use the Windows authentication.
Iṣẹ
· Url the CAS URL address entered manually or received automatically using the “Discover” command
lati
awọn
akojọ:
Press this button to delete the selected CAS profile.
The Cinegy Convert Client log report is stored at the following path: :ProgramDataCinegyCinegy Convert[Version number]LogsConvertClient.log.
11.3. Generating CineLink Files
Igbaradi
Before you start generating CineLink files, you should follow these steps:
1. Check if the Cinegy Process Coordination Service is installed and properly configured. 2. Create the folder where your generated CineLink files will be placed. 3. Use Cinegy Convert Profile Editor to create a proper profile for your transcoding tasks. 4. Make sure Cinegy Convert Agent Manager is properly configured and running. Check if Cinegy Convert Agent Manager
has a valid established connection to the Cinegy Process Coordination Service. 5. Start Cinegy Convert Client and select the clip(s) with the specified metadata and defined In/Out points, where
appropriate. Check the transcoding settings configuration and manage the transcoding task properties. Once this is done, you are ready to generate CineLink files.
Page 82 | Document version: a5c2704
CineLink Files Creation
Press the “Generate cinelink” button on the Processing panel to start the process. The following window appears allowing you to choose the required folder in which your CineLink files will be created:
As a result, depending on your transcoding settings, a single combined CineLink file with media from all clips or multiple CineLink files for each selected clip will be created. The transcoding task will be started; its processing can be monitored via Cinegy Convert Monitor:
Page 83 | Document version: a5c2704
Cinegy Convert Watch Service
The Cinegy Convert Watch Service is responsible for looking in configured file system directories or Cinegy Archive job drop targets and registering tasks inside the Cinegy Process Coordination Service for Cinegy Convert Agent Manager to pick up for processing.
Page 84 | Document version: a5c2704
Chapter 12. User Manual
12.1. Iṣeto ni
Watch Service Configurator
The Cinegy Convert Watch Service is designed for monitoring network shares and Cinegy Archive database job folders. To enable monitoring of the tasks, the service should be properly configured with all the necessary credentials defined.
To start the Cinegy Convert Watch Service configurator, use the icon on the Windows desktop or launch it from Start > Cinegy > Convert Watch Service configurator.
The Cinegy Convert Watch Service configurator window is launched:
The indicator in the bottom part of the window shows the connection of the Cinegy Convert Watch Service to the Cinegy PCS.
Refer to the Cinegy Process Coordination Service Manual for details on running and configuring the Cinegy PCS.
All the parameters for database connection, the Cinegy Process Coordination Service association, as well as tasks
Page 85 | Document version: a5c2704
configuration and creation of job folders are divided into separate tabs. All the configured tasks are located in the “Watch Folders” tab in a table view ni atẹle:
Press this button to refresh the list of watch folders.
The first column (“Switch ON / OFF”) is used for selecting the watch folders ready for processing. The next column (“Type”) displays the corresponding task type icon. The “Priority” column shows the priority of processing for each task, which is defined when configuring watch folders as explained later in this manual.
High-priority tasks are processed first, suspending the medium and low-priority ones respectively. Once a high-priority task is completed, low-priority tasks are resumed automatically.
When a watch folder is added and configured, select the checkbox in the first table column to enable task processing.
All configuration changes are retrieved automatically before processing new tasks.
If the checkbox for the required watch folder is not selected, task processing will not be performed.
The width of columns can be adjusted according to your needs by placing the mouse pointer on the grid line between the columns and dragging left or right to make it narrower or wider respectively:
Adjusting the order of columns via drag-and-drop, as well as managing the order of watch folders by pressing the column headers is also supported.
Watch Folders Management With the help of the context menu called by the right mouse button click on the watch folder name, you can duplicate, rename, or delete watch folders.
Ṣe pidánpidán
Use the “Duplicate” context menu command to create a copy of the watch folder:
Page 86 | Document version: a5c2704
Fun lorukọ mii
Use the “Rename” context menu command to rename a watch folder:
The corresponding dialog box appears:
Enter a new name for your watch folder.
Ṣatunkọ
Press the button to edit the corresponding watch folder in the edit form that appears.
Page 87 | Document version: a5c2704
Paarẹ
To remove a watch folder, click the
icon in the corresponding field.
The same action is performed by the “Delete” context menu command:
You will be asked to confirm your decision to remove the watch folder:
Page 88 | Document version: a5c2704
Watch Service Log File Press the button on the bottom right part of the window and choose the “Open service log file” pipaṣẹ.
The Watch Service log file will be opened in the corresponding text editor:
By default, Watch Service logs are stored under C:ProgramDataCinegyCinegy Convert22.12.xxx.xxxxLogs.
Watch Folders Tab
This tab allows configuring watch folders that will monitor transcoding tasks. To add a new watch folder, press the “+” button. Select one of the following task types from the list that appears:
Page 89 | Document version: a5c2704
Currently, six task types are available for configuration in the Cinegy Convert Watch Service: · Export media from Archive · Import media to Archive · Transcode to file · Archive Quality building · Import documents to Archive · Export documents from Archive
Export Media from Archive To automate the repetitive export of media from Cinegy Archive tasks, Cinegy Archive job drop targets are used. A job drop target is a special node type displayed in the Cinegy Desktop user interface that allows export task submission. To submit a task, add the desired node(s) to the open job drop target container via drag-and-drop, or use the command “Send to job drop target” from the context menu. Cinegy Convert Export from Archive watch folders are designed to provide the connection between Cinegy Archive job drop targets and Cinegy Convert processing queues.
When the “Export media from Archive” task is added, it is necessary to configure it using the corresponding form:
Page 90 | Document version: a5c2704
Valid Cinegy Archive connection settings are required to define certain watch folder parameters. Read the CAS connection configuration description for details.
Press the “Connect” button to establish the connection to the specified database.
Once the connection is established successfully, it becomes replaced by the “Disconnect” button. Press this button in case you want to abort the connection.
Further parameters are split into two groups:
Page 91 | Document version: a5c2704
The “Generic” group allows configuring the following settings:
· Name specify the export watch folder name. · Description enter the export watch folder description, if needed. · Priority use the drop-down list to define high, medium, low, or lowest default task priority. · Capability resources define the list of requirements to be met by the Cinegy Convert agent to be able to pick up tasks
generated by the current watcher. For example, access to some special network share with restricted access can be defined as the “Capability resource” and assigned to the dedicated Cinegy Convert Agent Manager machines.
The capability resources are added via Cinegy Process Coordination Explorer. Refer to this article for detailed information about capability resource creation.
In the “Scripting” group you may define a preferable script to be called before source initialization either by entering it manually or exporting an already-made PowerShell script.
The following parameters should be configured in the “Settings” group:
· Target folder define the export job drop target folder in the Cinegy Archive database by pressing the button and selecting the required resource from the dialog that appears.
· Scheme/target specify the export scheme by pressing the button and selecting the required resource from the dialog that appears.
· Quality select the desired media quality from the drop-down list. · Auto degradation select the checkbox to enable switching to the next available quality.
Page 92 | Document version: a5c2704
Having defined all the parameters, press “OK”.
Metadata Override
While editing the watch folder configuration, it is possible to override metadata settings from the selected target scheme. Press the button on the right to the “Scheme/target” field and select the “Edit” command:
Ọrọ sisọ atẹle yoo han:
Here you can change the values of metadata fields required for this watch folder. Import Media to Archive
Having added the “Import media to Archive” task, configure it using the corresponding form that appears. Similar to the export from archive task type configuration, parameters are split into groups:
Page 93 | Document version: a5c2704
The “Generic” group allows configuring the following settings:
· Name specify the import task watch folder name. · Description enter the import watch folder description, if needed. · Priority use the drop-down list to define high, medium, low, or lowest default task priority. · Capability resources define the list of requirements to be met by the Cinegy Convert agent to be able to pick up tasks
generated by the current watcher. For example, access to some special network share with restricted access can be defined as a “Capability resource” and assigned to the dedicated Cinegy Convert Agent Manager machines.
The capability resources are added via Cinegy Process Coordination Explorer. Refer to this article for detailed information about capability resource creation.
In the “Scripting” group you may define a preferable script to be called before source initialization either by entering it manually or exporting an already-made PowerShell script.
The following parameters should be configured in the “Settings” group:
· Scheme/target specify the import scheme by pressing the button and selecting the required resource from the dialog that appears.
· Watch folder define the import folder on the local PC or in a network share by pressing the button. Select the desired folder or make a new one and press “Select Folder”.
· File mask(s) define the specific file types the watch folder will identify for processing. Multiple masks can be specified with ; used as a separator (e.g., *.avi; *.mxf).
Page 94 | Document version: a5c2704
Having defined all the parameters, press “OK”.
Metadata Override
While editing the watch folder configuration, it is possible to override metadata settings from the selected target scheme. Press the button on the right to the “Scheme/target” field and select the “Edit” command: The following dialog appears, allowing you to change the values of the metadata fields required for this watch folder. To make changes to the database-related fields, establish the connection by pressing the “Connect” button.
Pressing the button in the “Descriptors” field will launch the dialog for editing descriptors for master clips:
Page 95 | Document version: a5c2704
The Rolls descriptors can also be edited on the dedicated tab:
Page 96 | Document version: a5c2704
Transcode to File
The transcoding task type is used for standalone mode without connection to the database required. These tasks perform transcoding of a file encoded by one codec to another codec or another wrapper, or both, or direct transcoding repacking to another wrapper without transcoding.
The transcoding task type configuration consists of the following parameters that should be set up identically to the other tasks described above.
The “Generic” group parameters are:
· Name specify the transcoding task watch folder name. · Description enter the description, if needed. · Priority use the drop-down list to define high, medium, low, or lowest default task priority. · Capability resources define the list of requirements to be met by the Cinegy Convert agent to be able to pick up tasks
generated by the current watcher. For example, access to some special network share with restricted access can be defined as a “Capability resource” and assigned to the dedicated Cinegy Convert Agent Manager machines.
The capability resources are added via Cinegy Process Coordination Explorer. Refer to this article for detailed information about the creation of capability resources.
In the “Scripting” group you may define a preferable script to be called before source initialization either by entering it manually or exporting an already-made PowerShell script.
Page 97 | Document version: a5c2704
The “Settings” group parameters are: · Scheme/target specify the transcoding scheme by pressing the button and selecting the required resource from the dialog that appears. · Watch folder define the folder to be monitored on the local PC or in a network share by pressing the button and selecting the required location from the dialog that appears. · File mask(s) define the specific file types the watch folder will identify for processing. Multiple masks can be specified with ; used as a separator (e.g., *.avi;*.mxf).
Metadata Override
While editing the watch folder configuration, it is possible to override metadata settings from the selected target scheme. Press the button on the right to the “Scheme/target” field and select the “Edit” command:
Ọrọ sisọ atẹle yoo han:
Here you can change the values of the metadata fields required for this watch folder.
Page 98 | Document version: a5c2704
Archive Quality Building
The Archive Quality building task type is used to automatically create non-existent qualities from the selected quality Cinegy Archive Roll quality.
The Archive Quality Building task type configuration consists of the following parameters that should be set up identically to the other tasks described above.
Valid Cinegy Archive connection settings are required to define certain watch folder parameters. Read the CAS connection configuration description for details.
The “Generic” group parameters are:
· Name specify the Archive Quality building task watch folder name. · Description enter the description, if needed. · Priority use the drop-down list to define high, medium, low, or lowest default task priority. · Capability resources define the list of requirements to be met by the Cinegy Convert agent to be able to pick up tasks
generated by the current watcher. For example, access to some special network share with restricted access can be defined as a “Capability resource” and assigned to the dedicated Cinegy Convert Agent Manager machines.
The capability resources are added via Cinegy Process Coordination Explorer. Refer to this article for detailed information about the creation of capability resources.
Page 99 | Document version: a5c2704
In the “Scripting” group you may define preferable Pre- and Post-processing scripts either by entering them manually or exporting already-made PowerShell scripts.
The “Settings” group parameters are:
· File name template define the file naming template to be used in Cinegy Archive Quality Building jobs. This field is mandatory. Its default value is {src.name}. Macros can be used in this field.
Please note that a unique ID will be automatically appended to the file name to avoid potential clashes with the existing files on the disk.
· Media group specify the Cinegy Archive media group to store document files.
· Target folder specify the Cinegy Archive Quality Building job drop target by pressing the required resource from the dialog that appears.
bọtini ati ki o yan awọn
· Quality select the desired media quality from the drop-down list.
· Auto degradation select the checkbox to enable switching to the next available quality.
· Quality builder schema select one or several specific TV formats from the drop-down list to use them for quality building.
Having defined the required TV format, you should specify the qualities that will be created in the corresponding Roll. To do this, press the button and select the required command:
Select select the profile for the corresponding quality creation from the Cinegy PCS resources list in the dialog that appears.
Preserve use this option to preserve the existing Roll quality, if any. Remove use this option to remove the existing Roll quality, if any.
The “Preserve” option is selected for all qualities by default.
The quality building parameters should be specified for each selected TV format separately in the respective settings section.
Page 100 | Document version: a5c2704
Import Documents to Archive
The “Import documents to Archive” task type is used to automatically copy pictures, folders, and other document files from the network storage into the Archive and register them there.
This task type configuration consists of the following parameters that should be set up identically to the other tasks described above.
The “Generic” group allows configuring the following settings:
· Name specify the name of the network share to be monitored. · Description enter the network share description, if needed. · Task priority use the drop-down list to define the lowest, low, medium, or high default task priority. · Capability resources define the list of requirements to be met by the Cinegy Convert agent to be able to pick up tasks
generated by the current watcher. For example, access to some special network share with restricted access can be defined as a “Capability resource” and assigned to the dedicated Cinegy Convert Agent Manager machines.
The capability resources are added via the Cinegy Process Coordination Explorer. Refer to this article for detailed information about the creation of capability resources.
Page 101 | Document version: a5c2704
In the “Scripting” group you may define preferable Pre- and Post-processing scripts either by entering them manually or exporting already-made PowerShell scripts. The following parameters should be configured in the “Document settings” group:
· Target folder define the folder in Cinegy Archive where documents will be imported. · Media group specify the Cinegy Archive media group to store document files. · DocumentBin name template specify the DocumentBin name to be used for importing. · Existing behavior from the drop-down list select the way to resolve the conflicts of existing documents:
Skip Document import is skipped; Replace a document file is replaced with a new one; Rename a new document is renamed as [original_name] (N).[original_ext], where N is the next non-
existing integer starting from 1; Fail the import task is failed. In the “Watch folder” group the following parameters should be configured: · Watch folder define the folder to be monitored on the local PC or in a network share. In case any document files are located within the watch folder the Document Bin is opened or created with the name from the DocumentBin name template. · File mask(s) define the specific file types the watch folder will identify for processing. Multiple masks can be specified with ; used as a separator (e.g., *.doc;*.png). · Preserve tree specify whether the folder tree should be preserved when importing documents. When the “Preserve tree” is enabled, the folders are scanned recursively and all documents are imported. For each folder, a corresponding one is created in Archive. Export Documents from Archive
The “Export documents from Archive” task type is used for exporting Folders, DocumentBins, and Documents.
The “Export documents from Archive” task type configuration consists of the following parameters that should be set up in the following groups:
Page 102 | Document version: a5c2704
In the “Generic” group configure the following settings:
· Name specify the name of the task to be monitored. · Description enter the task description, if needed. · Task priority use the drop-down list to define the lowest, low, medium, or high default task priority. · Capability resources define the list of requirements to be met by the Cinegy Convert agent to be able to pick up tasks
generated by the current watcher. For example, access to some special network share with restricted access can be defined as a “Capability resource” and assigned to the dedicated Cinegy Convert Agent Manager machines.
The capability resources are added via Cinegy Process Coordination Explorer. Refer to this article for detailed information about the creation of capability resources.
In the “Scripting” group you may define Pre- and Post-processing scripts, if available.
The following parameters should be configured in the “Document Settings” group:
· Target folder define the network share that will be used as a root. When a Document is provided as a job subject, the corresponding document file is copied to the Target Folder. When a Document Bin or a Folder is provided as a job subject, in case the Preserve tree option is set, the folder named the same as the DocumentBin or the Folder is created in the Target Folder and used as the target, each child document is copied to the Target folder.
· Existing behavior from the drop-down list select the way to resolve the conflicts of existing documents: Skip Document export is skipped; Replace the file will be replaced with a new one;
Page 103 | Document version: a5c2704
Rename the new file will be renamed as [original_name] (N).[original_ext], where N is the next nonexisting integer starting from 1;
Fail the export task should be failed.
In the “Watch folder” group the following parameters should be configured:
· Watch folder define the Cinegy Archive job drop folder to be monitored for new tasks to be monitored by pressing the button and selecting the required location from the dialog that appears.
· Preserve tree specify whether the folder tree should be preserved when exporting documents.
Archive Endpoints Tab
This tab is designed for managing Cinegy Archive connections and job folders in the corresponding Cinegy Archive databases. The tab displays the list of all database connections created and registered in the Cinegy PCS. These settings are used for Cinegy Archive targets and the creation of job folders.
You can add as many Cinegy Archive database connections as you need. Press the “+” button and fill in the form as described here.
This list is handy to simplify the creation of Cinegy Archive targets by reusing your settings as many times as needed.
Management of corresponding Archive Endpoints is performed in the same way as for Watch Folders, with the help of the context menu by clicking the right mouse button, as described here.
Press the button next to the corresponding resource to edit it, or the button to delete it.
Page 104 | Document version: a5c2704
Cinegy Convert can be run along with Cinegy Convert Legacy. To ensure compatibility with Cinegy Archive
9.6 version and above without patch requirements, Cinegy Convert uses the same job drop targets
structure as Cinegy Convert Legacy. To separate processing, an additional processing group for job drop
targets should be created, and all legacy job drop targets should be moved to it. In this case, jobs created
in Cinegy Archive for Cinegy Convert and Cinegy Convert Legacy will not interfere.
Job Folders Configuration
Cinegy job folders and job drop targets can be managed via the Cinegy Watch Service Configurator. To do this, press the button to access the desired database from the list. The Job drop folder configurator appears. The database is displayed
in a convenient tree-like structure:
To add a new job folder, click the “New Folder” button or right-click the “Job Folders” directory and select “Add job folder”:
Page 105 | Document version: a5c2704
In the following dialog that appears enter the new job folder name: Press “OK”. The folder will appear in the database explorer. To add a new export job drop target in the selected folder, right-click it and select the “Add Export job drop target” option:
The “Add Export Job Drop Target” dialog appears allowing you to set the following parameters:
Page 106 | Document version: a5c2704
· Name use the keyboard to enter the name of a new export job drop target.
· TV Format use the drop-down list to choose the required TV format or select <Allow all> to accept any source media TV format.
· Processing group select the required processing group from the drop-down list.
Adding Quality Builder and Document Export job drop targets is similar; the TV format option is not topical for these job types.
Use the “Edit”, “Delete” or “Rename” context menu commands to handle a specific job folder or job drop target, or just click the corresponding buttons in the upper panel that become highlighted:
Page 107 | Document version: a5c2704
Job Folders Display
All the changes made on the “Watch Folders” tab of the Cinegy Convert Watch Service Configurator are immediately applied in the database and displayed in the Cinegy Desktop Explorer:
Please mind that for a job drop target to become ready for media transcoding tasks, a watch folder for monitoring nodes sent to the job drop target should be properly set up.
CAS Connection
The Cinegy Archive Service connection is required to perform operations with the Cinegy Archive database. Once it has been configured, the connection settings can be saved for further use in all Cinegy Convert components.
By default, the Cinegy Archive Service is not configured and is represented as: Not configured
Configuration To launch the CAS Configuration resource edit form, press the button in the relevant Cinegy Convert component and choose the “Edit” option:
Alternatively, this dialog can be launched by pressing the button in the “Cinegy Archive” tab of the Cinegy Convert Watch Service Configurator:
Page 108 | Document version: a5c2704
The button next to each field allows you to clear its value by choosing the “Clear” command:
The required parameters are split into sections, which can be collapsed or expanded by pressing the arrow buttons next to the settings section names:
To apply the parameters once they are configured, press “OK”.
Gbogboogbo
Page 109 | Document version: a5c2704
Specify the following parameters in this section: · Name the CAS connection name to be displayed in the resources list. · Description any text to be used as the resource description.
This parameter is handy for searching or filtering resources by the description value, for example, in the Cinegy Process Coordination Service.
Aaye data
Define the server and database in the corresponding fields: · SQLServer the SQL server name. · Database the required Cinegy Archive database name.
Wọle Lori
Here specify the following data: · Domain the name of the domain you are using.
By default, Cinegy Capture Archive Adapter uses Integrated Windows Authentication. For some
specific scenarios where the Cinegy Archive Service (CAS) and the Cinegy Archive database are part
of a cloud-based architecture without an Active Directory domain, then access is authenticated by
database user policies. In this case, the “Domain” parameter should be set to . and the SQL user
login/password pair must be defined with appropriate permissions.
· Login the name under which the connection to Cinegy Archive will be established.
· Password the login password.
· SQL Server authentication use the checkbox to select whether the SQL Server or Windows authentication will be used for access to the database.
Iṣẹ
Define the CAS URL address in the corresponding field of this section via the keyboard:
Page 110 | Document version: a5c2704
Alternatively, press the button and select the “Discover” command:
Having specified the CAS host name in the dialog that appears, press the “Discover” button. The section below will list all available Cinegy Archive Service access protocols:
Having selected the desired one, press “OK”.
Please mind that the “OK” button will remain locked until one connection point is selected; the red indicator shows a tooltip explaining the reason why settings cannot be applied.
CAS Connection Import/Export
You can use the corresponding command from the button menu in the “Cinegy Archive Service” field on top if you wish to save this configuration as a Cinegy PCS resource or an XML file, or import a previously saved configuration:
From now these resources can be used for any specific purposes in the relevant components of your Cinegy Convert structure, being available for all options that support export to and import from the Cinegy PCS.
Page 111 | Document version: a5c2704
Having specified all the parameters, press “OK”.
The new CAS connection will be added to the list of resources and can be used for further work with Cinegy Archiveintegrated tasks.
If the previously configured CAS connection has been saved as a Cinegy PCS resource, it can be selected from the “Select resource” dialog box launched by the “Import from PCS…” command:
Please mind that the “OK” button will remain locked until one connection resource is selected; the red indicator shows a tooltip explaining the reason why settings cannot be applied.
To load the CAS connection configuration from a previously saved file, select the “Import from file…” command and select the file from the “Load CAS Configuration” dialog that appears.
Establishing CAS Connection The current CAS configuration is displayed in the relevant field of the Cinegy Convert component, for example:
Press this button to establish the CAS connection.
If the connection cannot be established, a corresponding message appears explaining the reason for the connection failure. For example:
When connected, press this button to terminate the connection, if needed.
Page 112 | Document version: a5c2704
Cinegy PCS Connection Configuration
The Cinegy Convert Watch Service requires a valid established connection to the Cinegy Process Coordination Service. By default, the configuration is set to connect to the Cinegy PCS installed locally on the same machine (localhost) and use the default port 8555. In case the Cinegy PCS is installed on another machine or another port should be used, the parameters should be changed correspondingly.
Press the appears:
button on the bottom right part of the window and choose the “Settings” command. The following window
Here set up the following parameters: · Endpoint by default, the configuration is set to connect to the Cinegy PCS installed locally on the same machine (localhost) and use the default port 8555. In case the Cinegy PCS is installed on another machine or another port should be used, the endpoint value should be modified: http://[machine name]:[port]/CinegyProcessCoordinationService/ICinegyProcessCoordinationService/soap where: machine name specifies the name or IP address of the machine where the Cinegy PCS is installed; port specifies the connection port configured in the Cinegy PCS settings. · Heartbeat frequency time interval for the Cinegy PCS to report it is running properly. · Reconnect delay time interval before the application will re-establish the connection automatically once the connection to the Cinegy PCS is lost. · Services update frequency time interval for the Cinegy PCS to update information about the internal services used by clients. · Task creation timeout time interval defining a timeout for the task to be created. If the task is not created during this interval, the task will fail after the timeout expires. The default value is 120 seconds.
Press “OK” to apply new settings. You will be asked to confirm your choice by the following prevention message:
Page 113 | Document version: a5c2704
In case changes cannot be applied, the following message will appear, pointing to the reason for negation:
12.2. Windows Service and Settings Storage
By default, the Cinegy Convert Watch Service runs as the NT AUTHORITYNetworkService account:
Please note that the NetworkService account must have sufficient rights to write to network resources on
the specified computer. If such a configuration is not available in your infrastructure, you should restart the
service under a user account with enough privileges.
Make sure the user, which was used to “Log on as” for the Cinegy Convert Watch Service (Windows
service) has read and write permissions for watch folder(s). For the Cinegy Archive Quality Building task, the user should have read and write permissions for Cinegy Archive shares. Right after installation the
default local system account usually has no such permissions, especially for network shares.
All the settings, logs, and other data are stored in the following path: C:ProgramDataCinegyCinegy Convert[Version number]Watch Service. For security purposes, these settings are also stored in the Cinegy PCS, which is handy in case of failure of the machine running the Cinegy Convert Watch Service, or if you need to run several instances of the service on different machines.
Refer to the Cinegy Process Coordination Service Manual for details on running and configuring the Cinegy PCS.
Page 114 | Document version: a5c2704
12.3. Watch Folder Use
This article describes the most common workflows using Cinegy Convert Watch Folders:
· Import to Cinegy Archive · Export from Cinegy Archive · Conform Ingest
Import to Cinegy Archive This workflow allows users to convert media files to Rolls in the Cinegy Archive database.
Cinegy Convert components require a valid established connection to the Cinegy Process Coordination Service and Cinegy Convert Agent Manager Service running as a Windows service.
To prepare a workflow for the automatic import of media files into Cinegy Archive through watch folders, follow these steps:
1. Go to the “Archive Endpoints” tab of the Cinegy Convert Watch Service configurator, then press the + button. In the form that appears fill in the data relating to the Cinegy Archive Service and specify the Cinegy Archive database to be used for importing materials:
2. In the “Watch Folders” tab of the Cinegy Convert Watch Service configurator, press the + button, select the “Import
Page 115 | Document version: a5c2704
media to Archive” task type, and fill in the form that appears:
Here, in the “Scheme/target” field, you should choose the appropriate Cinegy Archive Ingest / Import profile created in the Cinegy Convert Profile Editor. In the “Watch folder” field specify the path to a local folder or a network share which will be monitored for media files to be imported into the Cinegy Archive database. 3. Having configured the watch folder, mark it as ready for processing:
4. Place your media file(s) into the watch folder and a new task will be created. Tasks execution is performed by local agents managed by Cinegy Convert Agent Manager and coordinated by the Cinegy Process Coordination Service. The processing could be monitored in Cinegy Convert Monitor. To ensure that the import process was completed successfully, check for new Rolls in the Cinegy Archive database accessed from Cinegy Desktop:
Page 116 | Document version: a5c2704
Export from Cinegy Archive
This workflow allows the user to automate the repetitive export of media from Cinegy Archive into media files through Cinegy Archive job drop targets.
This workflow requires a valid established connection to the Cinegy Process Coordination Service and to
the Cinegy Archive Service, as well as the Cinegy Convert Agent Manager Service running as a Windows
iṣẹ.
To prepare this workflow, follow these steps:
1. In the “Archive Endpoints” tab of the Cinegy Convert Watch Service configurator create the Cinegy Archive Service endpoint in the same way as described in the Import to Cinegy Archive paragraph.
Then press the button to create an export job drop target in the corresponding database:
Page 117 | Document version: a5c2704
2. In the “Watch Folders” tab of the Cinegy Convert Watch Service configurator press the + button, select the “Export media from Archive” task type, and fill in the form that appears:
Page 118 | Document version: a5c2704
Here, in the “Cinegy Archive” field, press the button to set up the Cinegy Archive Service endpoint, as you did in Step 1. Then press the “Connect” button to establish the connection to the specified database. In the “Target folder” field define the export job drop target folder configured in the previous step. In the “Scheme/target” field choose the appropriate Transcode to File profile created in the Cinegy Convert Profile Editor. 3. Having configured the watch folder, mark it as ready for processing:
4. In Cinegy Desktop place the desired Cinegy object(s), such as clips, Rolls, ClipBins, and Sequences into the predefined job drop target folder. A new export Cinegy Convert task will be created. Tasks execution is performed by local agents managed by Cinegy Convert Agent Manager and coordinated by the Cinegy Process Coordination Service. The processing could be monitored in Cinegy Convert Monitor. To ensure that the export process is completed successfully, check for the new media files in the output location preconfigured in your Transcode to File profile:
Page 119 | Document version: a5c2704
Conform Ingest
The Cinegy Convert Watch Service allows you to organize an analog of the Conform Capturer functionality from earlier versions of Cinegy Desktop – multi-database operations to convert/render Cinegy objects, such as clips, Rolls, ClipBins or Sequences, into Rolls; in other words, you can conform a source media from Cinegy Archive to Cinegy Archive.
This workflow requires a valid established connection to the Cinegy Process Coordination Service and to
the Cinegy Archive Service, as well as the Cinegy Convert Agent Manager Service running as a Windows
iṣẹ.
To prepare this workflow, follow these steps:
1. In the “Archive Endpoints” tab of the Cinegy Convert Watch Service configurator create the Cinegy Archive Service endpoint in the same way as described in the Import to Cinegy Archive paragraph. Then choose an export job drop target as described here.
2. In the “Watch Folders” tab of the Cinegy Convert Watch Service configurator create an “Export media from Archive” task, in which you should complete the configuration and then connect to the Cinegy Archive Service. Then, in the “Target folder” field, specify the export job drop target folder and in the “Scheme/target” field choose the Cinegy Archive Ingest / Import profile created in the Cinegy Convert Profile Olootu:
Page 120 | Document version: a5c2704
3. Having configured the watch folder, mark it as ready for processing:
4. In Cinegy Desktop, place the Cinegy object(s), prepared for export, into the predefined job drop target folder. A new export Cinegy Convert task will be created and the new Rolls will be created in the predefined target folder in the Cinegy Archive database:
Page 121 | Document version: a5c2704
Conform ingest is possible within a single Cinegy Archive database (when export and import profiles ni
configured to use the same database) and in a multi-database workflow (when export and import profiles
are configured to different databases).
12.4. Makiro
The automatic macros substitution feature may be very handy when creating multiple files via Cinegy Convert. Naming such files in an automated manner helps to avoid file name conflicts and maintain the logical structure of the storage.
Refer to Macros for a comprehensive explanation of how to use different macros and where they are applicable.
Page 122 | Document version: a5c2704
Cinegy Convert Profile Olootu
Cinegy Convert Profile Editor is a state-of-the-art administrative tool providing the means for creating and adjusting target profiles and audio schemes. These schemes are used in Cinegy Convert for transcoding tasks processing.
Page 123 | Document version: a5c2704
Chapter 13. User Manual
13.1. Ni wiwo
If necessary, any profile prepared via Profile Editor can be exported to the centralized storage for further use in Cinegy Convert for transcoding tasks processing, and vice versa the profile can be easily imported and adjusted to specific requirements if needed.
The Cinegy Convert Profile Editor functionality is only available with the Cinegy Process Coordination
Service installed, properly configured, and running. Refer to the Cinegy Process Coordination Service
Afowoyi fun awọn alaye.
To launch Cinegy Convert Profile Editor, use the corresponding shortcut on the Windows desktop.
Cinegy Convert Profile Editor is represented as a table with the list of transcoding targets correspondingly registered in the Cinegy Process Coordination Service:
To learn about Profile Editor interface management, refer to the Handling Transcoding Targets section.
Press this button to refresh the transcoding targets list.
Page 124 | Document version: a5c2704
The indicator in the bottom part of the window shows the connection of Cinegy Convert Profile Editor to the Cinegy PCS.
Refer to the Cinegy Process Coordination Service Manual for details on running and configuring the Cinegy PCS.
Press this button to access either the log file or the Cinegy PCS connection settings:
Press this button in the main Cinegy Profile Editor window to create a new profile.
Awọn atẹle Profile types are currently supported: · Transcode to file Profile · Archive Ingest / Import Profile · Archive Quality building Profile · Publish to YouTube Profile · Compound Profile (Advanced) · Post on Twitter Profile
Select the required one and configure it using the resource edit form that appears.
13.2. Profiles iṣeto ni
Transcode to File Profile
Set up the profile in the following configuration window:
Page 125 | Document version: a5c2704
In case of error detection, e.g., blank mandatory fields, a red indicator appears specifying their number. Hovering the mouse pointer over the indicator displays a tooltip describing the problem(s).
From the “Container” drop-down list, choose the desired multiplexer to be used for converting among the available ones:
Page 126 | Document version: a5c2704
Having chosen the required one, you will need to specify its parameters below.
Generic Configuration The “Generic” configuration group is similar for all multiplexers. The following parameters should be defined here:
· Name define the multiplexer name. · Description enter the description of the multiplexer if needed. · Tracks specify audio and/or video tracks to be used in the multiplexer.
Refer to the Tracks Configuration paragraph for a detailed description of configuring audio and video tracks.
· File name define the output file oruko.
To automate naming, the filename macro is supported. Refer to the Macros article for details about macro templates.
Note that only the following characters are allowed in file names: alphanumeric 0-9, a-z, A-Z, special
– _ . + ( ) or Unicode. If an extra character is detected during task processing, it will be replaced
with the _ symbol.
· Outputs add the output location(s) for the converted file by pressing the icon next to the “Outputs” field:
Use the “Add output” command to add the output location; press to display the added output:
“Empty path” means that the output is not configured yet; press and browse for the output location. It can be marked as “critical” meaning that the failure of this output should cause the transcoding session to abort. Set the “Is critical” option to mark the required location as critical output.
It is possible to add multiple output locations.
Page 127 | Document version: a5c2704
Cinegy Convert supports the automatic execution of PowerShell scripts. Please refer to the Scripting article for details on their configuration.
Tracks Configuration
Press the icon next to the “Tracks” field and use the respective command to add an audio, video, or data track:
This operation can be repeated to add one video, one data, and multiple audio tracks if required. The corresponding track(s) will be added to the “Tracks” list:
The default parameters of all tracks can be individually adjusted if needed. Press the button to expand the block of the tracks:
Each parameter of any track can be configured individually. Format Configuration Press the icon next to the “Format” field of the required audio or video track and choose the desired format from the list of supported ones. Profile Configuration By default, the PCM encoder is used in the audio profile and the MPEG2 Generic Long GOP encoder in the video profile. To change the encoder and/or redefine its parameters, press the icon next to the required track field and choose “Edit”:
Page 128 | Document version: a5c2704
The following window appears allowing you to choose the required encoder from the list of supported codecs:
The list differs depending on the track type (audio or video) being configured.
Some multiplexers have additional configuration groups with extra parameters to be specified. The list of fields depends on the multiplexer type.
Transcoding Mode
Video track allows choosing transcoding mode to be used for the tasks. To do this, expand the added video track and choose the required option from the “Transcoding Mode” drop-down list:
· Direct the file will be transcoded without re-encoding. · Encode the file will be re-encoded.
Page 129 | Document version: a5c2704
Source Transformation
· Video aspect define the aspect ratio of the video stream by choosing either 4:3 or 16:9 or selecting “Keep Original” for the original aspect ratio of the source media.
· Video crop click the icon next to the “Video crop” field and then press the “Create” button to define the cropping area for your video file:
Use the buttons to define the coordinates of the top left corner as well as the width and height of the output rectangle in the corresponding fields. · Audio mapping click the icon in the “Audio mapping” field; the XML editor appears where you should press “Import” and choose the XML file with audio matrix presets which will be loaded to the dialog:
Alternatively, you can paste the “AudioMatrix” section from the XML file generated by Cinegy Air Audio Profile Editor into “XML editor”.
· Linear Acoustic UpMax click the icon next to the “Linear Acoustic UpMax” field and then press the “Create” button to map a stereo track in the source file into the 5.1 track with the following options:
Page 130 | Document version: a5c2704
Algorithm choose the upmixing algorithm type;
Further parameters depend on the algorithm type selected.
LFE Crossover Frequency define the crossover frequency to extract the low-frequency (LF) signal routed to the low-frequency effects (LFE) channel.
This option is only topical for the “Stereo to 5.1” algorithm.
Midbass Crossover Frequency define the crossover frequency used to split the phase-correlated signal into lowfrequency (LF) and high-frequency (HF) bands;
LFE Routing define the amount of low-frequency (LF) signal routed back to the center channel;
LFE Playback Gain used in combination with “Midbass Crossover Frequency” and “LFE Routing” to properly set the LFE signal level;
The “LFE Routing” and “LFE Playback Gain” options are only topical for the “Stereo to 5.1” algorithm.
LF Center Width define the routing of the low-frequency (LF) band across the center, left, and right channels; HF Center Width define the routing of the high-frequency (HF) band across the center, left, and right channels; Cycles Per Octave define the number of cycles per octave; Min Comb Filter Frequency define min comb filter frequency; Comb Filter Level define comb filter level; Front Rear Balance Factor define the extracted 2-channels side component distribution for left, left surround,
right, and right surround channels;
This option is only topical for the “Stereo to 5.1” algorithm.
Center Gain define a level change to the center channel signal; Rear Channels Downmix Level define the downmix level for rear channels.
Page 131 | Document version: a5c2704
This option is only topical for the “Stereo to 5.1” algorithm.
Front Gain (Legacy) define a level change to the front channel signal for the legacy algorithm. Center Gain (Legacy) define a level change to the center channel signal for the legacy algorithm. LFE Gain (Legacy) define a level change to the LFE channel signal for the legacy algorithm. Rear Gain (Legacy) define a level change to the rear channel signal for the legacy algorithm.
The options marked as legacy are only topical for the “Stereo to 5.1 legacy” algorithm.
An additional Linear Acoustic UpMax license is required for processing tasks with Linear Acoustic upmixing.
Refer to the Linear Acoustic UpMax Installation and Setup article for details regarding Linear Acoustics UpMax functionality deployment.
· XDS Insertion provides Extended Data Service (XDS) data insertion into VANC streams. Click the icon next to the “XDS Insertion” field and press the “Create” button; then set up the XDS processing options:
Program Name define the program name (title).
This parameter is optional and is not set by default. To use it, click the icon next to the “Program Name” field and press the “Create” button.
The length of the “Program Name” field is limited from 2 to 32 characters.
Network Name define the network name (affiliation) associated with the local channel.
This parameter is optional and is not set by default. To use it, click the icon next to the “Network Name” field and press the “Create” button.
The length of the “Network Name” field is limited from 2 to 32 characters.
Call Letters define the call letters (station ID) of the local broadcasting station. Content Advisory System select the content advisory rating system from the drop-down list.
Having selected the Content Advisory System, choose the required content rating from the dropdown list below.
· Burnt-in timecode select this option to overlay the timecode onto the resulting video. Click the icon next to the “Burnt-in timecode” field and press the “Create” button; then set up the Burnt-in timecode options:
Page 132 | Document version: a5c2704
Initial timecode define the initial timecode values. Position define the position of the timecode on the screen by choosing between “Bottom” and “Top”. Font family define the appropriate font family. To do this, use the keyboard to enter the name of the font installed on the current computer. Font size choose the font size from the corresponding drop-down list. Font style choose the font style for the timecode. Text color press the icon and select the desired color for the timecode text or click on the text color field for advanced color editing. Background color press the icon and select the desired color for the timecode background or click on the background color field for advanced color editing. Having defined all the profile parameters, press “OK”; the configured.
Awọn iwe aṣẹ / Awọn orisun
 |
cinegy Convert 22.12 Server Based Transcoding and Batch Processing Service [pdf] Itọsọna olumulo 22.12, Convert 22.12 Server Based Transcoding and Batch Processing Service, Convert 22.12, Server Based Transcoding and Batch Processing Service, Based Transcoding and Batch Processing Service, Transcoding and Batch Processing Service, Batch Processing Service, Service |


