![]() Z-1Pro
Z-1Pro
User Manual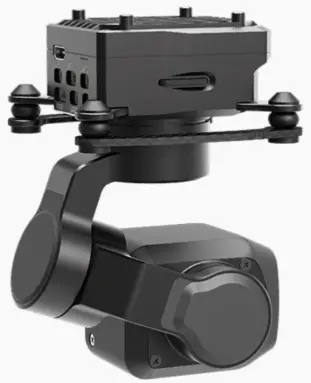 ©2025 XF All Rights Reserved
Using this Manual – Legend

Revision History
| Date | Document Version |
| 2024.06.17 | V1.0 |
| 2024.10.15 | V1.1 |
| 2025.01.15 | V1.2 |
| 2025.07.04 | V1.3 |
Caution
- When not in use, store the pod in the package box. The recommended storage environment is a relative humidity less than 40% at a temperature of 20±5° C. If the lenses fog up. The water vapor will usually dissipate after turning on the device for a while.
- Do not place the product under direct sunlight, in areas with poor ventilation, or near a heat source such as a heater.
- Do not frequently power on/off the product. After it is turned off, wait at least 30 seconds before turning back on, otherwise the product life will be affected.
- Make sure the pod port and pod surface are free from any liquid before installation.
- Make sure the pod is securely installed onto the aircraft.
- Do not plug or unplug the microSD card during use.
- Do not touch the surface of the camera lenses and keep it away from hard objects. As doing so may lead to blurred images and affect the imaging quality.
- Clean the surface of the camera lenses with a soft, dry, clean cloth. Do not use alkaline detergents.
- When not receiving valid carrier INS data, the yaw shaft of the pod will drift about 15 degrees per hour because of the earth rotation. To make sure the pod attitude corrects, it is necessary to transmit valid carrier INS data, usually the GNSS should be positioning.
- When its damping platform tilted over 45° , the pod will trigger protection mode and return to its neutral position. (except in FPV mode)
Introduction
Synopsis
The Z-1Pro carriers an ultra-starlight image sensor visible light camera. Combined with the AI-ISP full-color night vision imaging engine and the AI-HDR imaging engine, can present clear full-color images weather in extremely low-light environments or in complex lighting environments. Featuring AI multi-object detection and tracking, the Z-1Pro can constantly track one of the persons and vehicles intelligently identified in the image.
The Z-1Pro features a micro3-axis non-orthogonal mechanically stabilized structure, supporting both downward and upward installation. With the Dragonfly software, user can watch the image and control the pod without protocol ducking. Integrated with the XF-QGC software, it achieves comprehensive functionality compatibility with opensource autopilots.
Characteristics
- Carriers an ultra-starlight image sensor visible light camera, combined with the AI-ISP full-color night vision imaging engine, can present clear full-color images in extremely low-light environments, delivering night vision-level low-light imaging experience. Featuring Al-HDR, it ensures both highlights and shadow details remain vividly visible even in complex lighting scenarios with extreme brightness contrasts.
- Features Al multi-object detection and tracking, which can constantly track one of the persons and vehicles intelligently identified in the image.
- Micro 3-axis nonorthogonal mechanical stabilized structure reducing the weight down to 100g.
- Supports network, UART and S.BUS control and compatible with both private protocol and MAVLink protocol.
- Thanks to the Dual-IMU complementary algorithms with IMU temperature control and carrier AHRS fusion, the gimbal provides a stabilization accuracy at ±0.01.
- Can be mounted onto multiple carriers, whether downward or upward.
- With the Dragonfly software, user can watch the image and control the pod without protocol ducking, and download photos and videos online as well.
- With the customized QGC software, all the functions of the pod can be achieved in conjunction with an open source autopilot.
- Screen supports overlaying OSD information. Image supports EXIF saving. Live video stream and recording supports SEI saving. (The SEI functionality will be supported via subsequent firmware updates)
10-26.4 VDC wide voltage input.
Overview
 Accessories


- Power Cable
- SIYI AirUnit Net Cable
- SKYDROID H16 Net Cable
- Network Convertor / SKYDROID H12Pro/H30 Net Cable
- Open Source Autopilot UART Cable
- S.BUS Cable
Ports Definition

| Port | Description | Header | Pin | Definition |
| HDMI | For video output | Micro HDMI | – | – |
| SP | Audio out (Will be supported via subsequent formware updates) | SM03B-SRSS-TB | 1 | GND |
| 2 | AUDIO_OUT+ | |||
| 3 | AUDIO_OUT- | |||
| MIC | Audio in (Will be supported via subsequent formware updates) | SM02B-SRSS-TB | 1 | MIC+ |
| 2 | MIC- | |||
| USB | Reserved | SM03B-SRSS-TB | 1 | GND |
| 2 | USB_D+ | |||
| 3 | USB_D- | |||
| ETH | For GCU configuration & upgrating, private protocol control, video output and connecting AICore | SM04B-SRSS-TB | 1 | ETH_Tx+ |
| 2 | ETH_Tx- | |||
| 3 | ETH_Rx+ | |||
| 4 | ETH_Rx- | |||
| UART2 | For GCU IP configuration, private protocol control and MAVLink protocol control | SM03B-SRSS-TB | 1 | GND |
| 2 | UART_Rx (0~3.3V) | |||
| 3 | UART_Tx (0~3.3V) | |||
| PWR | Power in & Connecting AICore Operating Voltage: 10~26.4VDC | SM06B-SRSS-TB | 1 | Power In |
| 2 | ||||
| 3 | GND | |||
| 4 | ||||
| 5 | UART_AICore_Rx | |||
| 6 | UART_AICore_Tx | |||
| UART1 | For gimbal upgrading | SM03B-SRSS-TB | 1 | GND |
| 2 | UART_Rx (0~3.3V) | |||
| 3 | UART_Tx (0~3.3V) | |||
| S.BUS | S.BUS in Compatible with S.BUS1 standard such as FASST and SFHSS, and S.BUS2 such as FASSTes | SM02B-SRSS-TB | 1 | GND |
| 2 | S.BUS In |
Installation
Use 4 x M2 screws to fix the damping platform to the carrier and reserve enough space for damping.
![]() Do not hard-connect the pod to the carrier , and make sure that the pod does not come into contact with the carrier during use.
Do not hard-connect the pod to the carrier , and make sure that the pod does not come into contact with the carrier during use.
The pod heats while operating. Please ensure that the device is well cooled.
The Micro-pod Cooling Kit can be used to assist with heat dissipation.
Install the cooling kit on the top of the pod with 4 M1.6 x L4mm screws.

![]() Supports a U3/V30 or above MicroSD card with a capacity of up to 256GB.
Supports a U3/V30 or above MicroSD card with a capacity of up to 256GB.
![]() The Micro-pod Cooling Kit is sold separately.The M2 screws for fixing the pod are not incluede in the package.
The Micro-pod Cooling Kit is sold separately.The M2 screws for fixing the pod are not incluede in the package.
![]() The Micro-pod Cooling Kit needs to be powered separately, and the power supply range is 10~26.4VDC @0.5W.
The Micro-pod Cooling Kit needs to be powered separately, and the power supply range is 10~26.4VDC @0.5W.
Configuration & Upgrading
![]() Ensure the gimbal and the GCU have both been upgraded to the latest firmware before use. Otherwise, usage may be affected.
Ensure the gimbal and the GCU have both been upgraded to the latest firmware before use. Otherwise, usage may be affected.
![]() Ensure the diver of the config module is installed on the computer before configuration or upgrading.
Ensure the diver of the config module is installed on the computer before configuration or upgrading.
![]() Before configuration, the computer should be set to a static IP address, which is in the same network segment with the GCU (without IP address conflicts). The default IP address of the GCU is 192.168.144.108
Before configuration, the computer should be set to a static IP address, which is in the same network segment with the GCU (without IP address conflicts). The default IP address of the GCU is 192.168.144.108
![]() Do not power off the device while upgrading. Restart the device once the upgrading is complete.
Do not power off the device while upgrading. Restart the device once the upgrading is complete.
- Connect the computer and ETH port with the Network Conversion Module.
Power on the devices. - Run the Dragonfly display and control software to confirm that it is connected to the pod. Open the settings page.
- Open the settings and configure the current pod.
- When the settings are complete, click “Save”.
- Restart the pod to enable the configurations to take effect.
![]() For instructions on Net Settings, CAMERA, S.BUS Setting, Calibration,
For instructions on Net Settings, CAMERA, S.BUS Setting, Calibration,
![]() Carrier, and Advance, please refer to the Dragonfly Quick Start Guide – Ribbon – Settings, or visit the www.allxianfei.com to get information in the Video Center.
Carrier, and Advance, please refer to the Dragonfly Quick Start Guide – Ribbon – Settings, or visit the www.allxianfei.com to get information in the Video Center.
![]() After enabling OSD or target recognition, the video stream delay will increase, and the frame rate will decrease.
After enabling OSD or target recognition, the video stream delay will increase, and the frame rate will decrease.
![]() When changing the video stream resolution, the Dragonfly software or player needs to be restarted.
When changing the video stream resolution, the Dragonfly software or player needs to be restarted.
![]() After modifying network settings, the gimbal pod will automatically reboot.
After modifying network settings, the gimbal pod will automatically reboot.
GCU Upgrading
![]() Before performing the firmware upgrade, please make sure that the Dragonfly software is turned off.
Before performing the firmware upgrade, please make sure that the Dragonfly software is turned off.
- Connect the computer and ETH port with the Network Conversion Module. Power on the devices.
- Run the GCU Upgrade Tool.
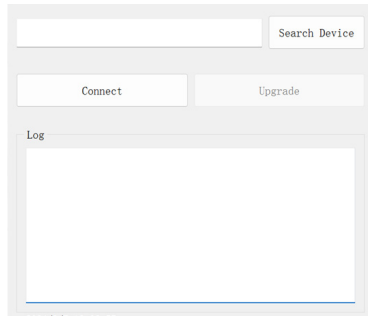
- Click the “Search Device” button and wait for the host computer search to complete.
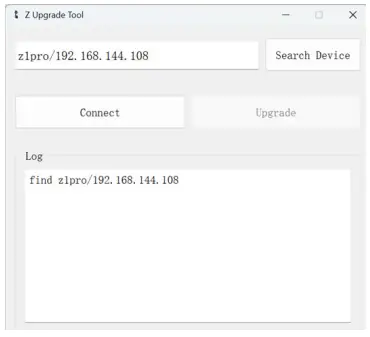
- After the search is complete, click “Connect” and wait for the connection to confirm that the connection is successful.
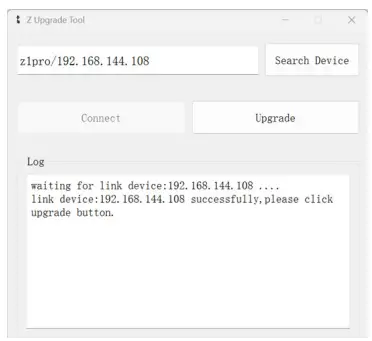
- After the connection is successful, click “Upgrade” and the device will start upgrading. Wait for the software to prompt “upgrade successfully” to indicate that the upgrade is successful.
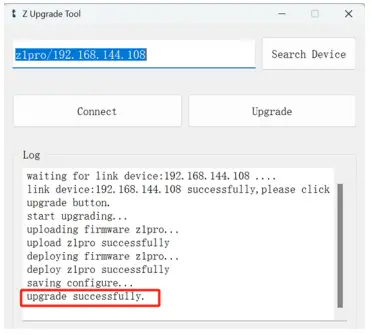
![]() Following a GCU firmware upgrade, all configurations will be restored to default values.
Following a GCU firmware upgrade, all configurations will be restored to default values.
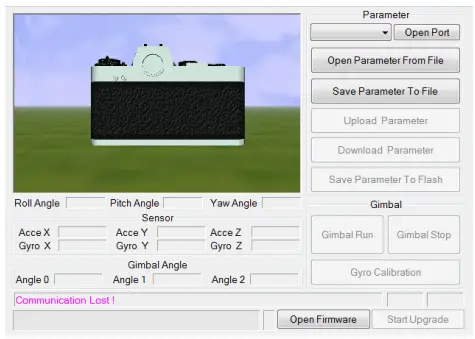
Gimbal Upgrading
![]() Ensure the driver of the Config Module is installed on the computer before upgrading.
Ensure the driver of the Config Module is installed on the computer before upgrading.
- Connect the UART1 port and the computer with the J1.0 Config Module. Power up the pod.
- Run GimbalConfig software. Select the COM port corresponding to the Config Module. Click “Open Port” and confirm the software and the gimbal being connected.
- Click “Open Firmware”. Select the firmware file. Click “Start Upgrade” and wait for the upgrade to complete.
 For some brands of dual Type-C cables, there may be cases where the computer cannot recognize the Config Module. Please try replacing it with a Type-A to Type-C cable.
Real-time Video Playing
Example as camera IP address 192.168.144.108:
Stream address: rtsp://192.168.144.108
Overheat Protection
When the pod’s CPU temperature exceeds 80℃ , the camera feed will flicker once and enter overheat protection mode, during which the frame rate drops to 5fps. The pod automatically exits overheat protection mode when the CPU temperature falls below 75℃ , at which point the frame rate returns to normal.
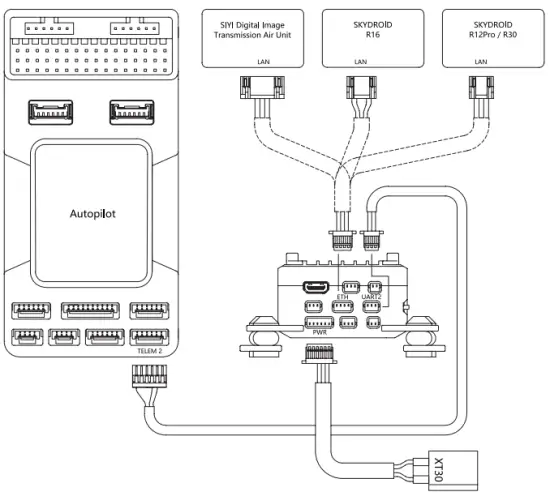
Appendix 1 Wiring Diagram of Connecting to Open Source Autopilot
Takeing the use of the autopilot’s TELEM2 port as an example.
Appendix 2 MAVlink Communication Process
After receiving HeartBeat from the flight controller, and identifying SYSID and COMPID of the flight controller, GCU will operate as below:
- GCU actively sends package MAVLINK_MSG_ID_HEARTBEAT 0 at a frequency of 2Hz.
- GCU requests following packages in turn at a frequency of 1Hz. The flight controller fills these parameters into package MAVLINK_MSG_ID_ COMMAND_LONG 76 until the request completing.:
MAVLINK_MSG_ID_EKF_STATUS_REPORT 193 (No this package for PX4);
MAVLINK_MSG_ID_GLOBAL_POSITION_INT 33;
MAVLINK_MSG_ID_SCALED_IMU 26;
MAVLINK_MSG_ID_SYSTEM_TIME 2;
MAVLINK_MSG_ID_RC_CHANNELS 65;
MAVLINK_MSG_ID_CAMERA_TRIGGER 112 (No this package for APM);
MAVLINK_MSG_ID_AUTOPILOT_STATE_FOR_GIMBAL_DEVICE 286;
MAVLINK_MSG_ID_GIMBAL_DEVICE_SET_ATTITUDE 284 (No this package for APM); - GCU actively sends package MAVLINK_MSG_ID_GIMBAL_DEVICE_ ATTITUDE_STATUS 285 at a frequency of 100 Hz while the packages above being received and the pod being operational.
- Generally, the flight controller will request package MAVLINK_MSG_ID_ GIMBAL_DEVICE_INFORMATION 283 , which GCU does not send actively.
Appendix 3 MAVLink Configuration
ArduPilot
Takeing the use of the autopilot’s TELEM2 port as an example.
| SERIAL2_PROTOCOL | 8 (Gimbal) |
| SERIAL2_BAUD | 115 / 250 / 500 / 1000 (Pod baud rate auto-adaptation) |
| CAM1_TYPE | 4 (Mount) |
| MNT1_TYPE | 14 (XFRobot) |
| MNT1_ROLL_MIN | -50 |
| MNT1_ROLL_MAX | 50 |
| MNT1_PITCH_MIN | -145 |
| MNT1_PITCH_MAX | 60 |
| MNT1_YAW_MIN | -180 |
| MNT1_YAW_MAX | 180 |
| MNT1_RC_RATE | 60 (deg/s) |
| RC6_OPTION | 213 (Mount Pitch) |
| RC7_OPTION | 214 (Mount Yaw) |
| RC9_OPTION | 163 (Mount Lock) |
![]() Visit https://ardupilot.org/copter/docs/common-xfrobot-gimbal.html for more support.
Visit https://ardupilot.org/copter/docs/common-xfrobot-gimbal.html for more support.
PX4
Takeing the use of the autopilot’s TELEM2 port as an example.
| MAVLink | |
| MAV_1_CONFIG | TELEM2 |
| MAV_1_MODE | Custom / Gimbal |
| MAV_1_RATE | 115200 B/s |
| Serial | |
| SER_TEL2_BAUD | 115200 8N1 |
| Mount | |
| MNT_MAIN_PITCH | AUX1 |
| MNT_MAIN_YAW | AUX2 |
| MNT_MODE_IN | Auto (RC and Mavlink Gimbal) |
| MNT_MODE_OUT | MAVLink gimbal protocol v2 |
| Camera Setup | |
| Trigger mode | Distance based, on command (Survey mode) |
| Trigger interface | MAVLink (forward via MAV_CMD_IMAGE_START_CAPTURE) |
![]() The MAV_1_MODE is recommended as Custom.
The MAV_1_MODE is recommended as Custom.
![]() The AUX1 and AUX2 are just examples, which can be defined according to actual situation. It should be configured in RC Map for further application.
The AUX1 and AUX2 are just examples, which can be defined according to actual situation. It should be configured in RC Map for further application.
![]() The trigger mode is just an example, which can be modified according to actual situation.
The trigger mode is just an example, which can be modified according to actual situation.
NANJING XIANFEI ROBOT TECHNOLOGY CO., LTD.
Documents / Resources
 |
XR Robot Z-1 Pro Ultra Starlight Image Sensor Visible Light Camera [pdf] User Manual Z-1 Pro Ultra Starlight Image Sensor Visible Light Camera, Z-1 Pro, Ultra Starlight Image Sensor Visible Light Camera, Image Sensor Visible Light Camera, Sensor Visible Light Camera, Visible Light Camera, Light Camera, Camera |