![]()
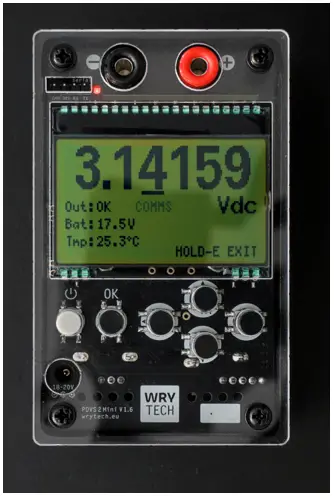
PRECISION DIGITAL VOLTAGE SOURCE
Model PDVS 2 Mini
A multitude of uses as a calfbrator, reference and fully adjustable precision voltage source for research, development and industry use
Manual Version 1.6
www.wrytech.eu

The screenshots & photos in this manual may not necessarily 100% reflect the actual hardware and/or firmware version and are as a guide only.
FUNCTIONS & FEATURES
- True 0 V DC to 10.22222 V DC (new for v1.6, extended from 10.00000 V) user adjustable output (5d.p’s, approx. 10 µV steps)
- Internal precision digital temperature sensor (new for v1.6)
- Based on the industry standard LM399AH (0.5 ppm/K) voltage reference
- All digital calibration, no internal potentiometers
- 20bit DAC with an accuracy/stability down in the µV’s (using a PLC filter of 1.0 or higher)
- Battery voltage monitor, including low voltage warning, auto-shutdown and charging status
- Output voltage monitor including short circuit protection
- 2.4” Graphics Monochrome LCD (128×64 pixels)
- Precision chopper op-amp on final output with extra stability achieved using low tempco resistors
- Re-calibration by the user possible, and saved to flash rom
- Charging socket for Li-ion batteries using dedicated battery management IC. Batteries and DC adaptor are not supplied
- Custom CNC machined aluminum housing
- Manual including factory calibration and settings test record. Unique serial number
SPECIFICATION SUMMARY
- Voltage reference: LM399AH (0.5 – 1 ppm/K temperature coefficient)
- 0.00000 V DC to 10.22222 V DC in 10 µV (0.00001 V) steps
- Load = 10 mA max.
- Accuracy = Within 50 µV. Typically 0.0005% at 10 V output
- Stability = 0.00005 V variation worst case. Orientation of the unit may effect output (calibrated horizontally), as will powering from external power supply
- Temperature coefficient (unit) = Typically < 3 ppm across a 10K temperature change
- INL (Integral Non-Linearity) per DAC datasheet = Typical +/- 1bit, Max./Min. = +/- 64bit across 20bit range reduced considerably by calibration setpoint system
- Stabilization time appr. 20 minutes to 1 hour depending on ambient temperature
- Output short circuit = indefinite (20 mA)
- Power (batteries) = Two Lithium-Ion re-chargeable 9V PP3 batteries (Not supplied, 600 mAh batteries recommended)
- Charging (external power) = 18 to 20 V DC for battery charging, 20 V recommended, 300 mA capable PSU required
- Absolute maximum supply voltage = 24 V
- Battery consumption = 100 mA approx. at power up, reducing to 50 mA approx. when LM399AH heater has stabilized (a few minutes)
- Battery quiescent current (unit switched off) = 4 µA approx.
- Battery = Approx. 12hrs (EBL 600 mAh re-chargeable batteries) typical under continuous operation
- Dimensions = 105mm x 65mm x 50mm
OPERATION OF INSTRUMENT
Power on:
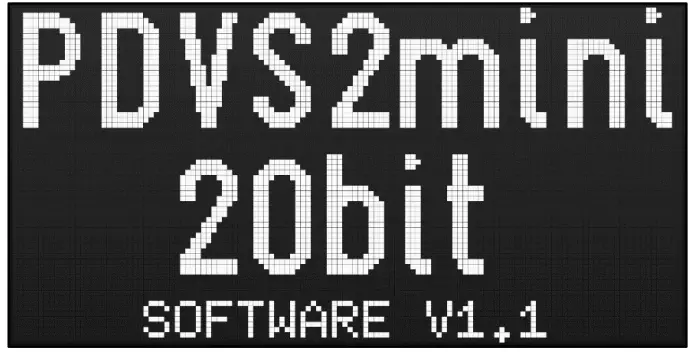
Press and hold the power button until the LCD shows the PDVS 2 Mini splash screen.
Power off:
Press and immediately release the power button. The LCD will clear, power is now off.
The unit will provide a low battery warning at 13.0 V DC and will auto shutdown at 12.5 V. Both settings are adjustable via settings.
Initialize:
The splash screen is displayed on power up with the software version before displaying the MAIN screen. It is recommended to wait 10mins from cold to allow the LM399AH reference to stabilize.
Menu:
To access the MENU, press and hold the OK button.
The Main Menu functions are as follows:
UP – MAIN The main output control screen
LEFT – SETTINGS Where user config settings can be changed.
RIGHT – CALIBRATION Where calibration of the unit can be done.
Power source:
The primary source of power is the batteries. The best performance of the unit is when the batteries are being used to supply power without any external power.
External DC input cable wiring: Red +, Blk -.
The battery terminals and the external DC input are reverse polarity protected.
Use only matched charged state batteries, i.e. don’t fit two batteries that are not charged to the same capacity/level.
The batteries must be capable of charging at a rate of 220mA. Most are, but please check. Batteries are charged in-place using the DC socket on the top. The PDVS 2 Mini must be powered up for charging to take place. This is so the PDVS 2 Mini can actively monitor the charging process. The batteries won’t charge with the unit turned off.
MIAN
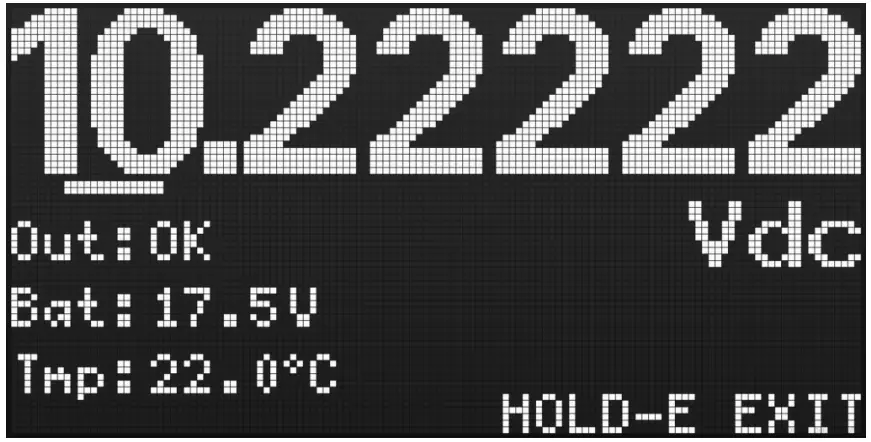
Setting an output: Use the LEFT & RIGHT buttons to select the digit you want to change then press the UP or DOWN to change the digit.
The digit selected is indicated with an underscore underneath.
Output Protection: The voltage monitor detects when the output has been overloaded or subject to a short circuit. The unit will immediately reduce the output to 0Vc (approx.) and display an “ERR” message on the LCD. When the problem is resolved the unit will recover back to normal.
Best Stability:
For the most accurate and stable output it is highly recommended to run the unit from the batteries with no external DC power input. This helps avoids any ground loop noise entering the system.
Screen Messages:
CHG – Batteries are charging (also displays the charge current).
FULL – Batteries are now fully charged.
OVER – The Battery charge current exceeded the maximum allowable.
OK – The main voltage output is functioning and is accurate.
ERR – An irregularity has been detected on the main voltage output, e.g. an external short circuit or over-current may have pulled the output low.
BT – Running on Batteries
DC – Running on external DC supply
COMMS – Serial comms is active
SERIAL INTERFACE (COMMS)
On power up the serial interface defaults to OFF.
The serial header is located at the top of the unit, voltage levels are TTL. The header used is a standard 0.1” pin header.
To enable comms press and hold the LEFT & RIGHT buttons together. Enabled comms is indicated on the LCD as well as flashing the small red LED next to the comms header.
The header on the top of the unit enables direct connection to a Windows PC via a suitable serial to USB converter, such as the 3.3 V Adafruit FTDI Friend or the isolated ones made by duppa.net.
Most adaptors will not plug in directly and will need an adaptor cable made up.
PDVS 2 Mini Serial Protocol:
A simple bi-directional Ascii based serial data protocol, BAUD: 250k,N,8,1
Rate = Data from PDVS 2 Mini to PC is sent every 100 ms
Format to PC VR0,0,12345
Format from PC <KeyVoltage, 0, 1.23456>
The following details all the data being sent from the PDVS2mini, and only a partial listing of the data from the PC.
PDVS 2 Mini OUTPUTS TO PC:
| KV,0, | Output Voltage of PDVS 2 Mini |
| BV,0, | Battery Voltage or DC Input Voltage |
| BVFM,0, | Battery Voltage Feed Mult |
| OVF,0, | Output Voltage Feedback |
| OVFM,0, | Output Voltage Feedback |
| TEMP,0, | Internal Temperature from Sensor [°C] |
| BC,0, | Message = DC Input – Charging, DC Input, DC Input – Full, Running on Batteries, Battery Charge high mA! |
| BLI,0, | Message = Status – Low, Status – Ok |
| Mode,0, | Message = Main Menu, Normal, Calibration, Settings BMIM,0, Battery Monitor IC Multiplier |
| BI,0, | Battery current |
| CMS,0, | Cal Mode Sub |
| dacZ0,0, | DAC Zero Cal 0 |
| dacS0,0, | DAC Span Cal 0 |
| dacS1,0, | DAC Span Cal 1 |
| dacS2,0, | DAC Span Cal 2 |
| dacS3,0, | DAC Span Cal 3 |
| dacS4,0, | DAC Span Cal 4 |
| dacS5,0, | DAC Span Cal 5 |
| dacS6,0, | DAC Span Cal 6 |
| dacS7,0, | DAC Span Cal 7 |
| dacS8,0, | DAC Span Cal 8 |
| dacS9,0, | DAC Span Cal 9 |
| dacS10,0 | DAC Span Cal 10 |
OUTPUT FROM PC TO PDVS 2 Mini:
SETTINGS
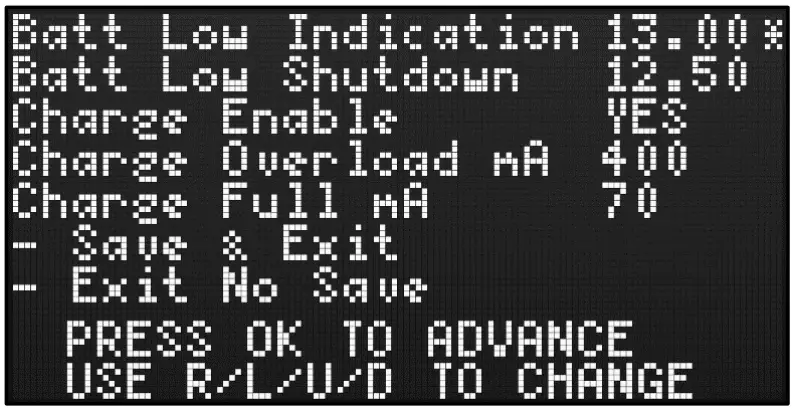
User adjustable settings:
| Batt Low Indication. | Battery voltage at which the unit displays BATTERY LOW. |
| Batt Low Shutdown | Battery voltage at which the unit will auto-shutdown. |
| Charge Enable | Enable / disable battery charging. This setting is useful when an external DC source is used but the user doesn’t want the batteries to charge. |
| Charge Overload mA | Charge overload current setting. The charging circuit is self-contained, but as a safety setting to protect the batteries & electronics if the charge current goes too high (a faulty battery perhaps). The charging will be shutdown. The maximum current should be approx. 250 mA, so the default setting here of 400 mA gives some margin. |
| Charge Full mA | Current (mA) at which the battery is determined to be near full. The charging circuit is self-contained, but as an added extra the software can shutdown charging if the battery is approaching near full capacity. This is done by monitoring the charge current and if it drops below a specific level then the charger is shutdown. |
Use the OK button to advance through the various entries, and the other buttons to make changes.
See the Calibration record as supplied with your PDVS 2 Mini for the original factory settings.
Any changes to settings are saved to EEPROM.
Note: If you decide to make any adjustments to the above settings then please record the original settings before you start.
CALIBRATION
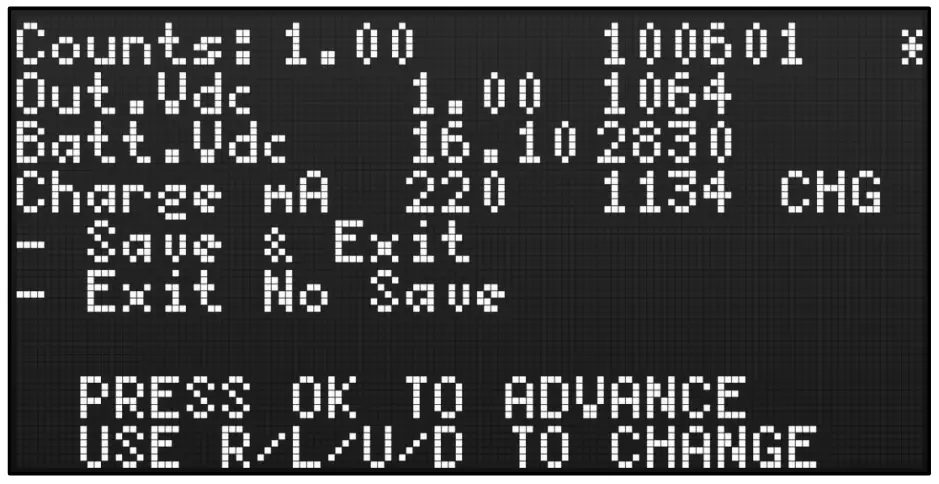
User adjustable / factory calibration:
Use the OK button to advance through the 11 point output calibration as well as the other analogue related calibration, as follows:
| Counts: 0.00000 | XXXXXXX | Counts for 0.00000 V output |
| Counts: 1.00000 | XXXXXXX | Counts for 1.00000 V output |
| Counts: 2.00000 | XXXXXXX | Counts for 2.00000 V output |
| Counts: 3.00000 | XXXXXXX | Counts for 3.00000 V output |
| Counts: 4.00000 | XXXXXXX | Counts for 4.00000 V output |
| Counts: 5.00000 | XXXXXXX | Counts for 5.00000 V output |
| Counts: 6.00000 | XXXXXXX | Counts for 6.00000 V output |
| Counts: 7.00000 | XXXXXXX | Counts for 7.00000 V output |
| Counts: 8.00000 | XXXXXXX | Counts for 8.00000 V output |
| Counts: 9.00000 | XXXXXXX | Counts for 9.00000 V output |
| Counts: 10.00000 | XXXXXXX | Counts for 10.00000 V output |
| Counts: 10.22222 | XXXXXXX | Counts for 10.22222 V output |
| Out.Vdc XX.X | XXXX | Output monitor counts Calibration of the output DC voltage monitor. |
| Batt/DC.Vdc XX.X | XXXX | Battery / Ext. power supply V DC Span counts Calibration of the Battery & external DC supply for the main screen. |
| Charge mA XXX | XXXX | Charge current Span counts Calibration of the battery charging current monitor. |
Use the menu options as detailed at the bottom of the screen to navigate the various entries, and the other buttons to make changes.
UP/DOWN – 1 count modify
RIGHT/LEFT – 100 count modify for DAC, 10 count for all else
HOLD RIGHT/LEFT – 1000 count modify for DAC, 100 count for all else
See the Calibration record as supplied with your PDVS 2 Mini for the original factory settings.
Any changes to settings are saved to EEPROM.
FREQUENTLY ASKED QUESTIONS
Q. When charging batteries what should I observe?
A. If you want to see what’s going on then go to the CALIBRATION screen and you will be able to observe the “Charge mA”. With a relatively flat set of batteries when you first start charging you should observe a constant current of around 220 mA and “CHG” will be displayed (and a similar message on the MAIN screen). It will stay this way for some time until the charging system switches to constant voltage. When this happens you should observe the Charge mA slowly dropping. Eventually, when the mA drops below the “Charge Full mA” preset (see SETTINGS) the charging will cease and “OFF” will be displayed. At this point the MAIN screen will display “FULL”. The charger disconnects from the batteries completely (DC pass-through), no trickle charging.
Q. Why does the charge current suddenly drop to 0mA from 200mA+ when I am charging the batteries in the PDVS 2 Mini?
A. The Lithium-Ion PP3 batteries are charged in series, as are the two cells within each battery. It is important for successful charging that the batteries are the same capacity & type and have the same capacity of charge in them before trying to charge them. Failure to do this can mean the internal protection circuit of one of the batteries can detect a possible over charge and shutdown. The symptom of this is that when you are charging batteries within the PDVS 2 Mini that it suddenly stops charging and the charge current drops to 0 mA. To fix this, remove the batteries from the PDVS 2 Mini and charge them separately in a standalone charger. This will match them again and you can return them to the PDVS 2 Mini. If this problem persists then you may have a faulty/weak battery.
Q. Can I run the PDVS 2 Mini without any batteries fitted?
A. You can, but depending on the accuracy and stability you are looking for on the output it’s not recommended. External DC supplies can sometimes generate noise and ground loops into a system. Running on batteries negates this.This is also true when running with batteries and with the external DC Input connected.
Q. What power source can I use to charge the batteries?
A. Using the DC connector (tail) supplied you can use any electronic linear bench power supply that’s capable of at least 250 mA. Just set it to 20 V. At this voltage you can also run the unit permanently off the bench power supply. You can safely run it like this with the batteries installed because once the batteries fully charge the charging circuit becomes disabled. It is strongly advised to be very careful when using wall plug type power supplies since especially the linear type can output a much higher voltage than is printed. Also, it is advised not to use wall type switch mode type power supplies as these can be notoriously noisy.
Q. Is there an Apple or Linux version of the PDVS 2 Mini Windows app?
A. Unfortunately not, I am only able to write code for the Windows desktop. However, the ascii based serial protocol is available on request if you want to write your own.
Q. There’s a blob of sealant on my PCB covering some components?
A. This isn’t a quality issue, but is infact protecting the DAC filter components from possible humidity issues. The sealant used is non-corrosive and designed for electronics.
Q. When I change the output by a least significant digit (10 µV) the output sometimes does not change by much?
A. It is changing, it’s just the INL affected step change between two bits may be so small it may not appear on your DMM, and due to rounding.
PRODUCT DISCLAIMER
Information has been carefully checked and is believed to be accurate; however, no responsibility is assumed for inaccuracies. This software/firmware of the actual unit shipped may be subject to change and may differ from the contents of this manual.
wrytech reserves the right to make changes without further notice to any products to improve reliability, function, or design. wrytech does not assume any liability arising out of the application or use of any product or circuit; neither does it convey any license under its patent rights of others.
The general policy of wrytech does not recommend the use of its products in life support, aircraft applications or other such critical activities wherein a failure or malfunction of the product may directly threaten life or injury. The use of wrytech products in life support, aircraft applications or other such critical activities assumes all risks of such use and indemnifies wrytech against all damages.
RETURN OF USED EQUIPMENT
According to the German Electrical and Electronic Equipment Act (ElektroG) (§7a ElektroG), every manufacturer is obliged to provide a reasonable opportunity for the return of old appliances.
We offer you the option of returning your old appliance to us.
The return shipment is at the sender’s expense. There are no costs for the disposal of old appliances for the sender.
Please contact us for further clarification of the return – see details below.
CONTACT
wrytech
Johannes Vorderobermeier
Fröttmaninger Str .14 b
80805 München
Web wrytech.eu
Mail info@wrytech.eu
WEEE-Reg.-Nr. DE76235810
Documents / Resources
 |
WRYTECH PDVS 2 Mini Handheld Precision Digital Voltage Source [pdf] User Manual PDVS-2-Mini, PDVS 2 Mini Handheld Precision Digital Voltage Source, PDVS 2 Mini, Handheld Precision Digital Voltage Source, Precision Digital Voltage Source, Digital Voltage Source, Voltage Source, Source |