V1001 55 inch Touch Screen Computer Kiosk User Manual

info@tvliquidator.com
tvliquidator.com
Introduction
Overview
Welcome to your new Touch Screen Computer Kiosk. This interactive kiosk is designed to enhance user engagement with a variety of applications and information displays. Whether used in retail environments, educational settings, or corporate lobbies, this kiosk offers a modern and efficient solution for digital interaction.
Key Features
- Full HD Touch Screen Display
- Multi-Touch Capabilities
- User-Friendly Interface
- Wi-Fi and Bluetooth Connectivity
- Durable Design
- Multiple Input Options
Safety Precautions
- Ensure the kiosk is placed on a flat, stable surface, or mounted correctly according to instructions.
- Do not expose the kiosk to direct sunlight or extreme temperatures.
- Use only the power cable provided.
- Avoid using the kiosk in environments with high moisture or dust levels.
- Always ensure that the kiosk is properly powered down through the on-screen shutdown menu before switching off the power or unplugging the unit.
- Disconnect the kiosk from the power source before cleaning.
Specifications


Overall Dimensions


Getting Started
Unpacking the Kiosk
- Carefully unpack the kiosk from its packaging. Be sure to keep all components together.
- Examine the product for any obvious signs of damage. While minor imperfections can happen, if you discover anything seriously wrong, contact the supplier for support.
- Ensure all components are present, including the power cable, user manual, and any additional accessories.
- Position the kiosk in the desired location for assembly, ensuring it is on a stable, level surface.
Installation
Setting Up the Kiosk – FLOOR STANDING MODEL
- The indoor LCD standing digital sign is divided into two parts, one is the body, and the other is the base. When assembling, the two parts need to be attached together and fixed with bolts from the bottom of the base, as shown in the images below.
- Connect the power cable to the kiosk and plug it into a dedicated, standard electrical outlet. Important: To prevent potential power blowouts, avoid connecting the kiosk to a shared circuit with other high-powered devices or appliances, such as microwaves, refrigerators, or other heavy-duty equipment. Ideally, use a Ground Fault Circuit Interrupter (GFCI) outlet to reduce the risk of electrical overload and enhance safety.
Step 1: After unpacking, move the machine body onto a padded workbench or piece of foam, and use bolts to attach the base and the machine body together (Note: it is recommended to lay clean foam or cotton on the table, place the screen horizontally in the direction of foam/cotton, and make sure it will not shake, so as to avoid damaging the machine or even damaging the screen during installation).

Step 2: After attaching the base and standing up the kiosk, connect the power cord to the power input on the back of the unit, plug the other end into an available power outlet and flip the main power switch to the on position. See image below. (Note: Port layouts may vary depending on kiosk model but will still be similar. Main Power switch below is shown in the “Off” Position.)
Step 3: Find the wireless antenna included with the accessories and screw it onto the wireless antenna port located on the back of the unit.

Setting Up the Kiosk – PEDESTAL MODEL
The indoor LCD standing digital sign is divided into two parts, one is the body, and the other is the base. When assembling, the two parts need to be attached together and tightened with bolts protruding from back of screen.
Step 1: After unpacking, move the screen portion onto a padded workbench or piece of foam and move the pedestal base to the desired location. On the back of the screen you will find screws that first need to be loosened but not removed. Carefully lift the screen and line these screws up with the corresponding holes on the baseplate, ensuring that the screen cable will be accessible after assembly. Once the screen is resting on the base with the screws protruding through baseplate, tighten the screws to secure the screen in place.

Step 2: Find the screen cable that runs from the front of the base and insert it into the power input on the back on the back panel of the screen. See image below.

Step 3: After connecting the base to the screen, connect the power cord to the power input on the back of the base, plug the other end into an available power outlet and flip the main power switch to the on position. See previous image. (Note: Port layouts may vary depending on kiosk model but will still be similar. Main Power switch is shown in the “On” Position.)
Important: Avoid connecting the kiosk to a shared circuit with other high-powered devices or appliances. Ideally, use a Ground Fault Circuit Interrupter (GFCI) outlet to reduce the risk of electrical overload and enhance safety.
Step 4: Find the wireless antenna included with the accessories and screw it onto the wireless antenna port located on the back of the unit.
Step 5: Locate the red power button on the bottom of the screen inside the port door. Press this button to begin booting up the kiosk.

Setting Up the Kiosk – WALL MOUNTED MODEL
The indoor LCD wall mounted digital sign comes ready to install using the provided wall mount, or using your own VESA compatible mount.
Step 1: Begin by preparing the wall surface. Ensure the wall is stable enough to support the kiosk’s weight, using a stud finder to locate studs for secure installation. Position the mounting bracket against the wall and mark the drill points with a pencil. After marking, drill pilot holes at these points, then secure the mounting bracket to the wall using screws and anchors (not provided), ensuring it is level and firmly attached.

Step 2: Locate the two mounting bracket arms and attach these to the back of the kiosk by lining up the holes and securing the screws in place. Ensure a nearby power source is accessible for the kiosk’s operation. When ready to mount, care- fully lift the kiosk and align it with the wall bracket. For safety, always use two people to lift and mount the kiosk. Secure it in place by lining up the bottom holes and screwing the two long screws clockwise to tighten and secure the display.
Note: Mounting bracket styles will vary and therefore may look slightly different than what is shown in the images. Image on the right is an example of how the unit should be mounted.

Step 3: Once mounted, connect the power cord to the power input on the side or bottom of the display, plug the other end into an available power outlet and flip the main power switch to the on position. See below image. (Note: Port layouts may vary depending on kiosk model but will still be similar. Main Power switch is shown in the “On” Position.)

Important: Avoid connecting the kiosk to a shared circuit with other high-powered devices or appliances. Ideally, use a Ground Fault Circuit Interrupter (GFCI) outlet to reduce the risk of electrical overload and enhance safety.
Step 4: Find the wireless antenna included with the accessories and screw it onto the wireless antenna port located on the back of the unit.
Step 5: Locate the silver power button on the port panel. Press this button to begin booting up the kiosk. Note: Main Power needs to be switched on to boot device.
Operating Instructions
Powering On/Off
On: Once the kiosk has the main power switched to “on” position, you then need to press the power button (See image above) to turn on the screen and begin booting the computer. The system will boot up, and the touch screen interface will be displayed.
Off: To properly power down the computer kiosk, first, access the shutdown menu by tapping the power icon or navigating to the system menu. Select the “Shut Down” option, and allow the system to complete the shutdown process. Wait until the screen has completely turned off, indicating that the system has powered down correctly. Once the screen is off, switch off the main power switch located on the back of the kiosk. Finally, unplug the kiosk from the electrical outlet to ensure it is fully powered down. Note: The main power should always be switched off before disconnecting unit from the wall.
Connecting to WiFi
- Select the Network, Sound, or Battery icons on the right side of the taskbar to open Quick Settings.
- Select Manage Wi-Fi connections in the Wi-Fi quick setting.
- Choose the Wi-Fi network you want to connect to and select Connect.
- Enter the network password and select Next. Note: Kiosks operate on a 2.4 GHz frequency, so be sure the router is also broadcasting at a 2.4 GHz band as well.
*You can also connect to Wi-Fi by using the keyboard command, the Wi-Fi menu, or the Settings app.
On-Screen Keyboard
To enable the on-screen keyboard (OSK), you can do the following:
- Click Start and select Settings
- Select Ease of Access
- Open the Keyboard menu
- Toggle Use the On-Screen Keyboard to On
The OSK will appear on the screen and remain until closed. To access it again, click the keyboard icon on the taskbar.
*For easy setup, a USB Keyboard and mouse can be used to get started.
10-Point Multi-Touch
Our touch screen monitors come with 10-point multi-touch functionality. 10-point multi-touch means that the touch screen can recognize and respond to up to 10 different touch points simultaneously. This allows for more advanced touch gestures and interactions.
- Two-Finger Zoom: Pinch-to-zoom, where two fingers are used to zoom in or out on the screen.
- Rotation: Rotating objects on the screen using two fingers.
- Multiple Taps: Recognizing multiple taps at the same time, such as 10 fingers tapping different areas of the screen.
- Multi-Finger Swipe: Using several fingers to swipe across the screen, enabling advanced navigation gestures.
- Palm Rejection: Ignoring unintended touches like when resting a palm on the screen while writing with a stylus.
- Gesture Recognition: More complex gestures involving multiple fingers, such as a 3- or 4-finger swipe to switch applications or perform specific actions.
- Simultaneous Drawing: Multiple people can draw on the screen at the same time.
- Gaming: Enhances gaming experiences by allowing more than one player to interact with the game simultaneously or enabling more complex controls.
- Virtual Keyboards: Allows multiple users to type on an on-screen keyboard at the same time.
- Collaboration Tools: Multiple users can interact with the screen for collaborative work in meetings or educational settings.
This multi-touch functionality enhances user interaction by allowing for more natural and intuitive gestures.
Setting Up Kiosk Mode
Kiosk mode can ensure the display continuously loops or runs content without interruptions, making it ideal for environments where constant display is needed (e.g., public events, exhibitions, or retail stores). In essence, kiosk mode helps keep the display focused on its purpose, running reliably without user interference. To set up kiosk mode on a digital display running Windows 10, follow these steps.
- Prepare Your Digital Display: Before setting up kiosk mode, ensure your digital display is properly configured and updated. Ensure the display is connected to a network, either via Ethernet or Wi-Fi.
- Create a Local User Account for Kiosk Mode: To restrict access to a specific application, you need to create a local user account that will run in kiosk mode.
Open the Settings menu, go to Accounts, and select Family & other users. Click Add someone else to this PC and choose to create a local account by selecting I don’t have this person’s sign-in information, followed by Add a user without a Microsoft account. Create a username and password, naming it something descriptive like “Kiosk User.” - Configure Kiosk Mode: Return to Settings > Accounts > Family & other users and click Set up a kiosk under Assigned access. Choose Get started, select the newly created local account (“Kiosk User”), and pick the application you want to run in kiosk mode, such as Microsoft Edge for web content or a dedicated signage app.
Testing Kiosk Mode
Log out of the current account and sign in to the “Kiosk User” account to activate kiosk mode. The selected application should launch automatically in full-screen mode, with no access to other system features. Test the application to ensure it functions correctly and securely.
Exiting Kiosk Mode
To exit kiosk mode, use a key combination like Ctrl + Alt + Del to sign out, then log in with an administrator account to make any changes.
Maintenance and Cleaning
When cleaning the touchscreen and the kiosk body, always power off the unit to avoid accidental inputs or potential electrical issues. Use a soft, lint-free microfiber cloth to gently wipe down the screen—avoid applying any liquid directly onto the screen. Never use harsh chemicals, such as ammonia-based cleaners or bleach, as they can damage the screen’s coating and reduce touch sensitivity.
If your kiosk is connected to a network, it’s important to routinely check for software updates that may include security patches, performance improvements, or new features. Updating the software is usually straightforward, but ensure you follow the manufacturer’s instructions closely to avoid any issues.
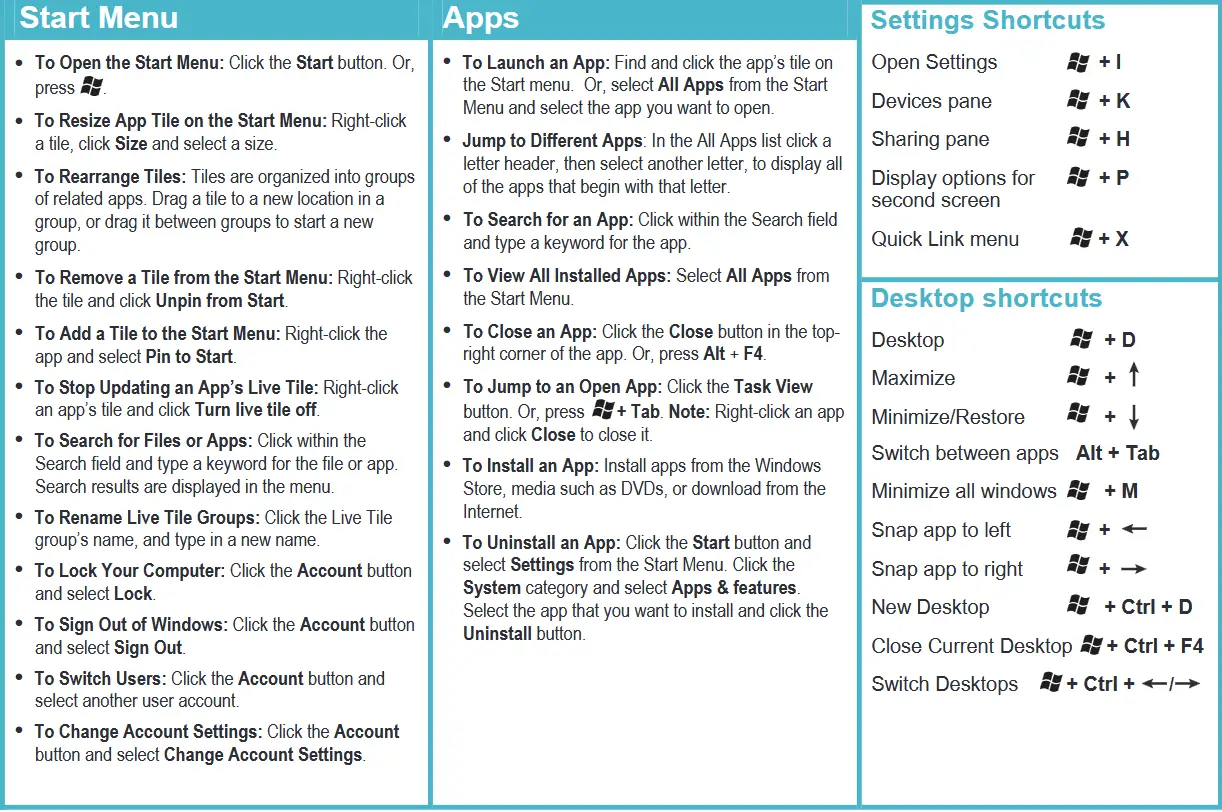
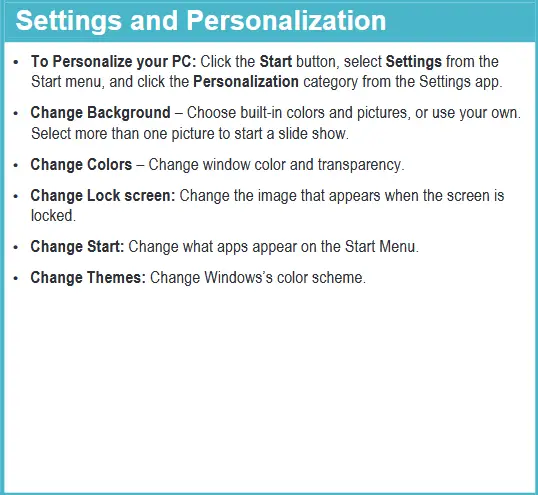
Windows 10 Reference Guide


Troubleshooting
Troubleshooting Solutions
- Touch Screen Unresponsive: Ensure the screen is clean and free of debris, ensure all cables are securely connected, and check for and install any available driver updates via the settings menu (driver name is “HID Compliant Touchscreen” ). Restart the kiosk if the issue persists as follows: Turn off the kiosk, wait for 10 seconds, and then turn it back on.
- No Power: Ensure the power cord is securely plugged into both the kiosk and the wall outlet. Plug another device into the outlet to ensure it is working. If your kiosk has a main power switch then make sure this is switched on. Press the power button firmly. If the issue continues, contact support.
- WiFi Not Connecting: Ensure the kiosk’s wireless antenna is installed and is within range of the WiFi network and that the signal is strong. Go to the network settings menu and check that all configurations are correct. Kiosks operate on a 2.4 GHz frequency, so be sure the router is also broadcasting at a 2.4 GHz band as well. If the problem persists, then restart the router and the kiosk and attempt to reconnect.
- Screen Display is Distorted or Flickering: Check video connections and ensure the video cable is securely connected to the screen and the computer. Remove interference, keeping other electronic devices away from the kiosk ensuring it is properly grounded. Navigate to the display settings menu and adjust the resolution and refresh rate.
Resetting the Kiosk
- Factory Reset: Access the Settings menu, choose “System,” and select “Reset.” Follow the on-screen instructions to reset the kiosk to its factory settings.
Contacting Support
- Phone Support: Call 1-888-885-7740.
- Email Support: Contact us at info@tvliquidator.com.
- Online Resources: Visit www.tvliquidator.com for manuals and more information.

Kiosk Homepage: https://www.tvliquidator.com/touch-screen-kiosk
Digital User Manual: https://www.tvliquidator.com/touch-screen-computer-kiosk-user-manual.pdf
TV Liquidator
5801 West Jefferson Blvd.
Los Angeles, CA 90016
Email: info@tvliquidator.com
Phone: 888-885-7740 Fax: 424-298-8490
OPEN MON-FRI 8AM – 4PM PST 11AM-7PM EST


Documents / Resources
 |
TOUCH SCREEN V1001 55 inch Touch Screen Computer Kiosk [pdf] User Manual V1001 55 inch Touch Screen Computer Kiosk, V1001, 55 inch Touch Screen Computer Kiosk, Screen Computer Kiosk, Computer Kiosk |