1. Bubuka
Thank you for choosing the TECKNET Wireless Mouse TK-MS076. This advanced mouse offers versatile connectivity options, a comfortable ergonomic design, and precise control for various tasks. Please read this manual carefully to ensure proper setup and optimal performance.
fitur konci ngawengku:
- Konektipitas Tri-Mode: Seamlessly switch between Bluetooth 5.0, Bluetooth 3.0, and 2.4G USB-A dongle connections.
- Batré anu tiasa dicas deui: Integrated 700mAh battery provides long-lasting power with convenient Type-C charging.
- Klik jempé: Enjoy a quiet working environment with silent left and right click buttons.
- DPI adjustable: Six customizable DPI levels (800/1200/1600/2400/3200/4800) for precise cursor control.
- Desain ergonomis: Crafted for comfort with a left-side thumb rest to reduce wrist strain during extended use.
2. Produk Langkungview
Familiarize yourself with the components of your TECKNET Wireless Mouse:

Figure 1: TECKNET Wireless Mouse Components. This diagram illustrates the various parts of the mouse, including the left button, right button, scroll wheel, DPI button, DPI indicator, forward button, back button, USB-C port, power switch, channel switch/pairing button, and USB receiver storage.
- Tombol kénca: Fungsi klik primér.
- Tombol katuhu: Fungsi klik sekundér.
- Gulung kabayang: For vertical scrolling and clickable for middle-click functions.
- Tombol DPI: Press to cycle through DPI settings.
- Indikator DPI: LED light indicating current DPI level.
- Tombol Maju: Navigates ka hareup web browser atawa file explorers (not available on Mac).
- Tombol Balik: Navigates ka tukang web browser atawa file explorers (not available on Mac).
- Palabuhan USB-C: For charging the mouse.
- Saklar kakuatan: Turns the mouse On/Off.
- Channel Switch / Pairing Button: Switches between 2.4G, Bluetooth 1, and Bluetooth 2 modes, and initiates Bluetooth pairing.
- Panarima USB: Stores the 2.4G wireless dongle.
3. Setélan
3.1 Ngecas Mouse
Sateuacan nganggo heula, disarankeun pikeun ngecas mouse pinuh.
- Connect the provided USB-C charging cable to the USB-C port on the front of the mouse.
- Connect the other end of the cable to a USB-A power source (e.g., computer USB port, USB wall adapter).
- The battery indicator light will illuminate during charging and change color or turn off when fully charged.

Figure 2: USB-C Rechargeable Mouse. The image shows the mouse connected via a USB-C cable for charging, highlighting its 700mAh battery capacity and quick charging capability.
A full charge takes approximately 2 hours and can provide up to 3 months of standby time.
3.2 Modeu Konéktipitas
The TECKNET TK-MS076 mouse supports three connection modes: 2.4G wireless via USB receiver, Bluetooth 1 (BT5.0), and Bluetooth 2 (BT3.0). You can connect to up to three devices simultaneously and switch between them.
Video 1: TECKNET Wireless Mouse Bluetooth 5.0/3.0 & 2.4G Rechargeable. This video provides a brief overview of the mouse's features, including its tri-mode connectivity and ergonomic design.
Sambungan Nirkabel 2.4G:
- Tangtukeun lokasi panarima USB disimpen dina kompartemen di handapeun beurit.
- Colokkeun panarima USB kana port USB-A anu sayogi dina komputer anjeun.
- Turn on the mouse using the power switch at the bottom.
- Press the Channel Switch button until the indicator light for 2.4G (usually a specific color or position) is active. The mouse should connect automatically.
Konéksi Bluetooth (BT1 / BT2):
- Hurungkeun beurit nganggo saklar daya.
- Press the Channel Switch button to select either BT1 or BT2 mode. The corresponding indicator light will blink slowly.
- To enter pairing mode, press and hold the Channel Switch/Pairing Button for 3-5 seconds until the indicator light blinks rapidly.
- On your device (laptop, tablet, etc.), enable Bluetooth and search for new devices.
- Select "TECKNET Mouse" or a similar name from the list of available devices to pair.
- Once paired, the indicator light on the mouse will stop blinking and remain solid for a few seconds before turning off.

Figure 3: Tri-Mode Connectivity. This image demonstrates the mouse connecting to a desktop monitor, a laptop, and a tablet simultaneously using Bluetooth and 2.4G USB-A connections.
4. Parentah Operasi
4.1 DPI adjustment
The mouse features 6 adjustable DPI levels to suit your precision needs:
- 800 DPI
- 1200 DPI
- 1600 DPI (Default)
- 2400 DPI
- 3200 DPI
- 4800 DPI
To change the DPI, press the DPI button located below the scroll wheel. The DPI indicator light will flash to confirm the current setting (e.g., one flash for 800 DPI, two for 1200 DPI, etc.).

Figure 4: 6-Level DPI Adjustment. This graphic illustrates the different DPI settings available, ranging from 800 to 4800, suitable for various tasks from office work to graphic design and gaming.
4.2 Fungsi Tombol
The mouse is equipped with 6 buttons for enhanced productivity:
- Tombol Kénca & Katuhu: Designed for silent clicks, minimizing noise in quiet environments. Tested for up to 6 million clicks.
- Gulung kabayang: Provides smooth scrolling and can be pressed for a middle-click function.
- Tombol DPI: Changes cursor sensitivity.
- Forward & Backward Buttons: Convenient for navigating web kaca jeung dokumén. Note: These buttons are not available on Mac systems.
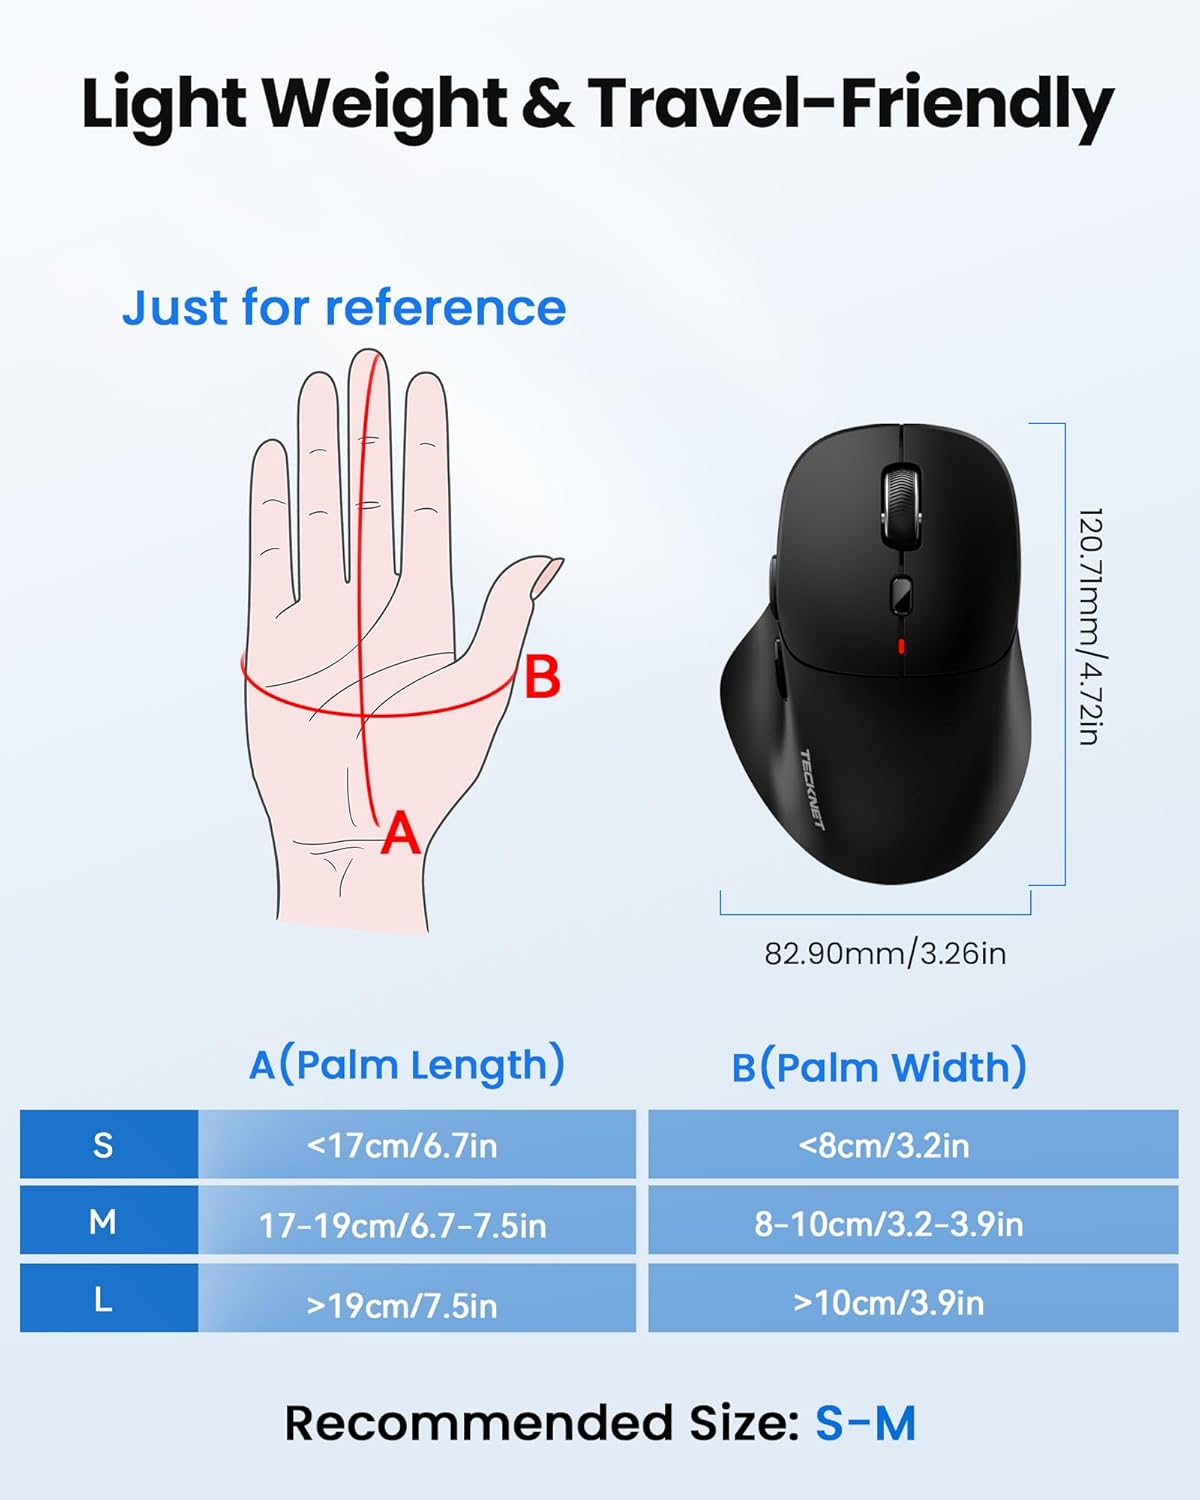
Figure 5: Multi-Button Control. This image highlights the six buttons on the mouse, including the forward and backward side buttons, and emphasizes the silent click feature and durability.
4.3 Desain ergonomic
The mouse features an ergonomic design with a unique left-side thumb contour to provide a comfortable grip and reduce wrist strain during prolonged use. This design helps maintain a neutral alignment for your wrist and palm.

Figure 6: Ergonomic Design. A hand is shown comfortably resting on the mouse, illustrating the ergonomic palm-shaped design, side finger rests, and angled design for reduced wrist pressure.
4.4 Kompatibilitas Lega
The TECKNET Wireless Mouse is compatible with a wide range of operating systems and devices:
- Windows
- Android
- macOS
- ios
It works seamlessly with tablets, laptops, and desktop computers, making it a versatile tool for various computing needs.

Figure 7: Multi-System Compatibility. This image displays the mouse alongside various devices and operating system logos (Windows, Mac OS, iOS, Android), indicating its broad compatibility.
5. Pangropéa
To ensure the longevity and optimal performance of your TECKNET Wireless Mouse, follow these maintenance guidelines:
- beberesih: Regularly wipe the mouse surface with a soft, slightly damp lawon. Hindarkeun ngagunakeun bahan kimia anu kasar atanapi pembersih abrasive.
- Perawatan sénsor: Keep the optical sensor at the bottom of the mouse clean and free from dust or debris to ensure accurate tracking.
- Perawatan batré: Charge the mouse regularly to maintain battery health. Avoid fully discharging the battery frequently. Store the mouse in a cool, dry place when not in use for extended periods.
- Panyimpenan: When transporting the mouse, ensure the USB receiver is securely stored in its dedicated compartment to prevent loss.
6. Cara ngungkulan
If you encounter any issues with your TECKNET Wireless Mouse, please refer to the following troubleshooting steps:
6.1 Mouse Not Connecting / Unresponsive
- Pariksa kakuatan: Ensure the mouse is turned ON using the power switch at the bottom.
- Modeu Verifikasi: Press the Channel Switch button to confirm you are in the correct mode (2.4G, BT1, or BT2) for your connected device.
- Pasangkeun deui Bluetooth: If using Bluetooth, go to your device's Bluetooth settings, remove the mouse from the list of paired devices, and then re-initiate the pairing process as described in Section 3.2.
- Pariksa Panarima USB: If using 2.4G, ensure the USB receiver is securely plugged into a working USB-A port on your computer. Try a different USB port if necessary.
- Ngeusi batre: Connect the mouse to a power source using the USB-C cable to ensure it has sufficient charge.
6.2 Cursor Erratic or Unresponsive
- Saluyukeun DPI: Press the DPI button to cycle through different sensitivity levels. A lower DPI might provide more stable tracking.
- Sensor beresih: Gently clean the optical sensor at the bottom of the mouse with a soft, dry cloth to remove any dust or debris.
- Change Surface: Try using the mouse on a different surface or a mouse pad. Highly reflective or uneven surfaces can affect tracking performance.
6.3 Tombol Teu Jalan
- Re-connect Mouse: Try turning the mouse off and then on again, or re-connecting it to your device.
- Pariksa kasaluyuan: Remember that Forward and Back buttons are not functional on Mac systems.
7. Spésifikasi
| Fitur | Katerangan |
|---|---|
| Nomer modél | TK-MS076 |
| Téhnologi konektipitas | Bluetooth 5.0, Bluetooth 3.0, 2.4G USB |
| Tingkat DPI | 800/1200/1600 (Default)/2400/3200/4800 |
| Kancing | 6 (Left, Right, Scroll Wheel, DPI, Forward, Back) |
| Kapasitas batré | 700mAh Rechargeable (1 Nonstandard Battery included) |
| Port ngecas | USB-C |
| Kahirupan batré | Nepi ka 3 bulan dina hiji muatan |
| Click Durability | 6 million clicks (Left/Right buttons) |
| Dimensi produk | 4.72 x 1.61 x 0.1 inci |
| Item Beurat | 2.72 ons |
| Fitur husus | Portable, Rechargeable, Silent, Wireless, Ergonomic |
| Téhnologi Deteksi Gerakan | Optik |
8. Garansi jeung Rojongan
TECKNET offers an exclusive 36-month warranty for registered members, demonstrating our commitment to product quality and customer satisfaction.
For technical support, warranty claims, or any inquiries, please refer to the contact information provided on the product packaging or visit the official TECKNET websitus.