Bubuka
Hatur nuhun pikeun meuliasing the Argon Audio TT MK2 Turntable. This manual provides essential information for the safe and optimal operation, setup, and maintenance of your new turntable. Please read this manual thoroughly before using the product and retain it for future reference.
The Argon Audio TT MK2 is designed to deliver high-fidelity audio playback from your vinyl records, featuring a built-in phono pre-amplifier, an Audio Technica AT3600 cartridge, and dual-speed control for 33 and 45 RPM records.
Parentah Kasalametan penting
Pikeun ngirangan résiko kasetrum listrik, kahuruan, atanapi karusakan kana unit, punten perhatikeun pancegahan kaamanan ieu:
- Ulah ngalaan alat ieu ka hujan atawa beueus.
- Ulah nempatkeun barang-barang anu dieusi cairan, sapertos vas, dina alat.
- Ulah meungpeuk sagala bukaan ventilasi. Pasang saluyu sareng parentah produsén.
- Entong dipasang di deukeut sumber panas sapertos radiator, register panas, kompor, atanapi aparat sanésna (kalebet ampLiifiers) anu ngahasilkeun panas.
- Ngajaga kabel listrik tina leumpang atanapi diciwit, khususna dina colokan, wadah genah, sareng titik dimana aranjeunna kaluar tina alat.
- Ngan anggo kantétan/aksésori anu ditunjuk ku produsén.
- Cabut colokan alat ieu nalika badai kilat atanapi nalika henteu dianggo kanggo waktos anu lami.
- Rujuk sadayana jasa ka tanaga jasa anu mumpuni. Diperlukeun ngalayanan nalika aparatur ruksak ku cara naon waé, sapertos kabel catu daya atanapi colokan rusak, cairan tumpah atanapi barang murag kana aparatur, aparatur parantos kakeunaan hujan atanapi lembab, henteu beroperasi normal. , atawa geus turun.
Naon dina Box
Carefully unpack all components and ensure all items are present before discarding packaging materials:
- Argon Audio TT MK2 Turntable Unit
- Audio Technica AT3600 Cartridge (pre-mounted)
- Dust Lid
- RCA Kabel
- Adaptor kakuatan
- counterweight
- Anti skate Beurat
- Platter and Drive Belt
- Dirasakeun Mat

Image: The Argon Audio TT MK2 Turntable with its clear dust cover in place, showcasing its sleek black finish.
Guide Setup
1. Panempatan
Place the turntable on a stable, level surface away from direct sunlight, heat sources, and strong vibrations. Ensure there is enough space around the unit for ventilation and operation.
2. Platter jeung Beubeur Instalasi
- Carefully place the metal platter onto the spindle.
- Locate the drive belt. Gently stretch the belt around the inner rim of the platter and hook it onto the motor pulley. Ensure the belt is not twisted.
- Teundeun mat felt dina luhureun platter nu.

Image: The Argon Audio TT MK2 Turntable with its dust cover removed, showing the platter and tonearm assembly.
3. Cartridge and Tonearm Setup
The Audio Technica AT3600 cartridge comes pre-mounted on the tonearm. Follow these steps to balance the tonearm and set the tracking force:
- Cabut pelindung stylus tina kartrij.
- Leupaskeun tonearm tina tempatna sacara lalaunan.
- Rotate the counterweight at the rear of the tonearm until the tonearm floats freely and is perfectly balanced horizontally.
- Once balanced, hold the counterweight steady and rotate the numbered ring on the front of the counterweight to "0".
- Rotate the entire counterweight (including the numbered ring) counter-clockwise until the desired tracking force is set. For the AT3600 cartridge, the recommended tracking force is typically 3.5 grams.

Gambar: A close-up view of the tonearm's counterweight and anti-skate mechanism, showing the numerical scale for adjustment.
4. Pangaluyuan Anti-Seluncur Es
Attach the anti-skate weight to the small loop on the tonearm and hang it over the second groove of the anti-skate support rod. This helps prevent the stylus from skipping inwards.
5. Nyambungkeun ka System Audio
The TT MK2 features a built-in phono pre-amplifier, allowing direct connection to powered speakers or an amplifier's line-level input. If your amplifier has a dedicated "Phono" input, you can bypass the internal pre-amp.
- Connect the supplied RCA cable from the "RCA OUT" jacks on the rear of the turntable to the corresponding input on your amplifier or powered speakers (e.g., "AUX", "LINE IN").
- Locate the "RIAA" switch on the rear of the turntable.
- Set the switch to "ON" if connecting to a line-level input (e.g., AUX, CD) on your amplifier or directly to powered speakers. This activates the internal phono pre-amppangagung.
- Set the switch to "OFF" if connecting to a dedicated "Phono" input on your amplifier. This bypasses the internal phono pre-amplifier, as your amplifier will provide the necessary RIAA equalization.

Image: The rear panel of the Argon Audio TT MK2 Turntable, showing the RCA output jacks, the RIAA (Phono/Line) switch, and the DC 12V power input.
6. Sambungan Daya
Connect the supplied power adapter to the "DC IN 12V" port on the rear of the turntable, then plug the adapter into a wall outlet.
Parentah Operasi
1. Powering on / Pareum
Use the power switch located on the rear panel to turn the turntable ON or OFF.
2. Milih Kagancangan Putereun
The TT MK2 supports two playback speeds: 33 1/3 RPM for LPs and 45 RPM for singles. Use the speed selection knob on the top right of the turntable to switch between "33" and "45".
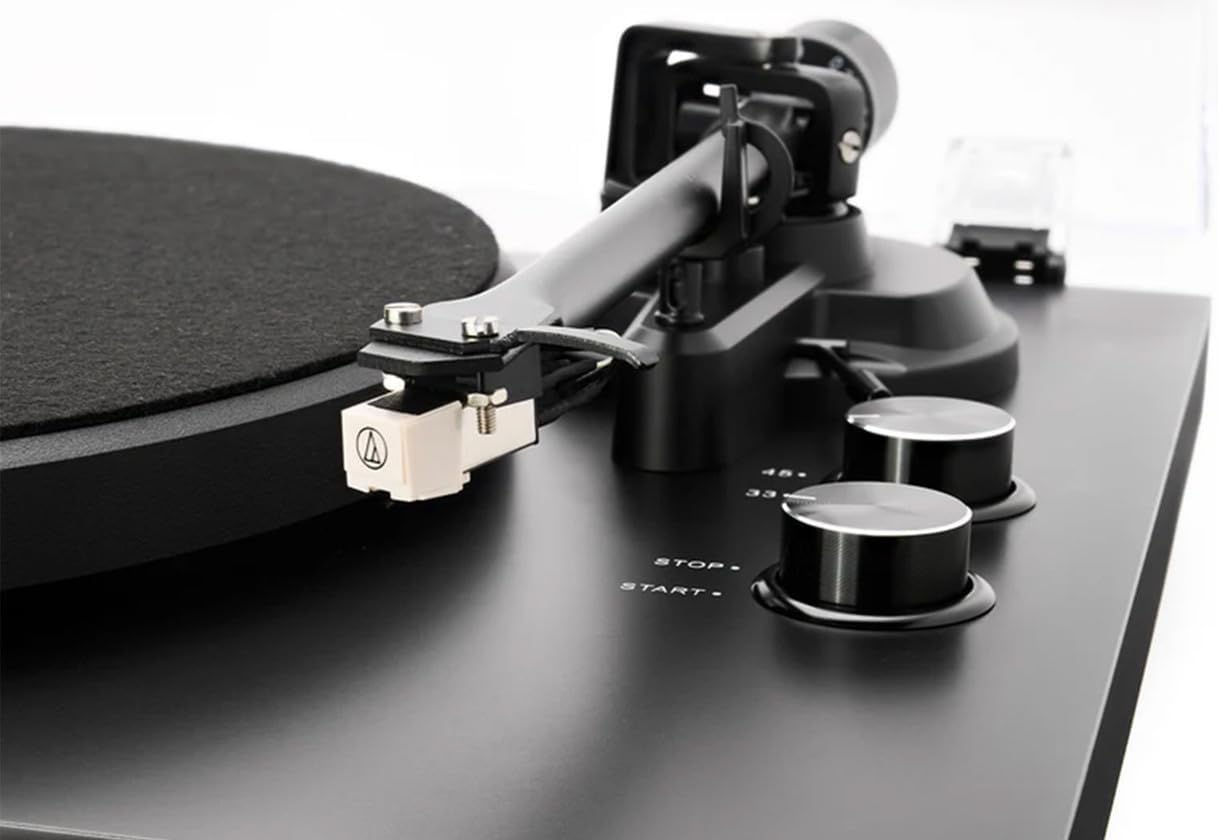
Image: A close-up of the Audio Technica AT3600 cartridge mounted on the tonearm, alongside the "STOP" and "START" buttons and the 33/45 RPM speed selection knob.
3. Maén Rékor
- Teundeun catetan dina platter, mastikeun eta dipuseurkeun.
- Select the correct speed (33 or 45 RPM) using the speed knob.
- Press the "START" button. The platter will begin to rotate.
- Gently angkat tonearm ngagunakeun uas cueing.
- Posisikeun tonearm di luhur alur awal rekaman anu dipikahoyong.
- Slowly lower the cueing lever to gently drop the stylus onto the record.
4. Ngeureunkeun Playback
- At the end of a record, the tonearm will not automatically return. Gently lift the tonearm using the cueing lever.
- Return the tonearm to its rest and secure it with the tonearm clip.
- Press the "STOP" button to halt platter rotation.
- Carefully remove the record.
Pangropéa
1. Ngabersihan Stylus
The stylus (needle) should be cleaned regularly to ensure optimal sound quality and prevent damage to your records. Use a soft brush designed for stylus cleaning, brushing gently from back to front (away from the cantilever).
2. Ngabersihkeun Catetan
Always handle records by their edges. Use a carbon fiber brush or a dedicated record cleaning solution and cloth to remove dust and debris before each play.
3. Ngabersihan Turntable
Wipe the turntable chassis and dust cover with a soft, dry, lint-free cloth. For stubborn marks, a slightly damp lawon bisa dipaké, dituturkeun ku lawon garing. Ulah make bahan kimia anu kasar atawa pembersih anu abrasif.
4. Perawatan Panutup Kekebul
The dust cover protects your turntable from dust. When not in use, keep the dust cover closed. Clean it gently with a soft, damp cloth to avoid scratching the acrylic surface.
Pamérésan masalah
If you experience issues with your Argon Audio TT MK2 Turntable, please consult the following table before contacting support:
| Masalah | Mungkin Cukang lantaranana | Solusi |
|---|---|---|
| Teu aya sora atawa sora nu leutik pisan |
|
|
| Distorted or muffled sound |
|
|
| Piring teu muter |
|
|
| Masalah kecepatan (gancang teuing/lambat teuing) |
|
|
spésifikasi
| Fitur | Rincian |
|---|---|
| Ngaran modél | TT MK2 |
| merek | Audio Argon |
| Ukuran (W x D x H) | 42 x 35 x 12 cm |
| Item Beurat | 4.5 kg |
| Bahan | Engineered Wood, Aluminium |
| Warna | Hideung |
| Kartrid | Audio Technica AT3600 (pre-fitted) |
| Phono Pra-amp | Built-in, switchable (RIAA ON/OFF) |
| Rotational Speeds | 33 1/3 RPM, 45 RPM (electronic speed selection) |
| Konektipitas | Kaluaran RCA |
| Komponén Kaasup | Turntable, Audio Technica AT3600 Cartridge, Dust Lid, RCA Cable, Power Adapter |
| Produsén | Audio Argon |
| Negara asal | Dénmark |
Garansi sareng Rojongan
Argon Audio products are designed and manufactured to the highest quality standards. This product is covered by a manufacturer's warranty. Please refer to the warranty card included with your product or visit the official Argon Audio websitus pikeun istilah jeung kaayaan jaminan lengkep.
For technical support, troubleshooting assistance beyond this manual, or warranty claims, please contact your authorized Argon Audio dealer or Argon Audio customer service directly. Contact information can typically be found on the Argon Audio websitus.


