1. Bubuka
This manual provides detailed instructions for the installation, operation, and maintenance of the Makerbase MKS Monster8 V2 32-Bit Control Board. Designed for advanced 3D printer applications, this board offers enhanced performance and compatibility with various printer setups, including Voron, Spider, and Octopus systems. Please read this manual thoroughly before proceeding with installation or operation to ensure proper functionality and safety.
2. Produk Langkungview
The Makerbase MKS Monster8 V2 is a high-performance 32-bit control board specifically engineered for 3D printers. It integrates advanced features and robust design to provide stable and precise control over printing processes. The board supports TMC2209 stepper motor drivers and is compatible with a range of popular 3D printer architectures.
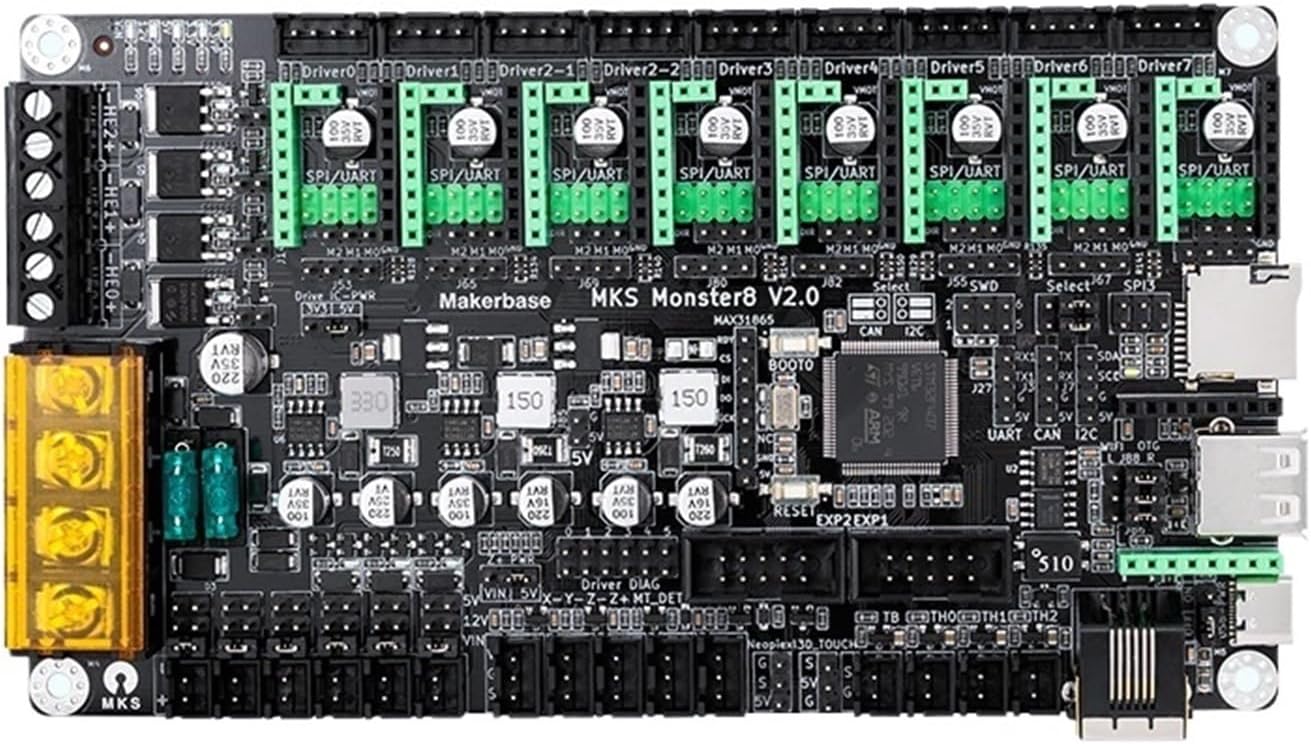
Gambar 2.1: Top view of the Makerbase MKS Monster8 V2 control board, showing various connectors and components.
3. Fitur konci
- 32-Bit Architecture: Provides high processing power for complex printing tasks and advanced features.
- TMC2209 Driver Support: Compatible with TMC2209 stepper motor drivers for silent and precise motor control.
- Enhanced Print Quality: Optimized design contributes to stable printing and improved output quality.
- Firmware Update Capability: Supports extended functionality and improvements through firmware updates.
- Konstruksi awét: Manufactured with high-quality materials for long-term stable operation.
- Optimized Drive System: Ensures stable material feeding, reducing common printing issues.
4. Setup jeung Instalasi
Before beginning installation, ensure your 3D printer is powered off and disconnected from the main power supply. Handle the control board with care to avoid electrostatic discharge.
4.1. Idéntifikasi komponén
Familiarize yourself with the various ports and connectors on the MKS Monster8 V2 board. Refer to Figure 2.1 for a visual guide.
4.2. Pemasangan Papan
- Carefully align the mounting holes on the MKS Monster8 V2 board with the standoffs in your printer's control box.
- Secure the board using appropriate screws. Do not overtighten.
4.3. Sambungan Wiring
Connect the following components to the MKS Monster8 V2 board:
- Sasayogian tanaga: Connect the 12V/24V power supply to the designated power input terminals. Ensure correct polarity.
- Motor Stepper: Connect X, Y, Z, and E (extruder) stepper motors to their respective driver slots. Ensure the correct orientation for each motor.
- Eureun tungtung: Connect X, Y, Z endstops to the corresponding endstop pins.
- Pamanas: Connect the hotend heater and heated bed heater to the designated heater outputs.
- Thermistors: Connect hotend and heated bed thermistors to their respective temperature sensor inputs.
- Fans: Connect cooling fans to the appropriate fan headers.
- Display/Interface: Connect your printer's display or other user interface components.
Refer to your 3D printer's specific wiring diagram and the MKS Monster8 V2 pinout documentation for detailed connection instructions.
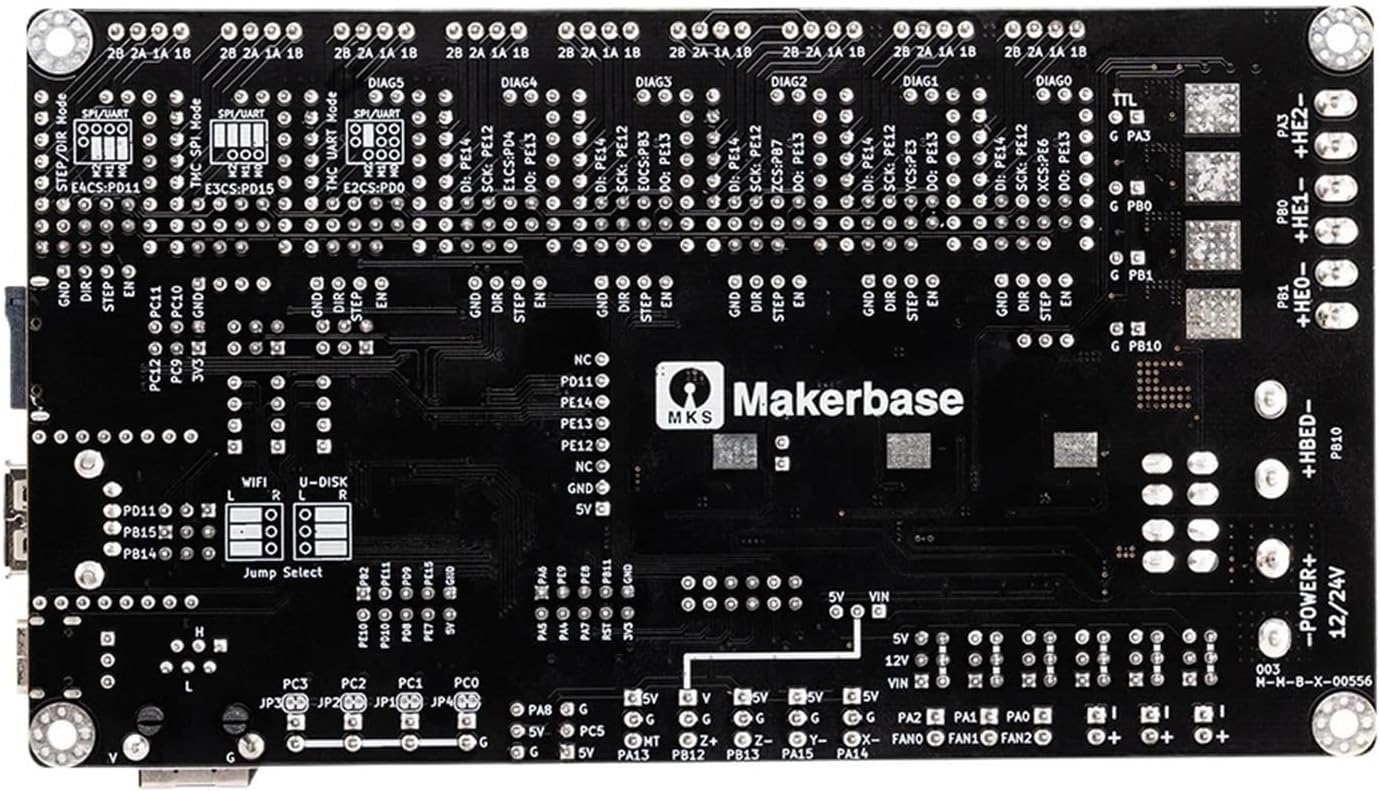
Gambar 4.1: Handap view of the Makerbase MKS Monster8 V2 control board, showing additional pin headers and mounting points.
5. Parentah Operasi
5.1. Firmware Installation and Configuration
The MKS Monster8 V2 requires appropriate firmware for operation. It is recommended to use Marlin, Klipper, or RepRapFirmware, configured specifically for this board and your printer's setup.
- Download the latest stable firmware version compatible with MKS Monster8 V2 from the official Makerbase GitHub repository or the respective firmware project's websitus.
- Configure the firmware according to your printer's specifications (e.g., bed size, motor steps per mm, thermistor types, endstop logic).
- Compile the firmware and upload it to the MKS Monster8 V2 board via USB or an SD card, following the firmware's specific flashing instructions.
5.2. First Power-Up and Testing
- After all connections are secure and firmware is uploaded, connect the power supply to the board.
- Observe the board's indicator LEDs. They should light up, indicating power.
- Perform initial tests:
- Verify motor movement in all axes (X, Y, Z, E).
- Check endstop functionality.
- Test heater and thermistor readings.
- Ensure fan operation.
- Address any issues before attempting a print.
6. Pangropéa
- Inspeksi rutin: Periodically inspect the board for any loose connections, signs of overheating, or physical damage.
- beberesih: Keep the board free from dust and debris. Use compressed air or a soft brush for cleaning. Ensure the board is powered off and disconnected before cleaning.
- Pembaruan firmware: Regularly check for and apply firmware updates to benefit from new features, bug fixes, and performance improvements.
- Kontrol Lingkungan: Operate the board in a clean, dry environment with stable temperatures to prevent damage.
7. Cara ngungkulan
| Masalah | Mungkin Cukang lantaranana | Solusi |
|---|---|---|
| Papan teu tiasa dihurungkeun. | Incorrect power connection, faulty power supply, blown fuse. | Pariksa catu daya voltage and polarity. Check the board's fuse. Test power supply independently. |
| Motors not moving or moving erratically. | Incorrect wiring, incorrect driver configuration, faulty motor/driver. | Check motor wiring and driver orientation. Verify firmware configuration for stepper drivers (e.g., steps/mm, current). Test motors/drivers individually. |
| Temperature readings are incorrect. | Incorrect thermistor wiring, wrong thermistor type configured in firmware. | Ensure thermistors are correctly wired. Update firmware to match the thermistor type used. |
| Printer not responding to commands. | Firmware not uploaded correctly, communication issue (USB/SD card). | Re-upload firmware. Check USB cable and drivers. Ensure SD card is properly formatted and contains valid G-code. |
8. Spésifikasi
- Jumlah modél: MKS Monster8 V2
- Prosesor: 32-Bit Mikrokontroler
- Rojongan Supir: TMC2209 (and compatible stepper drivers)
- Masukan Voltage: 12V/24V DC (typical for 3D printers)
- Beurat barang: 1.76 ons (kira-kira 50 gram)
- Ukuran Paket: 0.39 x 0.39 x 0.39 inci (Note: These dimensions appear to be generic and may not reflect the actual board size.)
- Kasaluyuan: Voron, Spider, Octopus 3D printer systems
9. Garansi jeung Rojongan
For warranty information and technical support, please refer to the official Makerbase websitus atanapi ngahubungan pangecér Anjeun. Simpen bukti pameseran anjeun pikeun klaim garansi.


