1. Bubuka
This manual provides detailed instructions for the installation, operation, and maintenance of your Kicker LX1200.5 5-Channel Amplifier, KISL K-Series Interconnect, and KEYLOC Key Series Smart Powered Line-Out Converter. Please read this manual thoroughly before attempting installation or operation to ensure proper function and safety.
2. Émbaran Kasalametan
Always disconnect the vehicle's battery before installing or servicing any car audio components. Ensure all wiring is properly routed and secured to prevent damage or interference. Use appropriate gauge wiring for power and ground connections. Consult a professional installer if you are unsure about any part of the installation process. Avoid exposing the ampLifier kana Uap atanapi suhu ekstrim.
3. Eusi Paket
- Kicker LX1200.5 5-Channel Amppangagung
- Kicker 46KISL K-Series Interconnect (Speaker Wire to RCA Adapter)
- Kicker 47KEYLOC Key Series Smart Powered Line-Out Converter
- LX Remote Control
- Pamasangan Hardware
- Manual pangguna (dokumén ieu)
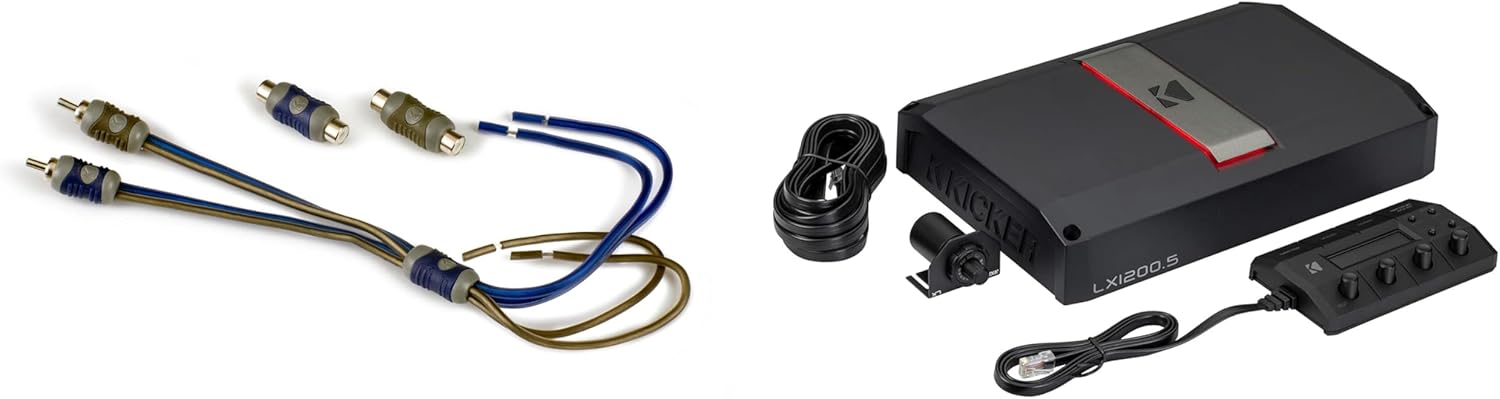
Gambar 3.1: Leuwihview of the Kicker LX1200.5 amplifier bundle, including the amplifier unit, KISL interconnects, and KEYLOC line-out converter.
4. Setup jeung Instalasi
4.1 Pedoman Instalasi Umum
- Choose a mounting location that is dry, well-ventilated, and protected from physical damage.
- Mastikeun spasi nyukupan sabudeureun éta amplifier pikeun cooling ditangtoskeun.
- Securely mount all components to prevent movement during vehicle operation.
- Route power cables away from signal cables to minimize noise.
4.2 KISL K-Series Interconnect Installation
The Kicker 46KISL K-Series Interconnect allows for easy connection of factory speaker wires to your amplifier's RCA inputs. This eliminates the need for a separate line-out converter when using a factory head unit.
- Identify the factory speaker wires from your vehicle's head unit or factory amppangagung.
- Connect the appropriate speaker wires to the bare wire ends of the KISL interconnect. Ensure correct polarity.
- Plug the RCA ends of the KISL interconnect into the corresponding RCA input jacks on the LX1200.5 amppangagung.

Image 4.1: The Kicker KISL K-Series Interconnect, showing the speaker wire inputs and RCA outputs.
4.3 KEYLOC Key Series Smart Powered Line-Out Converter Installation
The Kicker 47KEYLOC provides a revolutionary line-out conversion with automatic frequency detection, ideal for integrating with complex factory audio systems. It offers versatile input sensitivity from 1V to 40V (Hi-level) and 125mV to 10V (Lo-level).
- Connect the factory speaker wires to the high-level inputs of the KEYLOC converter.
- Connect the RCA outputs of the KEYLOC to the RCA inputs of the LX1200.5 amppangagung.
- Provide power and ground connections to the KEYLOC as per its specific instructions (refer to the KEYLOC manual for detailed wiring).
- The KEYLOC will automatically detect and optimize the frequency response for a clean signal.

Image 4.2: The Kicker KEYLOC line-out converter, showing its compact design and wiring harness for integration into a vehicle's audio system.
4.4 LX1200.5 5-Channel AmpPamasangan lifier
The LX1200.5 amplifier features a compact design and FIT+ technology for noise-free playback. It accepts both low- and high-level signals up to 40V.
- Kabel kakuatan: Connect a fused power cable directly from the vehicle's battery to the amplifier's +12V terminal. Ensure the fuse is located within 18 inches of the battery.
- Kabel taneuh: Connect a ground cable of the same gauge as the power cable from the amplifier's GND terminal to a clean, bare metal chassis point on the vehicle.
- Ngahurungkeun Jauh: Sambungkeun kawat péngkolan jauh tina kaluaran jauh unit sirah anjeun ka ampterminal REM liifier.
- Masukan Sinyal: Connect the RCA outputs from your head unit, KISL, or KEYLOC to the amplifier's RCA input jacks. The amplifier supports both low-level (RCA) and high-level (speaker wire) inputs.
- Kaluaran Speaker: Connect your speakers and subwoofer to the amplifier's speaker output terminals. Pay close attention to polarity and impedance ratings. The LX1200.5 delivers 175W x 4 @ 2Ω and 700W @ 1Ω for the sub channel.
- Pamasangan: Aman dipasang dina amplifier using the provided hardware in your chosen location.

Image 4.3: The Kicker LX1200.5 amplifier shown with its remote control and various wiring connections, illustrating a typical setup.
5. Parentah Operasi
5.1 LX Control Center
The LX Control Center provides real-time monitoring of critical amplifier parameters, including battery voltage jeung amplifier temperature. This helps ensure optimal performance and protection.
5.2 LX Remote Control
The included LX Remote Control allows for convenient adjustment of bass levels from the driver's seat. It also features SHOCwave2.0 technology for digital bass restoration, enhancing low-frequency response.
5.3 Gain-Match LEDs
The amplifier features Gain-Match LEDs to assist in setting input gain levels correctly. Adjust the gain until the LED indicates optimal signal without clipping, ensuring dynamic audio performance and preventing distortion.
5.4 Adjustable Crossovers
The LX1200.5 includes adjustable crossovers for precise audio tuning. These allow you to filter specific frequency ranges to your speakers and subwoofer, optimizing sound quality and protecting your components.
5.5 RGB LED Accent Colors
Sesuaikeun amplifier's aesthetic with 11 selectable RGB LED accent colors. Refer to the amplifier's specific controls or software (if applicable) for changing these settings.
6. Pangropéa
The Kicker LX1200.5 amplifier requires minimal maintenance. Periodically inspect all wiring connections to ensure they are secure and free from corrosion. Keep the amplifier's cooling fins clear of dust and debris to maintain proper heat dissipation. Clean the exterior with a soft, dry cloth. Do not use harsh chemicals or abrasives.
7. Cara ngungkulan
- Henteu aya kakuatan: Check the main fuse near the battery, the amplifier's internal fuses, and all power/ground connections. Ensure the remote turn-on wire is receiving +12V when the head unit is on.
- Henteu aya sora: Verify all RCA and speaker connections. Check head unit settings and amplifier gain levels. Ensure speakers are properly wired and functional.
- Sora distort: Ngurangan amplifier's gain setting. Check for proper crossover settings. Ensure speaker impedance matches the amplifier's capabilities. Inspect speaker wires for shorts.
- AmpPanas teuing: Pastikeun ventilasi nyukupan di sabudeureun éta amplifier. Check speaker impedance. Reduce gain levels if consistently overheating.
- Noise/Hiss: Reroute power and signal cables to prevent interference. Check ground connections for cleanliness and security.
8. Spésifikasi
| Fitur | Spésifikasi |
|---|---|
| RMS Power (Stereo Channels) | 175W x 4 @ 2Ω |
| RMS Power (Sub Channel) | 700W @ 1Ω |
| Daya dinamis | 1500W |
| Frequency Response (Stereo) | 20Hz - 20kHz |
| Frequency Response (Sub) | 10Hz - 160Hz |
| Input Sensitivity (KEYLOC) | 125mV to 10V (Lo), 1V to 40V (Hi) |
| Diménsi (H x W x L) | 2-3/8" x 8-7/16" x 12-5/8" |
| Item Beurat | 14.37 pon |
| Nomer modél | kickerbdl250219-19 |
9. Garansi jeung Rojongan
The Kicker LX1200.5 amplifier hadir kalawan a 1-Taun Garansi Produsén. For warranty claims or technical support, please contact Kicker customer service directly or visit their official website. Retain your proof of purchase for warranty validation.
For further assistance, you may visit the official KICKER Store online: KICKER Store


