1. Bubuka
Welcome to the instruction manual for your SONICAKE Sonic Cube II USB Audio Interface Mixer. This device is designed to provide high-quality audio recording, streaming, and podcasting capabilities for musicians, producers, and content creators. It features dual-channel analog preamps, 48V phantom power, and integrates with powerful computer software for digital modeling and DSP effects. This manual will guide you through the setup, operation, and maintenance of your Sonic Cube II, ensuring optimal performance and longevity.

Image 1.1: The SONICAKE Sonic Cube II USB Audio Interface Mixer.
2. Produk Langkungview
2.1 Fitur konci
- High-Performance Converters: Supports recording and mixing at up to 24-bit/48kHz for high-quality audio reproduction with low noise.
- Dual-Channel Analog Preamps: Equipped with high-quality analog preamps for excellent dynamic range and low distortion, suitable for various instruments and microphones.
- + 48V Phantom Power: Provides power for condenser microphones, ensuring compatibility with a wide range of professional audio equipment.
- Éfék Pemodelan Digital & DSP: Ngawengku parangkat lunak komputer anu kuat kalayan modél digital bawaan pikeun gitar amplifiers and various DSP effects, enhancing creative possibilities.
- "ON AIR" Function: Simplifies live streaming with a dedicated function for ease of use.
- Kasaluyuan lega: Compatible with most recording software (DAWs) on Mac and Windows operating systems, including ProTools, Reaper, and Ableton.
- Konektipitas USB: Connects via USB-C/USB-A, offering reliable power and data transmission.

Image 2.1: The Sonic Cube II highlighting its high-quality analog preamps pikeun sora anu unggul.
2.2 Kontrol sareng Sambungan

Image 2.2: Front and rear panel diagram of the Sonic Cube II, illustrating all controls and connections.
- Input MIC 1: XLR input for connecting a microphone.
- LINE/INST 2 Input: 1/4" (6.35mm) TRS input for connecting line-level instruments or high-impedance instruments like guitars.
- EFX / +48V Switch: Activates DSP effects or +48V phantom power for MIC 1.
- GAIN 1 Knob: Adjusts the input gain level for MIC 1.
- GAIN 2 Knob: Adjusts the input gain level for LINE/INST 2.
- RVB / HI-Z Switch: Activates reverb effect or sets LINE/INST 2 input to high impedance (HI-Z) for instruments.
- kenop OUTPUT: Controls the overall output volume to balanced outputs and headphones.
- ON AIR / MONITOR Button: Engages direct monitoring for real-time input sound or activates the "ON AIR" function for streaming.
- Kaluaran headphone: 1/4" (6.35mm) TRS stereo output for connecting headphones.
- Port USB (Tipe-C): Connects the device to a computer for power and data transfer.
- AUTO OUTPUT Switch: Toggles automatic output routing.
- OTG Port (Type-C): For connecting to mobile devices (e.g., smartphones, tablets) for recording or streaming.
- BALANCED OUTPUT (L/R): 1/4" (6.35mm) TRS outputs for connecting to studio monitors or other audio equipment.
3. Setup Guide
3.1 Sarat Sistim
- Sistem operasi: Windows, macOS.
- Alat anu cocog: Personal Computer, Digital Audio Workstation (DAW).
- Parangkat Lunak anu Dirojong: ProTools, Reaper, Ableton, and other standard DAW software.
3.2 Panyambung Hardware
- Connect the Sonic Cube II to your computer using a USB cable. The device is bus-powered, meaning it draws power directly from your computer via the USB connection.
- Connect your microphone to the MIC 1 XLR input.
- Connect your instrument (e.g., guitar, bass, keyboard) to the LINE/INST 2 1/4" input.
- Connect your headphones to the Headphone Output for monitoring.
- Connect your studio monitors to the BALANCED OUTPUT (L/R) using 1/4" TRS cables.

Image 3.1: Connecting the Sonic Cube II to a computer via USB for power and data.
3.3 Parangkat Lunak sareng Pamasangan Supir
For optimal performance, it is recommended to install the dedicated drivers and software for the Sonic Cube II. While the device may function as a generic USB audio device, proprietary drivers often provide lower latency and access to advanced features.
- Pamaké Windows: Search online for "Sonic Cube II Software & Firmware Download". Download and install both the "Sonic Mix Setup" and the "Sonicake USB ASIO Driver". This is crucial for proper device recognition and low-latency performance with DAWs.
- macOS Users: The device is generally plug-and-play with macOS. If specific drivers or software are available, they can be found on the official SONICAKE support websitus.
After installation, restart your computer and ensure the Sonic Cube II is selected as your audio input and output device in your operating system's sound settings and your preferred Digital Audio Workstation (DAW).
4. Parentah Operasi
4.1 Powering on / Pareum
The Sonic Cube II is USB bus-powered. It powers on automatically when connected to a powered USB port on your computer or mobile device. To power off, simply disconnect the USB cable.
4.2 Input Level Adjustment
- Ngagunakeun éta MANGKAS 1 knob to adjust the input level for the microphone connected to MIC 1.
- Ngagunakeun éta MANGKAS 2 knob to adjust the input level for the instrument or line-level device connected to LINE/INST 2.
- Monitor the input levels in your DAW to avoid clipping (distortion). Aim for levels that peak around -6dB to -3dB.
4.3 Daya Phantom (+48V)
If you are using a condenser microphone with the MIC 1 input, you will need to activate +48V phantom power. Press the EFX / +48V switch to engage phantom power. Ensure your microphone requires phantom power before activating it. Dynamic microphones typically do not require phantom power.
4.4 Direct Monitoring and "ON AIR" Function
The ON AIR / MONITOR button allows for direct monitoring, enabling you to hear your input signal in real-time through your headphones or studio monitors without latency. This is essential for recording and live performance.
- Pencét éta ON AIR / MONITOR button to activate direct monitoring.
- When engaged, the button's indicator light will illuminate.
- This function also serves as an "ON AIR" mode for streamlined live streaming, routing your audio directly.

Image 4.1: The Sonic Cube II highlighting the "One-Click Monitoring" feature via the ON AIR / MONITOR button.
4.5 Pangaluyuan Tingkat Kaluaran
Paké badag OUTPUT knob to control the overall volume of the balanced outputs (L/R) and the headphone output. Adjust this to a comfortable listening level. The headphone output volume is linked to the main output knob.
5. Software and DSP Effects
The Sonic Cube II includes powerful computer software that expands its capabilities with digital modeling and DSP effects. This software allows you to access a variety of guitar amplifier models, cabinet simulations, and other digital signal processing effects directly on your computer.
- Install the "Sonic Mix Setup" software as described in Section 3.3.
- Launch the software to access the digital modeling and DSP effects interface.
- Ékspérimén kalawan béda amp models and effects to shape your sound for recording or live streaming.
- Ensure the software is correctly configured to use the Sonic Cube II as its audio input and output device.
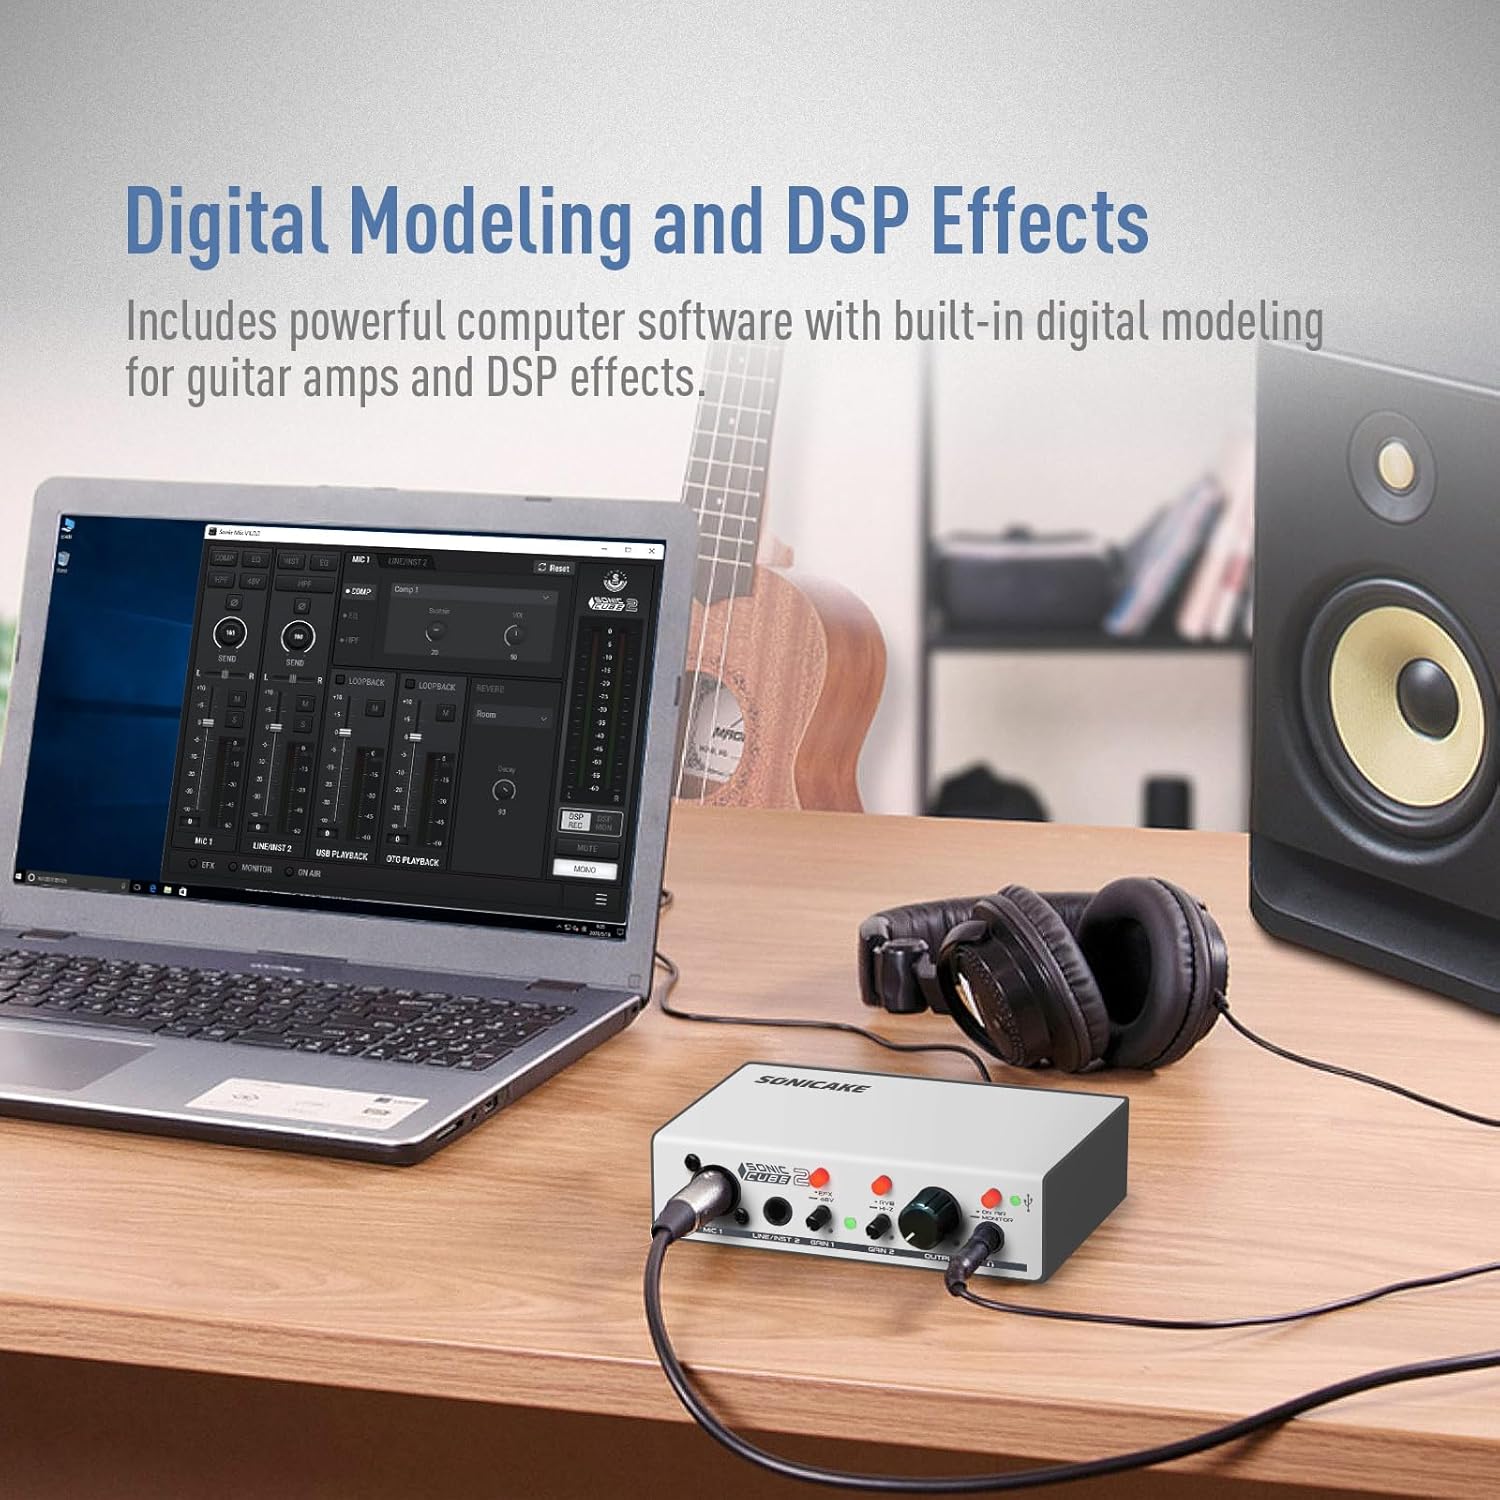
Image 5.1: The Sonic Cube II integrated with computer software for digital modeling and DSP effects.
6. Pangropéa
- beberesih: Anggo lawon anu lemes sareng garing pikeun ngabersihkeun bagian luar alat. Ulah nganggo pembersih cair atanapi pangleyur, sabab tiasa ngaruksak lapisan atanapi komponén internal.
- Panyimpenan: Store the Sonic Cube II in a cool, dry place away from direct sunlight, extreme temperatures, and high humidity.
- Penanganan: Nanganan alat kalayan ati-ati. Hindarkeun lungsurna atanapi nahan kana dampak anu kuat.
- Sambungan: Pariksa sacara berkala sadaya sambungan kabel tina karusakan sareng karusakan. Pastikeun kabel dipasang kalayan aman pikeun nyegah leungitna sinyal atanapi masalah anu teu puguh.
7. Cara ngungkulan
Upami anjeun ngalaman masalah sareng Sonic Cube II anjeun, tingali tip ngungkulan masalah ieu:
- Taya Kaluaran Sora:
- Ensure the Sonic Cube II is properly connected to your computer via USB and powered on.
- Check that the OUTPUT knob is turned up to an audible level.
- Verify that the Sonic Cube II is selected as the default audio output device in your computer's sound settings and your DAW.
- Check headphone and monitor connections.
- No Input Signal / Low Input Volume:
- Ensure your microphone or instrument is correctly connected to the appropriate input (MIC 1 or LINE/INST 2).
- Saluyukeun MANGKAS 1 or MANGKAS 2 knobs to increase the input level.
- If using a condenser microphone, ensure +48V phantom power is activated via the EFX / +48V pindah.
- Verify that the Sonic Cube II is selected as the default audio input device in your computer's sound settings and your DAW.
- Check microphone/instrument cables for damage.
- Driver Issues (Windows):
- If the device is not recognized or experiencing high latency, ensure you have installed both the "Sonic Mix Setup" and "Sonicake USB ASIO Driver" as described in Section 3.3.
- Try uninstalling and reinstalling the drivers.
- Sambungkeun alat ka port USB béda dina komputer Anjeun.
- Audio distort:
- Ngurangan MANGKAS 1 or MANGKAS 2 knobs to prevent input clipping.
- Turunkeun OUTPUT knob if the distortion occurs at the output stage.
- Check for faulty cables or connections.
8. Spésifikasi
| Fitur | Spésifikasi |
|---|---|
| merek | SONICAKE |
| Nomer modél | QAI-23 |
| Item Beurat | 15.5 ons |
| Ukuran Paket | 8.03 x 5.43 x 3.23 inci |
| Téhnologi konektipitas | USB, XLR, 6.35mm TRS |
| Jumlah Saluran | 2 |
| Alat nu cocog | DAW, Personal Computer |
| Software Dirojong | ProTools, Reaper, Ableton (versions not specified) |
| Sistem operasi | Windows, macOS |
| Kakuatan Phantom | +48V |
| Max Sample Rate / Bit Jero | 48kHz / 24-bit |
9. Garansi jeung Rojongan
For warranty information and technical support, please refer to the documentation included with your product or visit the official SONICAKE website. Keep your proof of purchase for warranty claims. If you encounter issues not covered in this manual, contacting SONICAKE customer support is recommended for further assistance.


