1. Bubuka
Thank you for choosing the FLYLINKTECH 5000A Jump Starter. This portable device is designed to provide instant power to jump-start 12V vehicles, charge electronic devices, and offer emergency lighting. Please read this manual thoroughly before use to ensure safe and optimal performance.
2. Émbaran Kasalametan penting
- Always ensure the jump starter is fully charged before use.
- Ulah nyobian ngahurungkeun batré anu beku.
- Nyambungkeun clamps correctly: red to positive (+), black to negative (-). Reverse polarity can cause damage.
- Ulah nyambungkeun cl beureum jeung hideungamps babarengan.
- Jauhkeun tina jangkauan barudak.
- Anggo di daérah anu berventilasi saé.
- Hindarkeun ngalaan alat ka suhu anu ekstrim atanapi sinar panonpoé langsung kanggo waktos anu berkepanjangan.
- If the device becomes excessively hot during use, disconnect it immediately.
- Tingali buku manual nu boga kandaraan anjeun pikeun prosedur jump-starting anu khusus.
3. Eusi Paket
Pastikeun yén sadaya item aya dina pakét anjeun:
- FLYLINKTECH 5000A Jump Starter (Model BD10)
- Kabel Jumper pinter
- Kabel Ngecas USB-C
- Kasus Panyimpenan Eva
- Manual pamaké

Image: Contents of the FLYLINKTECH 5000A Jump Starter package, including the jump starter unit, smart jumper cables, USB-C charging cable, and EVA storage case.
4. Produk Langkungview
Familiarize yourself with the components and ports of your jump starter:
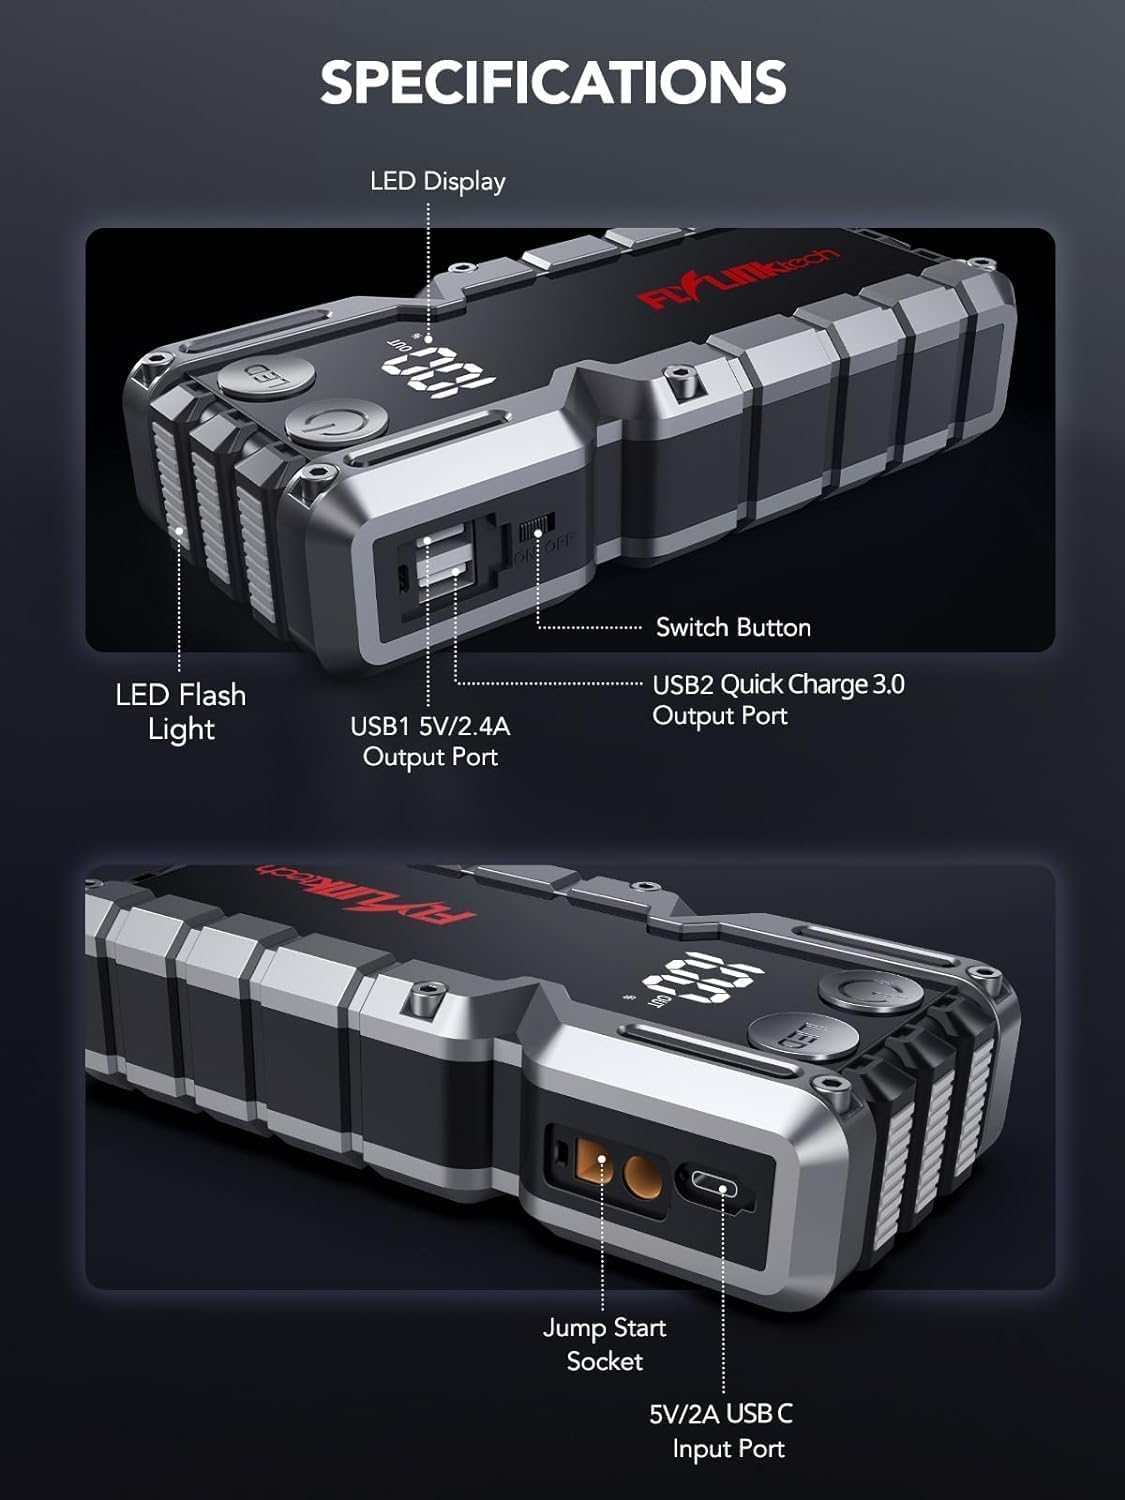
Gambar: Detil view of the jump starter showing the LED display, LED flashlight, power button, switch button, USB1 5V/2.4A output port, USB2 Quick Charge 3.0 output port, Jump Start Socket, and 5V/2A USB-C input port.
- Témbong LED: Némbongkeun persén batrétage.
- Senter LED: Nyayogikeun katerangan kalayan sababaraha modeu.
- Tombol Daya: Activates the device and controls flashlight modes.
- Tombol switch: Kontrol daya utama.
- Kaluaran USB1 (5V/2.4A): Port ngecas USB standar.
- Kaluaran USB2 (QC3.0): Quick Charge 3.0 port for faster charging.
- Soket Luncat Mimitian: Nyambungkeun kana kabel jumper pinter.
- USB-C Input (5V/2A): Used to recharge the jump starter.
5. Ngecas Jump Starter
Before first use, fully charge the jump starter. It is recommended to recharge the unit every 3-6 months to maintain battery health.
- Connect the provided USB-C charging cable to the USB-C input port on the jump starter.
- Connect the other end of the USB-C cable to a 5V/2A USB wall adapter (not included) or a car charger.
- The LED display will show the charging progress. The unit is fully charged when the display shows 100%.

Image: The jump starter connected via USB to charge a smartphone and a tablet, demonstrating its power bank functionality.
6. Jump Starting Your Vehicle
Follow these steps carefully to safely jump-start your 12V vehicle:
- Prepare the Jump Starter: Ensure the jump starter is at least 50% charged. Turn off your vehicle's ignition and all accessories (headlights, radio, etc.).
- Connect Smart Jumper Cables: Insert the blue plug of the smart jumper cables into the Jump Start Socket on the jump starter. Ensure a firm connection. The indicator light on the smart clamp will flash red and green.
- Sambungkeun ka Batré Kendaraan:
- Gantelkeun ka beureum (+) clamp ka terminal positif batré kandaraan anjeun.
- Gantelkeun ka hideung (-) clamp ka terminal négatif batré kandaraan anjeun.
Sakali nyambung kalayan leres, lampu indikator dina lampu pinter bakal hurungamp bakal ngahurungkeun héjo padet.
- Mimitian Kendaraan: Go into your vehicle and start the engine. If the vehicle does not start immediately, wait 30 seconds and try again. If it still doesn't start, press the "BOOST" button on the smart clamp for 3 seconds until the green light turns solid, then try starting the car again within 30 seconds.
- Cabut Kabel: Once the engine starts, immediately remove the smart jumper cables from the vehicle battery, then disconnect them from the jump starter.

Image: Visual guide for jump-starting: 1. Insert jump clamp into booster. 2. Connect clamps to car battery. 3. Start your car. 4. Remove clamps.

Image: The smart clamps connected to the jump starter, illustrating the 10-layer safety protections including short circuit, reverse charge, over charge, reverse polarity, over discharge, over current, reverse connection, and high temperature protection.
7. Ngagunakeun salaku Power Bank
The jump starter can also be used to charge your electronic devices.
- Connect your device's USB charging cable to either the USB1 (5V/2.4A) or USB2 (QC3.0) output port on the jump starter.
- Jump starter bakal otomatis mimiti ngecas alat anjeun.
- The LED display will show the remaining battery capacity of the jump starter.

Image: The jump starter functioning as a portable power bank, with two USB output ports (5V/2.4A and Quick Charge 3.0) actively charging a smartphone and a tablet.
8. Ngagunakeun Senter LED
The built-in 600-lumen LED flashlight has three modes for various situations:
- Pikeun Ngahurungkeun/Pareuman: Press and hold the LED button for 3 seconds.
- Ka Modeu Siklus: Once the light is on, short press the LED button to switch between:
- Konstan On: Pikeun katerangan umum.
- Modeu SOS: Flashes the international SOS signal for emergencies.
- Modeu Strobe: Kedip-kedip gancang pikeun peringatan atanapi sinyal.

Image: The jump starter with its LED flashlight active, illustrating the three available modes: standard flashlight, SOS signal, and strobe light for emergencies.
9. Pangropéa
- beberesih: Lap unitna ku lawon anu lemes sareng garing. Entong nganggo bahan kimia anu kasar atanapi bahan anu abrasif.
- Panyimpenan: Store the jump starter in its EVA case in a cool, dry place away from direct sunlight. Ensure it is charged to at least 50% before storing for extended periods. Recharge every 3-6 months.
- Perawatan batré: The internal lithium-ion battery is designed for long life. Avoid fully discharging the unit frequently.

Water-resistant design.

Rugged ABS shell for drop resistance.

Operates in extreme temperatures (-4°F to 140°F).
10. Cara ngungkulan
| Masalah | Mungkin Cukang lantaranana | Solusi |
|---|---|---|
| Vehicle won't start after connecting. | Jump starter battery too low; incorrect clamp connection; vehicle battery completely dead. | Ensure jump starter is fully charged. Check clamp connections (red to +, black to -). Press the "BOOST" button on the smart clamp for 3 seconds and try again. |
| Cl pinteramp indicator light is red/flashing. | Polaritas tibalik; sirkuit pondok; suhu anu kaleuleuwihi. | Pegatkeun sambungan clamps and re-connect correctly. Check for any short circuits. Allow unit to cool down if overheated. |
| Jump starter teu ngecas. | Faulty charging cable or adapter; loose connection. | Ensure USB-C cable and adapter are working and connected securely. Try a different cable or adapter. |
| Senter LED teu tiasa dianggo. | Not activated correctly; low battery. | Press and hold the LED button for 3 seconds to activate. Ensure the jump starter has sufficient charge. |
11. Spésifikasi
| Fitur | Rincian |
|---|---|
| Puncak Arus | 5000A |
| Kapasitas batré | 18000mAh (66.6Wh) |
| Mimitian Voltage | 12V |
| Kasaluyuan engine | Nepi ka 9.0L Gas / 8.0L Diesel |
| Kaluaran USB 1 | 5V / 2.4A |
| Kaluaran USB 2 | QC3.0 |
| Input USB-C | 5V / 2A |
| Senter LED | 600-Lumen (Constant, SOS, Strobe) |
| Suhu Operasi | -4°F nepi ka 140°F (-20°C nepi ka 60°C) |
| Diménsi | 4.2 x 9 x 19 cm |
| Beurat | 540 g (1.19 lbs) |
| Protections Kasalametan | 10-Layer (Short Circuit, Reverse Polarity, Over-Current, etc.) |
12. Garansi jeung Rojongan
The FLYLINKTECH 5000A Jump Starter comes with an industry-leading garansi 3 taun ti tanggal pameseran. Garansi ieu nutupan cacad manufaktur sareng mastikeun kinerja anu tiasa dipercaya.
For technical support, warranty claims, or any questions regarding your product, please contact FLYLINKTECH customer service through the retailer's platform or visit our official websitus.
Punten nahan bukti pameseran anjeun pikeun validasi garansi.


