Bubuka
This manual provides detailed instructions for the installation, operation, maintenance, and troubleshooting of your AINAVI 10-inch QLED Touchscreen Car Stereo. This unit is specifically designed as a replacement and upgrade for Toyota RAV4 models manufactured between 2013 and 2018, offering advanced features such as Wireless CarPlay, Android Auto, GPS Navigation, and a high-resolution multimedia experience.
Please read this manual thoroughly before installation and use to ensure proper function and to maximize your enjoyment of the product.
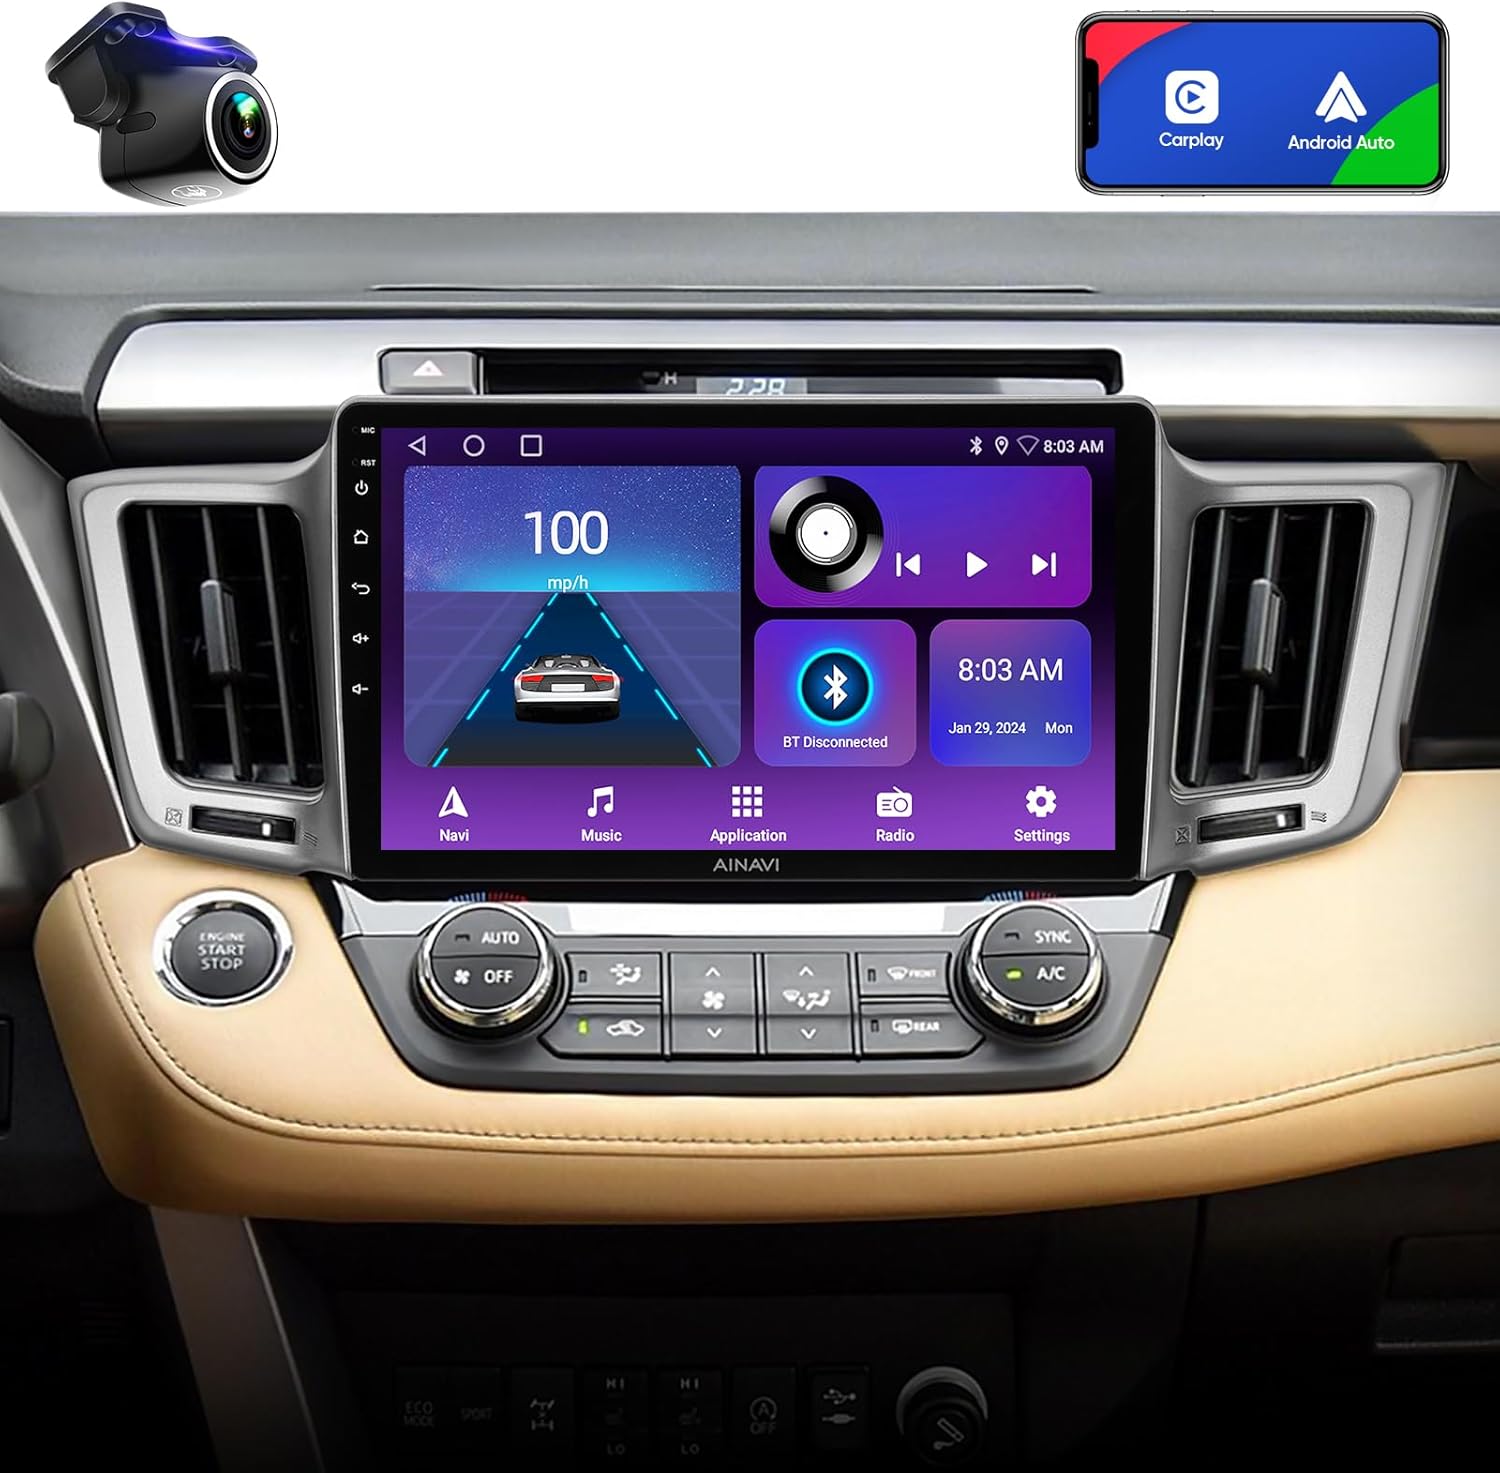
Image: The AINAVI 10-inch QLED Touchscreen Car Stereo seamlessly integrated into the dashboard of a Toyota RAV4.
Setup sareng Instalasi
The installation of this car stereo involves working with vehicle electronics and interior components. Professional installation is recommended. If you choose to perform the installation yourself, proceed with caution and refer to vehicle-specific disassembly guides.
1. Eusi Paket
Sateuacan ngamimitian, pariksa heula sadaya komponén anu aya dina pakét:
- Car Stereo Radio Head Unit (1280*720) with Frame for Toyota RAV4
- AHD 1080P Rear View Kaméra
- Antena GPS
- USB 4Pin Cable
- USB 6Pin Cable
- Mikropon
- Blue Frame Removal Tool
- Manual pamaké
- Kabel Daya

Image: A visual representation of all items included in the product package, such as the head unit, cables, camera, and tools.
2. Léngkah-léngkah Pra-Pamasangan
- Pegatkeun sambungan batré: For safety, disconnect the vehicle's negative battery terminal before starting any electrical work.
- Cabut Radio Asli: Carefully remove the dashboard trim and the original radio unit. This typically involves prying off plastic panels and unscrewing mounting bolts. Note the location of all clips and screws.
- Komponen Transfer: Transfer the air vents and any necessary yellow plastic trim clips from the original radio bezel to the new AINAVI unit's frame.

Image: The dashboard of a Toyota RAV4 showing the factory-installed radio unit before the upgrade.
3. Wiring sareng Sambungan
The AINAVI unit is designed for plug-and-play installation with most Toyota RAV4 models (2013-2018). Match the connectors from your vehicle's wiring harness to the corresponding ports on the new head unit. Ensure all connections are secure.
- Kakuatan Kabel: Connect the main power harness.
- Anteneu GPS: Connect the GPS antenna and mount it in a location with a clear view of the sky (e.g., on the dashboard).
- Kabel USB: Connect the provided USB cables for external device connectivity.
- Mikropon: Sambungkeun mikropon éksternal pikeun kualitas telepon sareng paréntah sora anu langkung saé.
- Tukangeun View Kaméra: If installing the included AHD 1080P rear view camera, route the cable and connect it to the designated input on the head unit.
4. Instalasi Unit
- Carefully position the new head unit into the dashboard opening, ensuring all cables are tucked away and not pinched.
- Secure the unit using the appropriate mounting brackets and screws.
- Reinstall the dashboard trim panels, ensuring all clips snap into place.

Image: The dashboard of a Toyota RAV4 after the successful installation of the AINAVI 10-inch QLED Touchscreen Car Stereo.
5. Mimiti Power-Up jeung Konfigurasi
- Sambungkeun deui terminal batré négatip kandaraan urang.
- Turn on the vehicle's ignition. The unit should power on automatically.
- Turutan pitunjuk dina layar pikeun setelan awal, kalebet pilihan basa sareng zona waktos.
- Access the factory settings (if necessary, consult the technical support for the password) to configure vehicle-specific options, such as turning off incompatible AC control pop-ups or adjusting backup camera settings.
Parentah Operasi
1. Fungsi Dasar
- Hurungkeun/Pareuman: Press and hold the power button (usually located on the front panel) to turn the unit on or off. A short press typically mutes the audio.
- Kontrol volume: Adjust volume using the physical knobs or on-screen controls.
- Antarmuka layar rampa: Navigate through menus and applications by tapping, swiping, and pinching on the QLED touchscreen.
2. Wireless CarPlay & Android Auto
Sambungkeun smartphone anjeun sacara nirkabel pikeun integrasi navigasi, musik, telepon, sareng pesen anu lancar.
- Pastikeun Bluetooth sareng Wi-Fi diaktipkeun dina smartphone anjeun.
- On the car stereo, select the CarPlay or Android Auto application.
- Follow the on-screen instructions to pair your phone. For Android Auto, you may need to accept permissions on your phone.

Image: The car stereo displaying the user interfaces for Apple CarPlay and Android Auto, demonstrating smartphone integration.
3. GPS Napigasi
The unit supports various satellite services and utilizes 5G WiFi for enhanced navigation accuracy. Pre-installed Google Maps offers 2D and 3D perspectives, voice guidance, and real-time traffic information.
- Tap the 'Navi' or 'Maps' icon to launch the navigation application.
- Enter your destination using the touchscreen keyboard or voice commands.
- Customize route preferences (e.g., avoid tolls, highways).
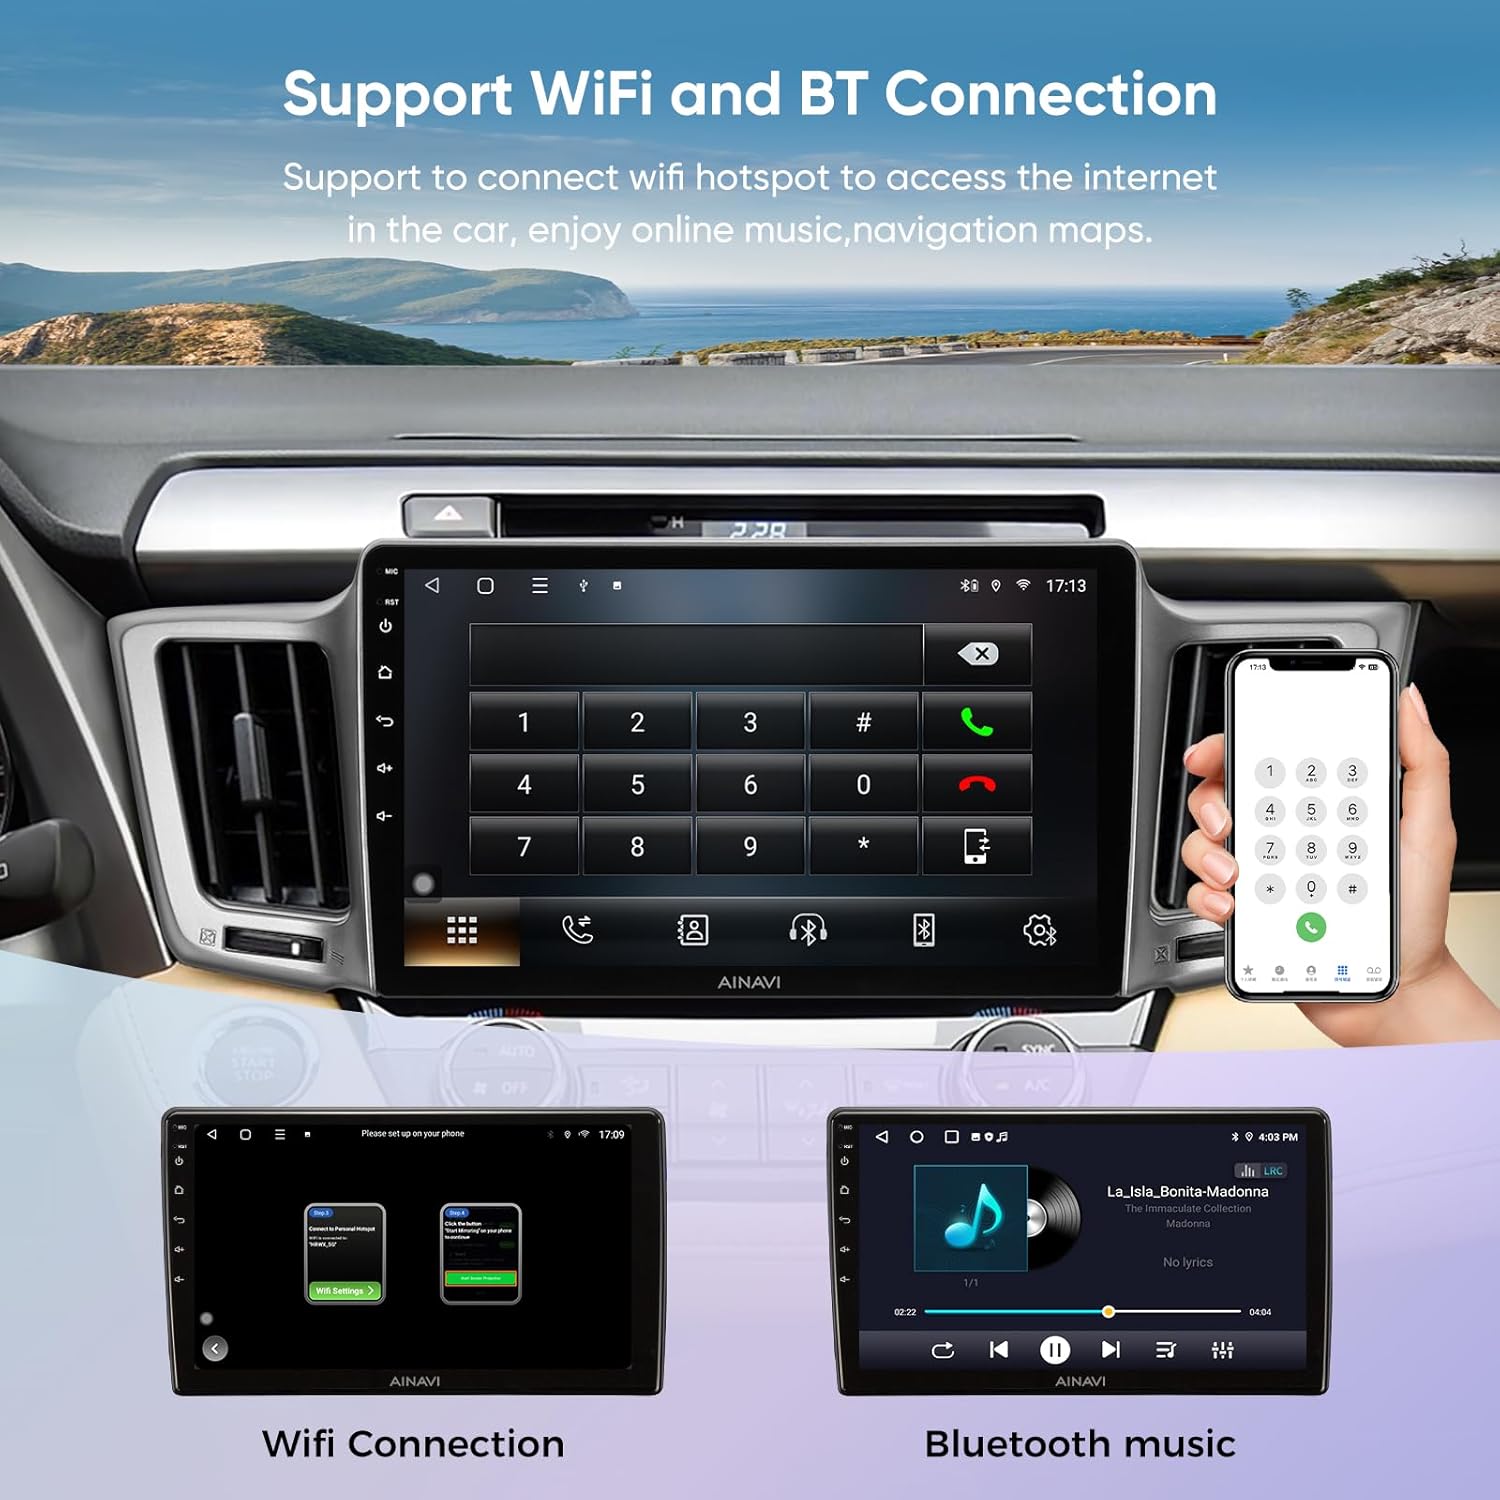
Image: The AINAVI car stereo screen showing a detailed GPS navigation map, indicating a route and current location.
4. Wi-Fi jeung Bluetooth Konéktipitas
Connect to Wi-Fi hotspots for internet access and pair Bluetooth devices for hands-free calling and audio streaming.
- Wifi: Go to Settings > Network > Wi-Fi. Select an available network and enter the password.
- Bluetooth: Go to Settings > Bluetooth. Enable Bluetooth, search for your device, and pair.

Image: Two screens on the AINAVI car stereo demonstrating Wi-Fi connection setup and Bluetooth music playback from a paired smartphone.
5. Split Screen Mode
Manpaatkeun fungsi layar pamisah pikeun ngajalankeun dua aplikasi sacara babarengan, sapertos navigasi sareng pamuteran musik.
- Buka aplikasi anu munggaran.
- Press and hold the recent apps button (or follow specific on-screen gestures) to activate split-screen mode.
- Pilih aplikasi kadua anu bakal dipidangkeun bareng jeung anu kahiji.

Image: The car stereo screen demonstrating split-screen functionality, showing two different applications running side-by-side.
6. Kontrol Setir (SWC)
The unit supports integration with your vehicle's existing steering wheel controls. You may need to configure these settings in the unit's menu.
- Buka Setélan > Kontrol Setir.
- Follow the on-screen instructions to map your steering wheel buttons to the desired functions (e.g., volume up/down, track skip, mode).
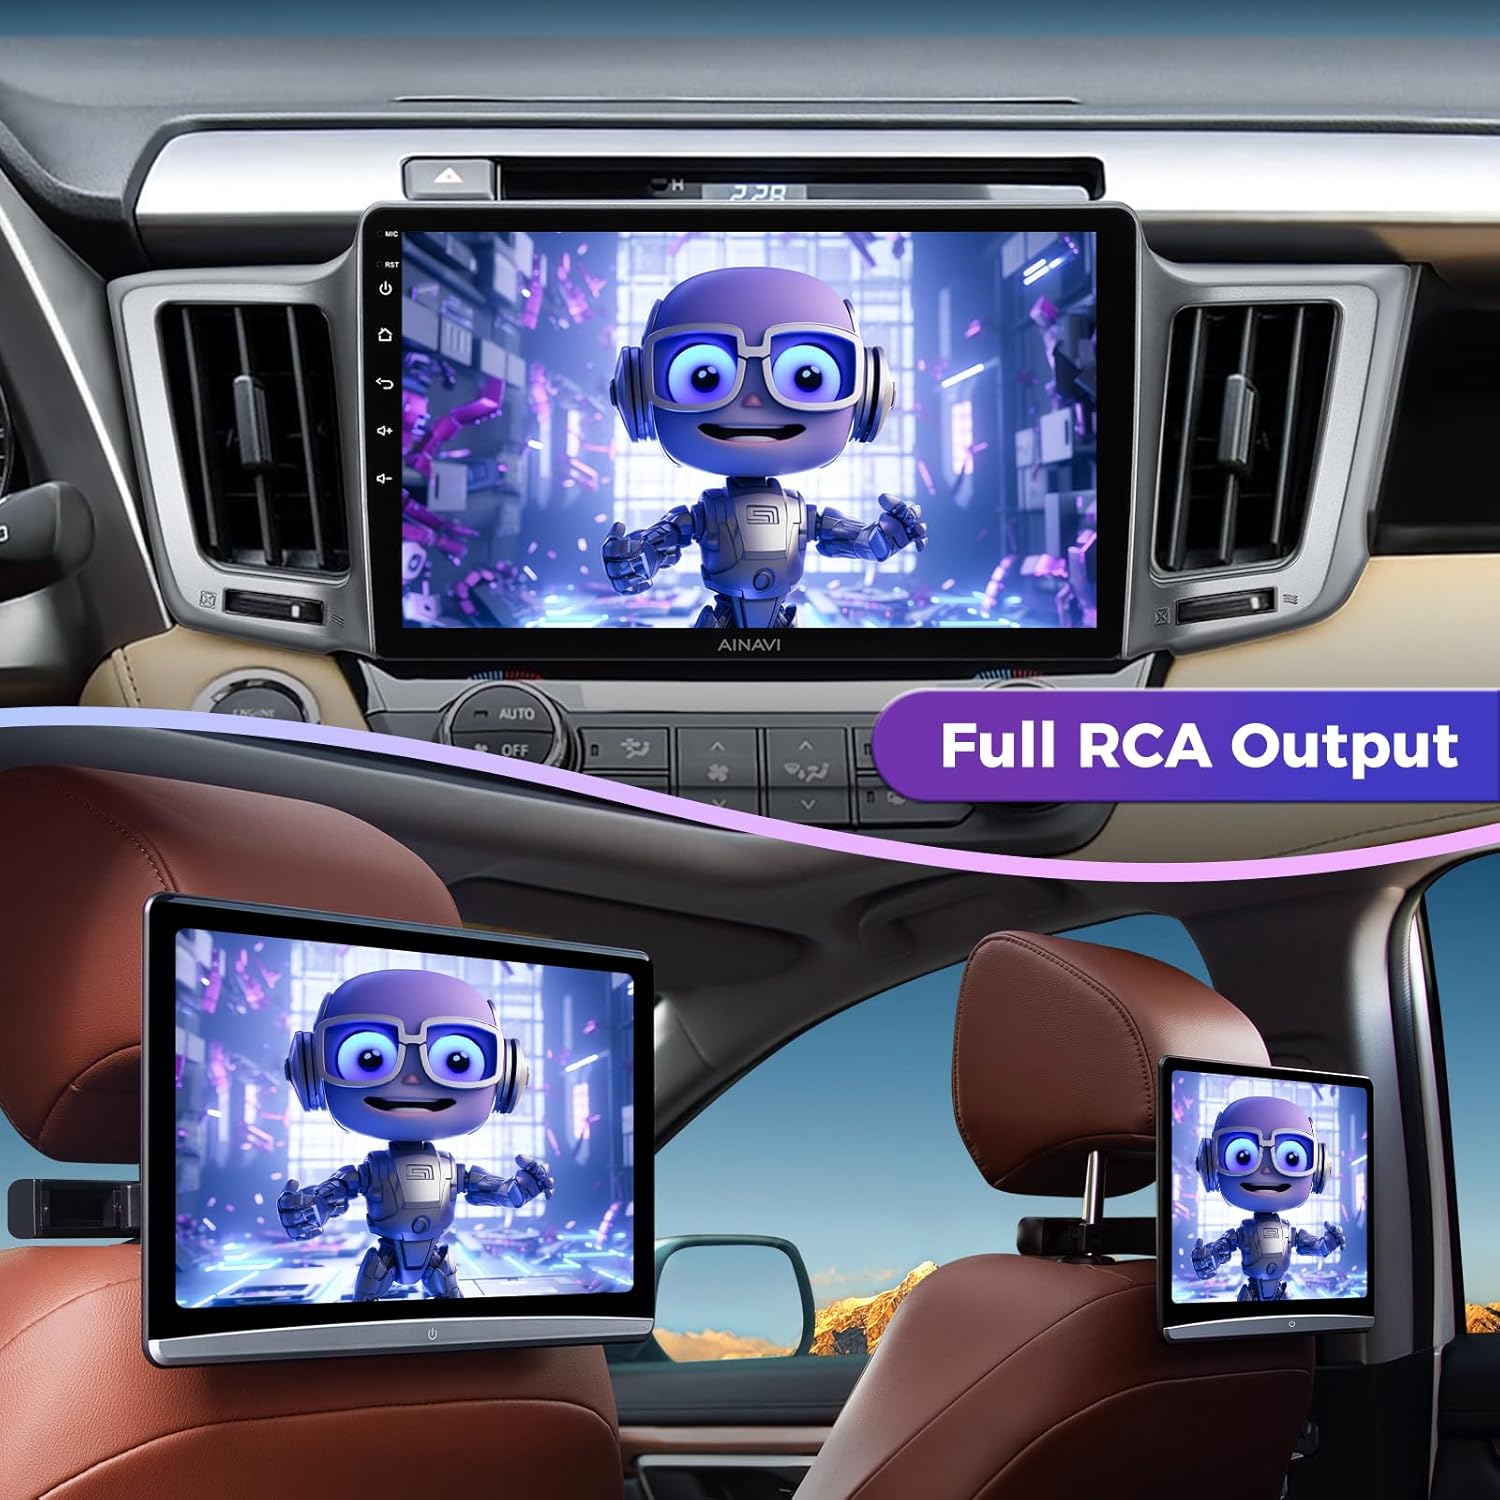
Image: The car stereo's interface for configuring steering wheel controls, with an inset showing a vehicle's steering wheel buttons.
7. Full RCA Output
The unit features RCA output functionality, allowing you to connect external monitors (e.g., headrest screens) to display video content independently.
- Connect external displays to the RCA output ports on the wiring harness.
- Configure the output settings in the unit's menu to send video to the external screens.

Image: The AINAVI car stereo and two rear headrest monitors simultaneously displaying video content, illustrating the full RCA output feature.
8. Smart Control Sora
Activate voice assistants like Siri or Google Assistant for hands-free operation of various functions.
- Once connected to CarPlay or Android Auto, you can activate voice control by saying "Hey Siri" or "Hey Google," or by tapping the microphone icon on the screen.
- Use voice commands for navigation, making calls, sending messages, playing music, and more.

Image: The car stereo's display illustrating the smart voice control feature, with examples of voice commands for various functions.
9. Audio Settings (DSP & Equalizer)
The unit features a professional DSP (Digital Signal Processor) and a 48-band equalizer for advanced audio customization.
- Access the 'EQ' or 'Sound Settings' application.
- Adjust the 48-band equalizer to fine-tune audio frequencies.
- Utilize the voice point touch control to optimize sound based on seating position.
- Select from preset sound modes (Normal, Jazz, Pop, Classical, Heavy Metal, Vocal, Soft) and adjust surround sound patterns and bass boost.
10. Tukangeun View Tampilan Kaméra
When the vehicle is shifted into reverse, the 1080P AHD rear view camera feed will automatically display on the screen, complete with astern ruler lines for parking assistance.
- Ensure the camera is properly connected and configured during installation.
- If your vehicle supports astern trajectory, it will also be displayed on the screen.

Image: The car stereo screen showing a high-definition 1080P rearview camera feed, complete with dynamic parking guidelines.
Pangropéa
1. Ngabersihan layar
To clean the QLED touchscreen, gently wipe it with a soft, lint-free cloth. For stubborn smudges, slightly dampen the cloth with water or a screen-safe cleaning solution. Avoid harsh chemicals or abrasive materials that could damage the screen.
2. Apdet parangkat lunak
Periodically check for software updates to ensure optimal performance and access to new features. Updates can typically be downloaded via Wi-Fi or USB. Refer to the manufacturer's website or contact support for the latest update procedures.
Pamérésan masalah
Bagian ieu ngabahas masalah umum anu anjeun tingali. Pikeun masalah teu didaptarkeun di dieu, mangga ngahubungan rojongan customer.
| Masalah | Mungkin Cukang lantaranana | Solusi |
|---|---|---|
| Unit teu hurung. | Loose power connection, blown fuse, vehicle battery disconnected. | Check all power cable connections. Verify vehicle fuses. Ensure battery is reconnected. |
| Screen is glitchy or unresponsive. | Software issue, temporary system freeze. | Restart the unit. If issue persists, perform a factory reset (data will be lost). Ensure software is up to date. |
| Microphone quality is poor during calls. | External microphone not connected or positioned incorrectly, interference. | Ensure the external microphone is securely connected and positioned optimally (e.g., near the driver's head). Check for sources of interference. |
| Backup camera does not display or shows a black screen. | Loose camera connection, incorrect wiring, camera malfunction, software setting. | Check the camera's video input connection. Verify the camera's power supply. Access factory settings to ensure camera input is enabled. |
| Music cuts out or Bluetooth connection is unstable. | Weak Bluetooth signal, interference, phone settings. | Ensure your phone is close to the unit. Disconnect and re-pair the Bluetooth device. Try using a wired USB connection if available. |
| Steering wheel controls do not work or function incorrectly. | Incorrect wiring, unconfigured settings. | Verify SWC wiring connections. Reconfigure steering wheel control settings in the unit's menu. |
spésifikasi
Below are the technical specifications for the AINAVI 10-inch QLED Touchscreen Car Stereo:
| Fitur | Spésifikasi |
|---|---|
| Ukuran tampilan | 10 inci |
| Resolusi | 1280*720 (QLED) |
| Sistem operasi | Android |
| Prosesor | 4-Inti CPU |
| Mémori (RAM) | 2GB |
| Panyimpenan (ROM) | 64GB |
| Konektipitas | Bluetooth, USB, Wi-Fi (2.4GHz & 5GHz) |
| Fitur husus | Android Auto, Built-In Bluetooth, Built-In Wi-Fi, CarPlay, Touchscreen, RDS, Panel light and Four Themes, 48EQ (Sound Point Control) + Premium DSP, Highest Level QLED, Split Screen Function, Equalizer |
| Map Type Support | Europe, North America, South America, Worldwide |
| Mode Kaluaran Audio | Sakuliling stereo |
| Tipe Pamasangan | Dashboard Gunung, Panel Gunung |
| Item Beurat | 4.47 pon |
| Ukuran Paket | 18.98 x 8.98 x 4.69 inci |
Émbaran jaminan
The AINAVI 10-inch QLED Touchscreen Car Stereo comes with a 12-garansi sasih ti tanggal dibeuli. Garansi ieu nyertakeun cacad manufaktur sareng gangguan dina panggunaan normal. Punten tahan bukti pameseran anjeun pikeun klaim garansi.
The warranty does not cover damage caused by improper installation, accidental damage, misuse, unauthorized modifications, or normal wear and tear.
Rojongan Palanggan
Our professional technical support team is available to assist you with any questions regarding installation, operation, or troubleshooting.
Ngahubungan Rojongan:
- Dukungan Online: For technical assistance, please visit the AINAVI store page on Amazon and use the 'Ask a question' feature to contact the seller, HomeCar.
- Rojongan Telepon: You may also reach customer service at +1 833 858 5016.
When contacting support, please have your product model number (B0DGXMV3Z) and a detailed description of your issue ready to facilitate a quicker resolution.

Image: A visual guide on how to access customer installation support through the Amazon product page, highlighting the 'Ask a question' button and phone number.


