1. Bubuka
This manual provides detailed instructions for the proper installation, operation, and maintenance of your Pioneer T-9090WR Double Cassette Deck. The T-9090WR is a high-fidelity stereo cassette deck featuring two independent tape transports (Deck I and Deck II), auto-reverse capability, and Dolby B/C noise reduction for superior audio performance. Please read this manual thoroughly before using the unit to ensure optimal performance and longevity.
2. Émbaran Kasalametan penting
- Sumber Daya: Sambungkeun unit ngan ka outlet AC tina voltage dieusian dina panel pungkur.
- Ventilasi: Ensure adequate ventilation. Do not block ventilation openings. Allow sufficient space around the unit for proper airflow.
- Cai sareng Uap: Ulah ngalaan unit ka hujan atawa Uap. Ulah nempatkeun objék ngeusi cairan, kayaning vases, dina unit.
- Objék Asing: Ulah ngasupkeun barang asing kana liang unit.
- Palayanan: Entong nyobian ngalayanan unit ieu nyalira. Rujuk sadayana jasa ka tanaga jasa anu mumpuni.
- beberesih: Disconnect the power cord from the outlet before cleaning. Use a soft, dry cloth. Do not use liquid or aerosol cleaners.
3. Setup jeung Sambungan
3.1 Ngabongkar bungkusan
Carefully remove the T-9090WR from its packaging. Retain all packing materials for future transport or storage.
3.2 Nempatkeun
Place the cassette deck on a stable, level surface away from direct sunlight, heat sources, and excessive dust. Ensure there is sufficient space around the unit for proper ventilation, especially above the top panel.
3.3 Panyambung Audio
Connect the T-9090WR to your amplifier or receiver using RCA audio cables. The unit features standard stereo RCA input and output jacks.

Figure 3.1: Rear panel connections. Connect the 'LINE OUT' jacks to an available 'TAPE IN' or 'AUX IN' on your amplifier. Connect the 'LINE IN' jacks to the 'TAPE OUT' or 'REC OUT' on your amplifier for recording.
- Nyambungkeun GARINGAN (red for right, white for left) on the T-9090WR to the TAPE DI or NGARÉMÉ DI jacks on your amplifier / panarima.
- Nyambungkeun LINE IN (red for right, white for left) on the T-9090WR to the PITAKEUN or RES OUT jacks on your amplifier / panarima.
3.4 Sambungan Daya
After all audio connections are made, plug the power cord into a suitable AC outlet. The unit is now ready for operation.
4. Parentah Operasi
4.1 Loading and Unloading Cassettes
To load a cassette, press the EJECT button for the desired deck (Deck I or Deck II). The cassette holder will open. Insert the cassette with the open edge facing forward and the tape side facing down. Gently push the cassette holder back until it clicks into place.
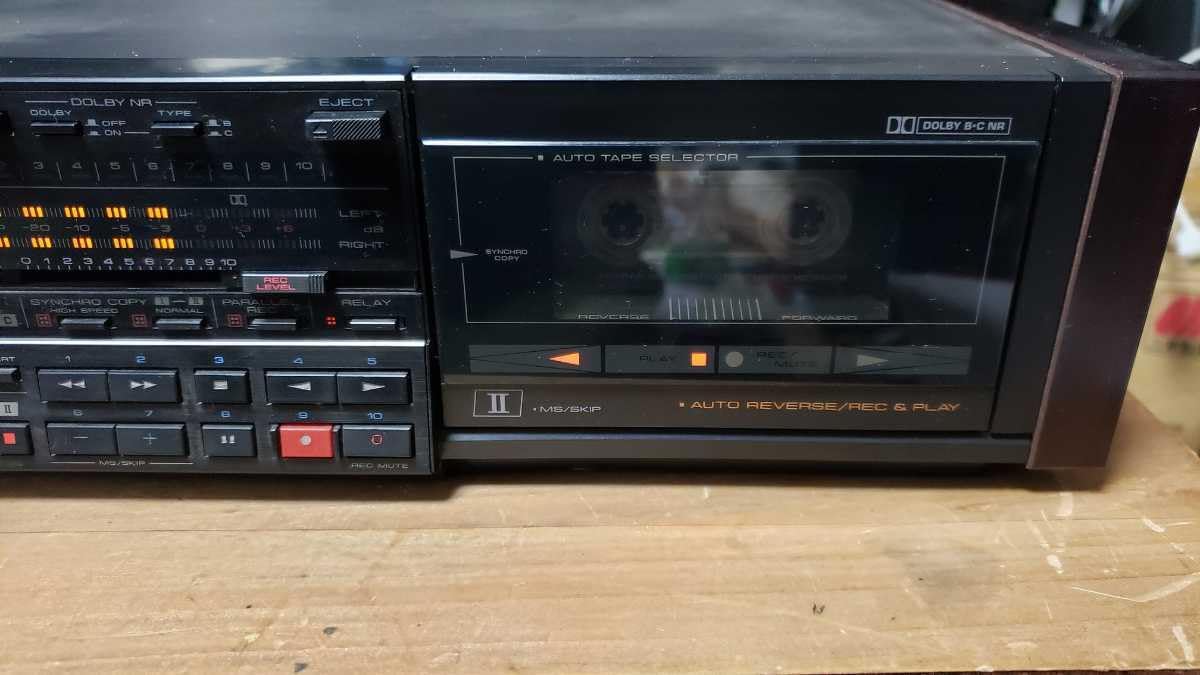
Figure 4.1: Front panel of Deck I with a cassette inserted.
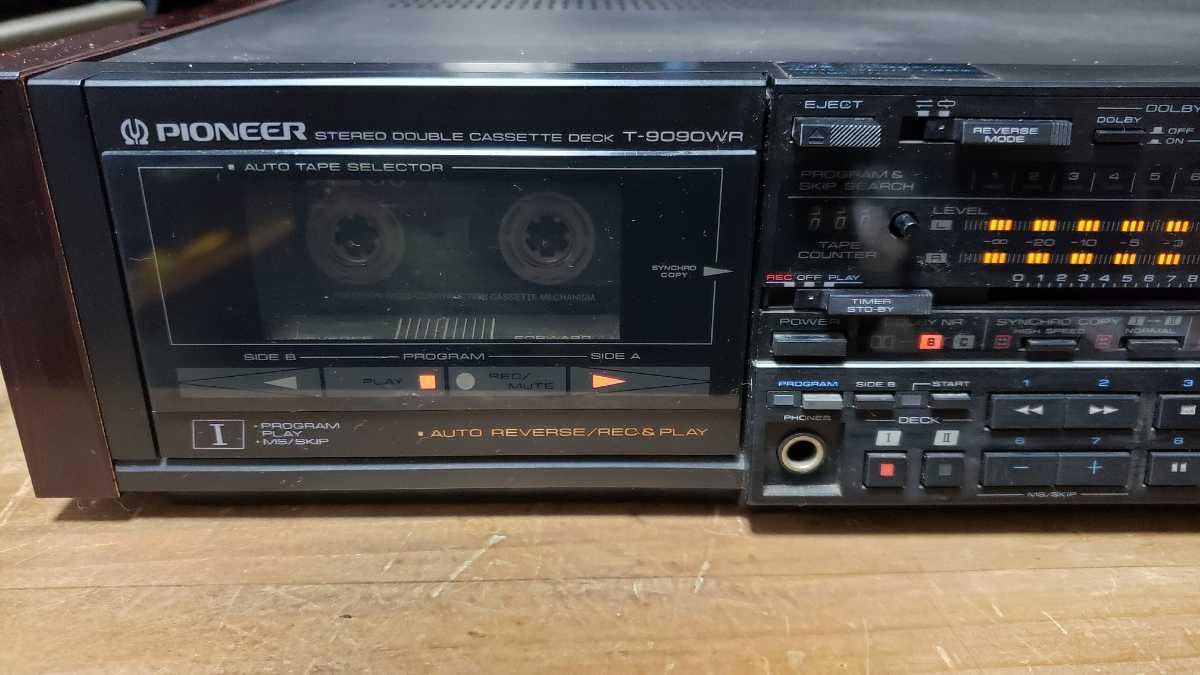
Figure 4.2: Front panel of Deck II with a cassette inserted.
4.2 Playback Dasar
- Insert a cassette into either Deck I or Deck II.
- Pilih input anu pas dina anjeun amplifier/receiver (e.g., TAPE or AUX).
- Pencét éta ulin button (►) for the selected deck. The tape will begin to play.
- Pikeun ngeureunkeun putereun deui, pencét éta EUREUN tombol (■).
- Ngagunakeun éta NGUNDUH BALIK (◀◀) or MAJU CEPAT (►►) buttons to navigate the tape.
4.3 Auto-Reverse Function
The T-9090WR features auto-reverse, allowing continuous playback or recording on both sides of a cassette. The MODE REVERSE selector allows you to choose playback direction (forward, reverse, or continuous loop).
4.4 Ngarékam
The T-9090WR allows recording on both Deck I and Deck II. Ensure your amplifier's REC OUT is connected to the deck's LINE IN.
- Insert a recordable cassette into the desired deck.
- Select the input source on your amplifier that you wish to record (e.g., CD, Tuner).
- Pencét éta REC (●) button. The deck will enter record-pause mode.
- Saluyukeun TINGKAT REC controls to ensure the recording level meters peak appropriately without distortion.
- Pencét éta ulin (►) button to start recording.
- Pikeun ngeureunkeun rékaman, pencét éta EUREUN (■) kancing.
4.4.1 Synchro Copy
This feature allows for synchronized recording from Deck I to Deck II. Load the source tape into Deck I and a blank tape into Deck II. Press the SYNCHRO COPY tombol, teras pencét ulin on Deck I and REC on Deck II.
4.4.2 High-Speed Copy
For faster duplication, the T-9090WR supports high-speed copying. Engage the HIGH SPEED COPY function during synchro copy for quicker dubbing.
4.5 Dolby Noise Reduction
The unit includes Dolby B and C noise reduction systems. Select the appropriate Dolby NR setting (DOLBY NR B or DOLBY NR C) to match the recording. If the tape was recorded without Dolby NR, set the switch to Pareum.
4.6 Auto Tape Selector
The T-9090WR automatically detects the type of tape (Normal, CrO2, Metal) inserted and adjusts equalization accordingly. Ensure the tape type is correctly identified for optimal playback and recording quality.
5. Pangropéa
Regular maintenance ensures optimal performance and extends the life of your cassette deck.
5.1 Cleaning Tape Heads and Pinch Rollers
Dust and tape oxide can accumulate on the tape heads, pinch rollers, and capstans, leading to poor sound quality. Clean these components regularly (every 10-20 hours of use) using a cotton swab lightly dampIsopropil alkohol atawa cairan beberesih sirah husus.
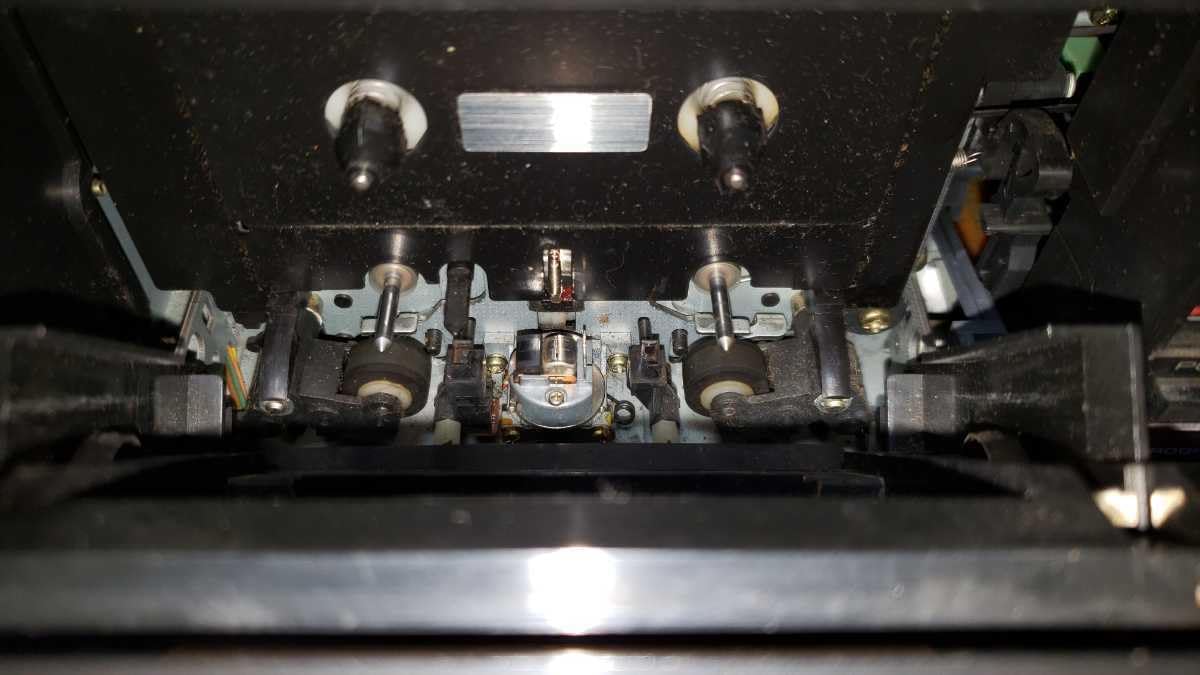
Gambar 5.1: Internal view of Deck I mechanism, showing tape heads and pinch rollers.

Gambar 5.2: Internal view of Deck II mechanism, showing tape heads and pinch rollers.
- Pencét éta EJECT tombol pikeun muka wadah kasét.
- Gently wipe the tape heads, capstans, and pinch rollers until clean.
- Allow the components to dry completely before inserting a tape.
5.2 Demagnetization
Over time, tape heads can become magnetized, leading to increased noise and dull sound. Demagnetize the heads periodically (e.g., every 50-100 hours of use) using a specialized tape head demagnetizer. Follow the demagnetizer's instructions carefully.
5.3 beberesih exterior
Wipe the exterior of the unit with a soft, dry cloth. For stubborn dirt, use a cloth lightly dampened with mild detergent solution, then wipe dry. Avoid abrasive cleaners or solvents.
6. Cara ngungkulan
If you experience problems with your T-9090WR, consult the following table before seeking professional service.
| Masalah | Mungkin Cukang lantaranana | Solusi |
|---|---|---|
| Taya kakuatan | ari kakuatan teu disambungkeun; stop kontak listrik lepat | Pariksa sambungan kabel kakuatan; Coba outlet béda |
| Taya sora salila playback | Input anu dipilih salah amplifier; Audio cables loose or faulty; Volume too low | Select correct input (TAPE/AUX); Check RCA cable connections; Increase ampvolume panguat |
| Kualitas sora goréng (teu jelas, kurang jelas) | Dirty tape heads; Worn tape; Incorrect Dolby NR setting | Clean tape heads and pinch rollers (Section 5.1); Try a different tape; Adjust Dolby NR setting |
| Tape not playing or winding | Tape jammed; Pinch rollers dirty; Mechanical issue | Eject and re-insert tape; Clean pinch rollers; If problem persists, seek service |
| Ngarékam teu jalan | LINE IN cables not connected; Input source not selected on amplifier; Tape write-protect tab engaged | Check LINE IN connections; Select correct source on amplifier; Cover the write-protect tab on the cassette with tape |
7. Spésifikasi
These specifications are typical and subject to change without notice.
- model: Pioneer T-9090WR
- Tipe: Stereo Double Cassette Deck
- Kepala pita: Hard Permalloy (Recording/Playback), Ferrite (Erase)
- Motor: Motor Servo DC
- Ngurangan Noise: Dolby B, Dolby C
- Auto-Reverse: Yes, both decks
- Tape Type Selector: Automatic (Normal, CrO2, Metal)
- Tanggapan Frékuénsi: (Typical, depending on tape type)
- Normal: 20 Hz - 17 kHz
- CrO2: 20 Hz - 18 kHz
- Metal: 20 Hz - 19 kHz
- Rasio Signal-to-Noise: (Dolby C ON) > 70 dB
- Wah sareng Flutter: < 0.05% WRMS
- Input: Line In (RCA)
- Kaluaran: Line Out (RCA), Headphones (6.3mm stereo jack)
- Syarat Daya: AC 100V, 50/60 Hz (Japanese market model)
- Ukuran (L x W x H): Kira-kira 420 x 130 x 300 mm
- beurat: Kira-kira 5.5 kg
8. Garansi sarta Rojongan Palanggan
Specific warranty details for the Pioneer T-9090WR Double Cassette Deck are not provided in this document. For warranty information, service, or technical support, please refer to the warranty card included with your product or contact Pioneer customer service directly in your region. You may also visit the official Pioneer websitus pikeun sumber rojongan.


