1. Produk Langkungview
The Waveshare 1.54-inch OLED Display Module is a compact, high-contrast display solution featuring a 128 × 64 pixel resolution. It integrates the SSD1309 driver chip and supports both 4-wire SPI and I2C communication interfaces, offering broad compatibility with various microcontrollers and development boards such as Raspberry Pi, Arduino, STM32, ESP32, and Jetson Nano. This module is designed for embedded applications requiring a clear, efficient visual output.

Gambar 1.1: Leuwihview of the 1.54-inch OLED Display Module highlighting its features and specifications.
2. Fitur konci
- Jenis tampilan: 1.54-inch OLED with 128 × 64 pixel resolution.
- Driver Chip: Embedded SSD1309 for efficient display control.
- Antarbeungeut Komunikasi: Supports both 4-wire SPI and I2C for flexible integration.
- Voltage kasaluyuan: Dina kapal voltage translator ensures compatibility with 3.3V and 5V MCUs.
- Kasaluyuan lega: Designed for use with Raspberry Pi, Arduino, STM32, ESP32, Jetson Nano, and similar platforms.
- Warna tampilan: Blue display color.

Image 2.1: The 1.54-inch OLED Display Module with its blue display.
3. Spésifikasi
| Parameter | Nilai |
|---|---|
| Operasi Voltage | 3.3V / 5V |
| Panel tampilan | OLED |
| Antarbeungeut Komunikasi | 4-wire SPI / I2C |
| Supir | SSD1309 |
| Resolusi | 128 × 64 piksel |
| Ukuran piksel | 0.25 × 0.25 mm |
| Ukuran tampilan | 35.05 × 17.52 mm |
| Ukuran modul | 43.00 × 37.50 mm |
| Ukuran Paket | 1.69 x 1.45 x 0.19 inci |
| Item Beurat | 0.32 ons |
4. Pedaran Pinout
The module features a 7-pin header for power and communication. Understanding each pin's function is crucial for proper integration.
| Pin | Katerangan |
|---|---|
| VCC | Power Input (3.3V / 5V) |
| GND | kakuatan Ground |
| DIN | Data Input (MOSI for SPI, SDA for I2C) |
| CLK | Clock Signal Input (SCK for SPI, SCL for I2C) |
| CS | Chip Select, low active (SPI only) |
| DC | Data/Command selection (High for data, Low for command) |
| RST | Reset, low aktip |

Image 4.1: Pinout diagram for the OLED Display Module.
5. Setup jeung Connection
5.1 Pedoman Sambungan Umum
- Ensure your microcontroller operates at 3.3V or 5V, compatible with the module's voltage penerjemah.
- Connect VCC to the power supply (3.3V or 5V) and GND to the ground of your microcontroller.
- Choose either SPI or I2C communication mode based on your project requirements and microcontroller capabilities.
- Refer to the specific wiring diagrams for your chosen development board.
5.2 Connecting with Raspberry Pi (SPI Interface)
To connect the OLED module to a Raspberry Pi using the SPI interface, follow the pin connections below. Ensure your Raspberry Pi's SPI interface is enabled.
- VCC → Raspberry Pi 3.3V/5V
- GND → Raspberry Pi GND
- DIN → Raspberry Pi MOSI (GPIO 10 / Pin 19)
- CLK → Raspberry Pi SCLK (GPIO 11 / Pin 23)
- CS → Raspberry Pi CE0 (GPIO 8 / Pin 24)
- DC → Raspberry Pi GPIO 25 (Pin 22)
- RST → Raspberry Pi GPIO 27 (Pin 13)
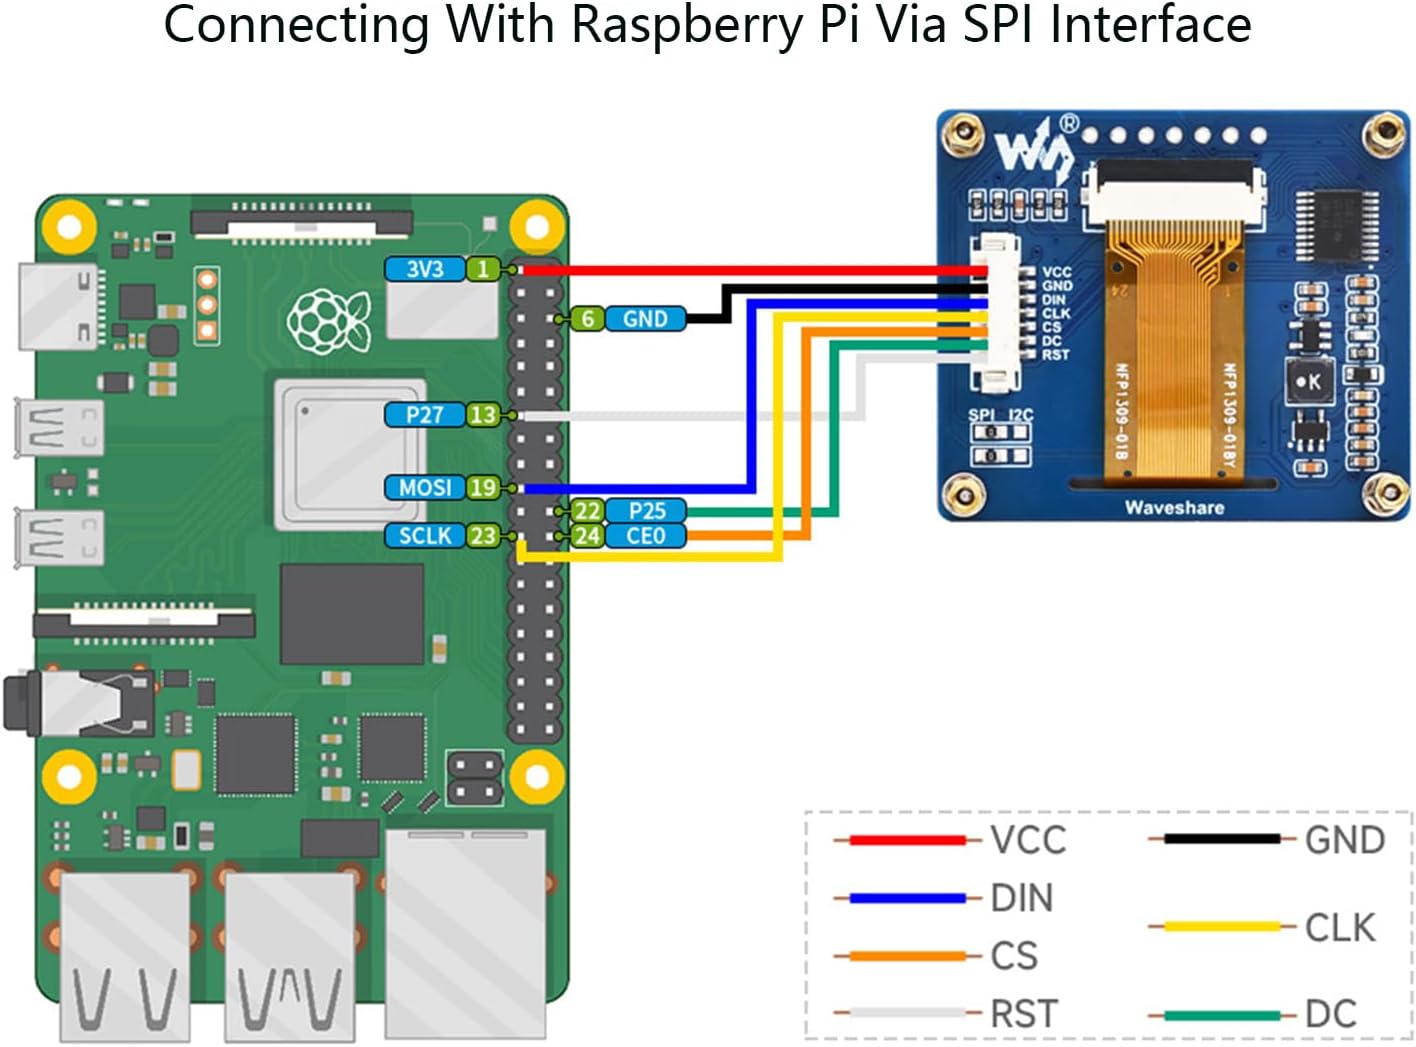
Image 5.1: SPI connection diagram for Raspberry Pi.
5.3 Connecting with Arduino Board (SPI Interface)
For Arduino boards, connect the OLED module using the SPI interface as follows:
- VCC → Arduino 5V
- GND → Arduino GND
- DIN → Arduino MOSI (Pin 11 for Uno/Nano, Pin 51 for Mega)
- CLK → Arduino SCK (Pin 13 for Uno/Nano, Pin 52 for Mega)
- CS → Arduino Digital Pin (e.g., Pin 10)
- DC → Arduino Digital Pin (e.g., Pin 9)
- RST → Arduino Digital Pin (e.g., Pin 8)

Image 5.2: SPI connection diagram for Arduino.
6. Parentah Operasi
After successful physical connection, the module requires software configuration to display content. Waveshare provides example code and libraries for various platforms.
6.1 Setup parangkat lunak
- Pasang Perpustakaan: Download and install the appropriate SSD1309 OLED display library for your chosen development environment (e.g., Adafruit SSD1306 library for Arduino, or specific Waveshare libraries for Raspberry Pi/Python).
- Configure Pins: In your code, define the GPIO pins connected to the OLED module's CS, DC, and RST pins according to your wiring.
- Initialize Display: Use the library functions to initialize the SSD1309 driver. This typically involves setting the display resolution and communication protocol (SPI or I2C).
- Eusi tampilan: Utilize the library's drawing functions to display text, graphics, or images on the OLED screen. Remember to call a display update function (e.g.,
display.display()) to push changes to the screen.
6.2 Pamilihan Mode Komunikasi
The module supports both SPI and I2C. The default mode is typically SPI. If you intend to use I2C, you may need to adjust onboard jumpers or solder pads, if available, and ensure your software is configured for I2C communication (SDA for DIN, SCL for CLK, and CS/DC/RST might be tied to specific states or not used depending on the library).
7. Pangropéa
- Penanganan: Handle the module by its edges to avoid touching the display surface or electronic components.
- beberesih: If necessary, gently clean the display surface with a soft, lint-free cloth. Avoid abrasive materials or harsh chemicals.
- Panyimpenan: Store the module in a dry, anti-static environment, away from direct sunlight and extreme temperatures.
- Sasayogian tanaga: Salawasna pastikeun voltase catu dayatage is within the specified 3.3V-5V range to prevent damage.
8. Cara ngungkulan
- Layar Teu Cahya:
- Check power connections (VCC, GND) and ensure correct voltage.
- Verify all communication pins (DIN, CLK, CS, DC, RST) are correctly wired.
- Confirm that the display initialization code is running without errors.
- Ensure the correct communication protocol (SPI/I2C) is selected in both hardware and software.
- Garbled or Incorrect Display:
- Check for loose connections or incorrect pin assignments in your code.
- Ensure the correct display resolution (128x64) is set in the software library.
- Verify that the correct SSD1309 driver is being used by the library.
- Henteu aya komunikasi:
- Double-check all wiring, especially for DIN, CLK, CS, DC, and RST.
- Ensure the communication interface (SPI or I2C) is enabled on your microcontroller.
- Uji nganggo ex anu dipikanyahoample code provided by Waveshare or the library developer.
9. Diménsi Garis Besar
The physical dimensions of the module are important for integration into custom enclosures or projects.

Image 9.1: Outline dimensions of the module (Unit: mm).
10. Online Resources and Support
For detailed development resources, example code, and further technical documentation, please visit the official Waveshare online tutorial page:
Waveshare 1.54inch OLED Module Online Tutorial
This resource provides examples for Raspberry Pi, Arduino, STM32, ESP32, and Jetson Nano, which are essential for getting started with your module.


