Bubuka
This manual provides detailed instructions for the installation, configuration, and operation of your ASRock B760M PG Riptide WiFi Micro-ATX Motherboard. Please read this manual thoroughly before attempting to install or use the motherboard to ensure proper setup and to prevent damage to the components.
The ASRock B760M PG Riptide WiFi motherboard supports 14th, 13th, and 12th Generation Intel Core Processors (LGA1700 socket) and features DDR5 memory support up to 7200MHz (OC), WiFi 6E, and 2.5G LAN for high-performance computing.
Émbaran Kasalametan
- Always disconnect the power cord from the power supply before handling any components inside the computer case.
- Wear an anti-static wrist strap or frequently touch a grounded metal object to discharge static electricity before touching the motherboard or other components.
- Nanganan motherboard dina edges na ulah noél komponén sénsitip.
- Pastikeun sadaya kabel disambungkeun bener jeung aman saméméh powering on sistem.
- Tetep motherboard sareng komponenana jauh tina Uap jeung hawa ekstrim.
Eusi pakét
Verify that all items are present in your motherboard package. If any items are missing or damaged, contact your retailer.
- ASRock B760M PG Riptide WiFi Motherboard
- I/O Shield (Pre-installed)
- Kabel Data SATA
- Antena WiFi
- M.2 screws / standoffs
- Manual pamaké / Guide Instalasi Gancang
- Support CD/DVD (may include drivers and utilities)
Tata ruang motherboard
Familiarize diri jeung rupa komponén tur konektor on motherboard Anjeun.

Gambar 1: Top-handap view of the ASRock B760M PG Riptide WiFi motherboard, showing the CPU socket, RAM slots, PCIe slots, M.2 slots, and various headers.

Figure 2: Diagram highlighting key features and ports of the ASRock B760M PG Riptide WiFi motherboard, including I/O shield, power connectors, VRM design, DDR5 slots, M.2 sockets, SATA ports, and audio components.
Disetél
1. Pamasangan CPU
- Buka uas stop kontak CPU jeung angkat plat beban.
- Carefully align the notches on your Intel LGA1700 processor with the socket and gently place the CPU into the socket. Do not force it.
- Tutup pelat beban sareng dorong ka handap uas dugi ka ngonci kana tempatna.
- Larapkeun témpél termal kana CPU sareng pasang cooler CPU anjeun numutkeun parentah produsénna.
2. Pamasangan mémori (RAM).
This motherboard supports DDR5 memory. Refer to your motherboard manual for specific dual-channel configurations.
- Buka klip dina kadua tungtung slot DIMM.
- Align kiyeu dina modul memori DDR5 jeung konci dina slot DIMM.
- Pencét pageuh dina kadua tungtung modul mémori dugi ka jepitan dipasang dina tempatna.
3. Pamasangan Panyimpenan (M.2 sareng SATA)
The motherboard features 2 Hyper M.2 (PCIe Gen4 x4) slots and 4 SATA3 ports.
Pamasangan SSD M.2:
- Locate the M.2 slots (often under heatsinks). Remove the M.2 heatsink if present.
- Selapkeun M.2 SSD kana slot dina sudut 30-gelar.
- Gently push the SSD down and secure it with the provided M.2 screw or standoff.
- Reinstall the M.2 heatsink if applicable.
Pamasangan SATA Drive:
- Connect one end of a SATA data cable to a SATA3 port on the motherboard.
- Sambungkeun tungtung séjén kabel data SATA ka hard drive SATA Anjeun atawa SSD.
- Sambungkeun kabel kakuatan SATA tina catu daya anjeun ka drive.
4. Pamasangan Kartu Ékspansi (PCIe)
The motherboard has 1 PCIe 4.0 x16 slot and 1 PCIe 4.0 x1 slot.
- Leupaskeun panutup slot ékspansi saluyu tina kotak komputer Anjeun.
- Align your expansion card (e.g., graphics card) with the PCIe slot and press down firmly until it is seated correctly.
- Ngamankeun kartu kana hal kalawan screw a.
- Sambungkeun sagala kabel kakuatan PCIe diperlukeun tina catu daya anjeun ka kartu grafik.
5. Sambungan Kakuatan
- Connect the 24-pin ATX power connector from your power supply to the motherboard's 24-pin power socket.
- Connect the 8-pin (or 4+4-pin) CPU power connector from your power supply to the motherboard's 8-pin 12V power socket.
6. Sambungan Panel hareup
Connect the cables from your computer case's front panel (USB, audio, power button, reset button, LED indicators) to the corresponding headers on the motherboard. Refer to the motherboard layout diagram and the small labels on the motherboard for correct pin alignment.
- USB 3.2 Gen1 Type-C (Front): Connect your case's front USB-C cable.
- USB 3.2 Gen1 Type-A (Front): Connect your case's front USB 3.0/3.1 cables.
- USB 2.0 (Front): Connect your case's front USB 2.0 cables.
- Audio HD: Connect your case's front panel audio cable.
- System Panel Header: Connect power switch, reset switch, power LED, and HDD LED cables. Pay close attention to polarity for LEDs.
Ngoperasikeun
1. Setup mios
The BIOS (Basic Input/Output System) is firmware that initializes hardware during the booting process. To enter BIOS Setup, press the Del or F2 konci sababaraha kali nalika sistem ngamimitian.
- Urutan boot: Configure the boot device priority (e.g., USB drive for OS installation, then SSD/HDD).
- XMP/EXPO: Aktipkeun XMP (Extreme Memory Pro)file) or EXPO for optimal DDR5 memory performance.
- Kontrol kipas: Adjust fan curves for CPU and chassis fans.
- Lampu RGB: Configure or disable onboard RGB lighting (ASRock Polychrome RGB).
2. Pamasangan supir
After installing your operating system, install the necessary drivers for optimal performance. Drivers can be found on the included support CD/DVD or downloaded from the ASRock websitus.
- Supir Chipset
- LAN Drivers (Dragon 2.5G LAN)
- WiFi/Bluetooth Drivers (Killer 802.11ax WiFi 6E)
- Supir Audio (Realtek ALC897)
- Graphics Drivers (for integrated graphics, if applicable, or discrete GPU drivers from the GPU manufacturer)
ASRock Auto Driver Installer can simplify this process by automatically detecting and installing required drivers.
3. Konfigurasi Jaringan
LAN kabel:
Connect an Ethernet cable from your router/modem to the 2.5G LAN port on the motherboard's rear I/O panel. Ensure the Dragon 2.5G LAN driver is installed.
Wireless (WiFi 6E):
Attach the included WiFi antennas to the connectors on the rear I/O panel. Ensure Killer 802.11ax (WiFi 6E) drivers are installed. Connect to your wireless network through your operating system's network settings.
4. Konfigurasi Audio
The motherboard features Realtek ALC897 7.1 CH HD Audio with Nahimic Audio support. Connect your speakers or headphones to the appropriate audio jacks on the rear I/O panel. Install the audio drivers for full functionality and access to Nahimic Audio software.
5. RGB Lighting (ASRock Polychrome RGB)
The motherboard includes built-in RGB illumination and onboard RGB headers for compatible LED devices. You can synchronize RGB LED devices using ASRock Polychrome RGB software or configure settings directly in the BIOS.

Gambar 3: Kelample of ASRock Polychrome RGB lighting effects on the motherboard and compatible components.
Pangropéa
1. BIOS Apdet
Pariksa ASRock sacara berkala website for BIOS updates. BIOS updates can improve system stability, add support for new CPUs, or fix bugs. Follow the instructions provided by ASRock carefully when updating the BIOS to avoid system damage.
2. beberesih
Regularly clean your computer's interior to prevent dust buildup, which can lead to overheating and reduced performance. Use compressed air to remove dust from fans, heatsinks, and motherboard components. Ensure the system is powered off and unplugged before cleaning.
Pamérésan masalah
Upami anjeun mendakan masalah sareng motherboard anjeun, pertimbangkeun léngkah-léngkah ngungkulan umum ieu:
- Henteu Kakuatan / Henteu Boot:
- Pariksa sadaya sambungan kakuatan (24-pin ATX, 8-pin CPU).
- Pastikeun catu daya dihurungkeun.
- Pariksa sambungan saklar daya panel hareup.
- Coba booting kalawan komponén minimal (CPU, hiji RAM iteuk, GPU lamun euweuh grafik terpadu).
- Henteu aya tampilan:
- Ensure your monitor is connected to the correct graphics output (discrete GPU or motherboard's HDMI/DisplayPort).
- Pasang deui kartu grafik sareng modul RAM.
- Pariksa pilihan input monitor.
- Instabilitas Sistem / Kacilakaan:
- Pariksa suhu CPU sareng GPU.
- Ensure RAM is properly seated and running at stable speeds (disable XMP/EXPO to test if it's memory related).
- Update all drivers and BIOS to the latest versions.
- Jalankeun alat diagnostik mémori.
- Masalah jaringan:
- Verify LAN cable connection or WiFi antenna attachment.
- Reinstall LAN/WiFi drivers.
- Pariksa status router/modem.
For more specific troubleshooting, consult the ASRock support website or the full motherboard manual available for download.
spésifikasi
| Fitur | Spésifikasi |
|---|---|
| Ngaran modél | B760M PG RIPTIDE WIFI |
| CPU Socket | LGA 1700 |
| Prosesor cocog | 14th/13th/12th Gen Intel Core Processors |
| Chipset | Intel B760 |
| Téhnologi Mémori RAM | DDR5 |
| Laju Mémori Maksimum (OC) | 7200MHz+ |
| Desain Fase Daya | 14+1+1 |
| PCIe liang | 1 x PCIe 4.0 x16, 1 x PCIe 4.0 x1 |
| Kaluaran Grafika | HDMI, DisplayPort |
| Audio Codec | Realtek ALC897 7.1 CH HD Audio, Nahimic Audio |
| palabuhan SATA | 4 x SATA3 |
| M.2 liang | 2 x Hyper M.2 (PCIe Gen4 x4) |
| USB 3.2 Gen1 Tipe-C | 1 Tukangeun, 1 hareup |
| USB 3.2 Gen1 Tipe-A | 3 Tukangeun, 2 hareup |
| USB 2.0 | 4 Tukangeun, 2 hareup |
| LAN | Naga 2.5G LAN |
| Konéktipitas Wireless | Killer 802.11ax (WiFi 6E) + Bluetooth 5.3 |
| Faktor Bentuk | Mikro-ATX |
| Diménsi | 10.63 x 10.24 x 2.36 inci |
| Item Beurat | 3.01 pon |
CPU Support List
This motherboard supports a range of Intel 12th, 13th, and 14th generation processors. Always refer to the latest CPU support list on the ASRock website for the most up-to-date compatibility information and recommended BIOS versions.

Figure 4: Partial CPU Support List for ASRock B760M PG Riptide WiFi, showing Intel Core i9, i7, and i5 processors (Raptor Lake-S Refresh).

Figure 5: Continuation of the CPU Support List, including more Intel Core i5 and i3 processors (Raptor Lake-S).
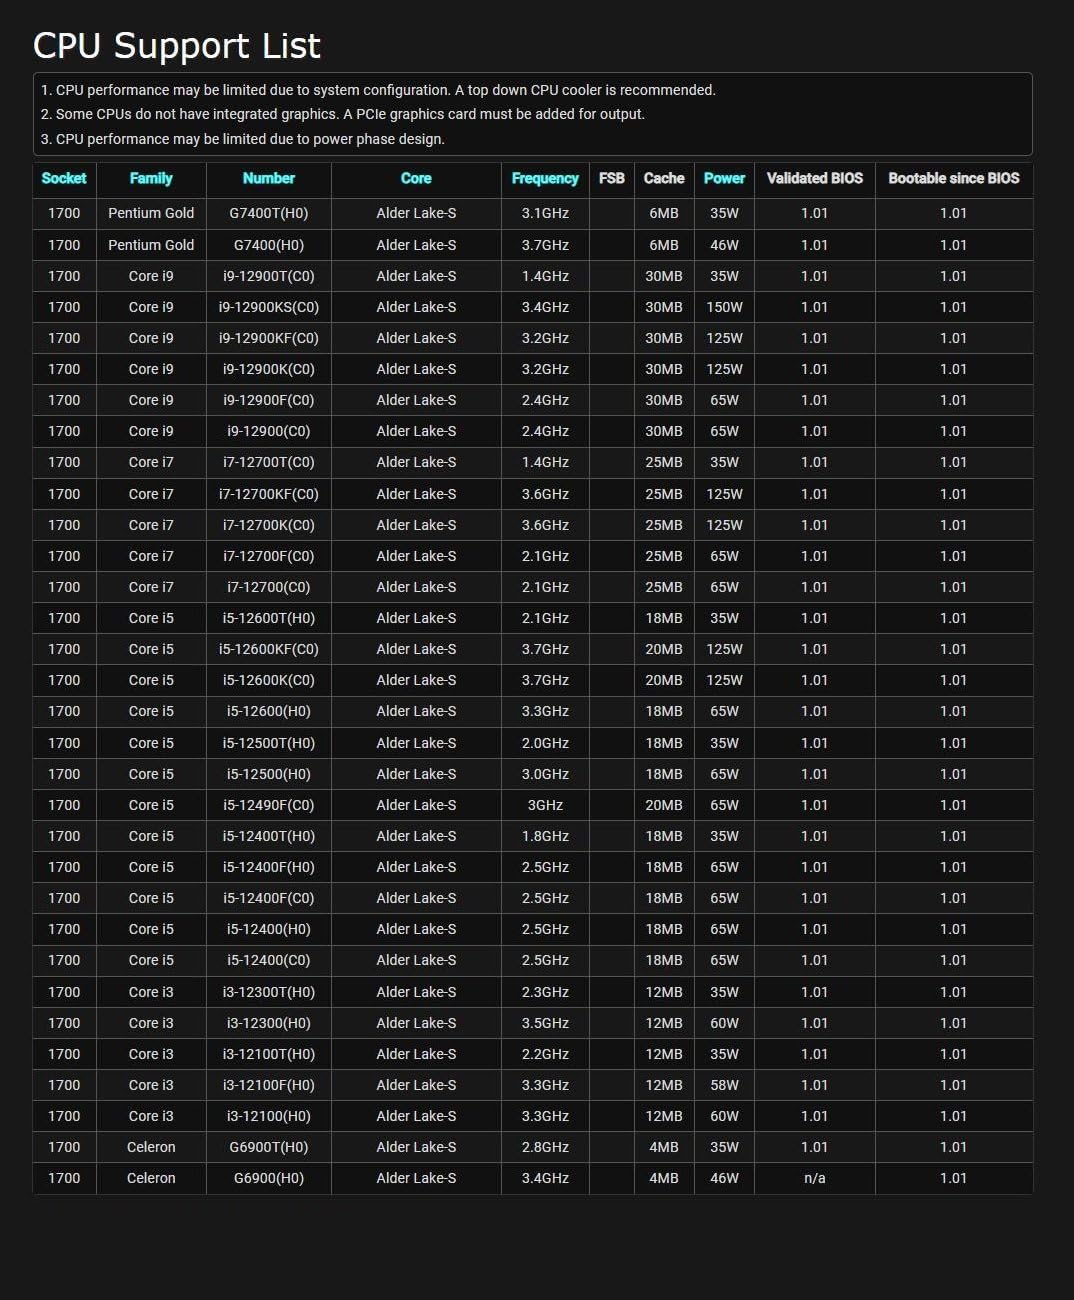
Figure 6: Further continuation of the CPU Support List, including Intel Pentium Gold and Celeron processors (Alder Lake-S).
Note: CPU performance may be limited by system configuration. A top-down CPU cooler is recommended. Some CPUs do not have integrated graphics. A PCIe graphics card may be needed for output. CPU performance may be limited due to power phase design.
Garansi sareng Rojongan
For warranty information, please refer to the warranty card included with your product or visit the official ASRock website. ASRock provides technical support and driver downloads through their official websitus.
- ASRock Official Websitus: www.asrock.com
- Bantosan Téknis: Refer to the support section on the ASRock websitus pikeun FAQ, pituduh ngungkulan, sareng inpormasi kontak.


