Bubuka
This user manual provides comprehensive instructions for the installation, operation, and maintenance of your Cuifati ATX B75A Motherboard. Please read this manual thoroughly before proceeding with installation to ensure proper setup and optimal performance. This motherboard is designed for desktop systems, supporting LGA1155 processors and DDR3 memory.
Produk Leuwihview jeung Fitur Key
The Cuifati ATX B75A Motherboard offers a robust platform for your desktop computing needs. Key features include:
- Kaluaran Video Definisi Tinggi: Equipped with VGA and HD Multimedia Interface ports for digital high-definition video output.
- Konéktipitas euyeub: Features 2 x DDR3 memory slots, 1 x SATA3.0, 3 x SATA2.0 hard disk interfaces, and a total of 10 USB interfaces (including USB 3.0).
- Kamampuh jaringan: Supports a 100M network card interface for reliable internet connectivity.
- Pangiriman Daya Stabil: Utilizes multiphase power design for enhanced stability and efficiency.
- Pamasangan Gampang: Constructed with premium printed circuit board material for durability and straightforward setup.
- NVMe M.2 Support: Includes an NVMe M.2 slot for high-speed storage solutions.
- PCIe 16X Slot: Provides a dedicated slot for graphics cards.

Gambar 1: Ti luhur ka handap view of the Cuifati ATX B75A Motherboard, showcasing the CPU socket, DDR3 memory slots, PCIe slot, and various ports.

Gambar 2: Leuwihview of the Cuifati B75A Motherboard highlighting key features such as 2xDDR3, 1xNVMe M.2, 1xPCIe 16X, 1xSATA3.0, 1xVGA, 1xWiFi M.2, 1xHDMI, and 3xSATA2.0.

Gambar 3: Diagram illustrating product features including Intel LGA 1155 socket, DDR3 memory support, WiFi M.2, PCIe 16X, SATA 3.0 and 2.0 ports, and NVMe M.2 slot.

Gambar 4: Motherboard view accompanied by icons representing solid state capacitance for stability, 100M network card, front USB 3.0 interface, and VGA/HD Multimedia Interface.
Spésifikasi teknis
| Fitur | Rincian |
|---|---|
| merek | Cuifati |
| Ngaran modél | Cuifatipg823zgbh9 |
| CPU Socket | LGA 1155 |
| Prosesor cocog | Intel Core 2 DUO (and other LGA 1155 compatible CPUs) |
| Tipe Chipset | Intel B75 Express |
| Téhnologi Mémori RAM | DDR3 |
| Mémori Jam Speed | Nepi ka 2400 MHz (OC) |
| Kapasitas Panyimpen Mémori (Max) | 16 GB |
| Dimensi produk | 6.69 x 6.69 x 6.7 inci |
| Item Beurat | 1.1 pon |
| Kaluaran Video | VGA, HD Multimedia Interface |
| Panyimpenan Interfaces | 1 x SATA3.0, 3 x SATA2.0, 1 x NVMe M.2 |
| slot ékspansi | 1 x PCIe 16X |
| Antarbeungeut USB | Multiple USB 2.0 and USB 3.0 ports |
| Jaringan | 100M Ethernet |
| Platform | Windows 10 compatible |
Guide Setup
Follow these steps to properly install your Cuifati ATX B75A Motherboard into your computer system.

Gambar 5: Detailed diagram highlighting key components and connectors on the motherboard, including CPU Slot, DDR3 Memory Slots, 24PIN CPU Power Supply, SATA ports, NVMe M.2, USB ports, HDMI, VGA, and front panel connectors. Refer to this diagram for component locations during installation.
1. Persiapan
- Pastikeun catu daya anjeun dipegatkeun tina stop kontak témbok.
- Gather necessary tools: Phillips head screwdriver, anti-static wrist strap (recommended).
- Prepare your computer case by removing the side panel.
2. Pamasangan CPU
- Locate the LGA 1155 CPU socket on the motherboard (refer to Figure 5).
- Gently lift the load plate lever and open the load plate.
- Carefully align your LGA 1155 processor with the socket, ensuring the gold triangle on the CPU matches the indicator on the socket. Do not force the CPU into the socket.
- Tutup pelat beban sareng amankeun ku uas.
- Larapkeun témpél termal kana CPU sareng pasang cooler CPU numutkeun parentah produsénna.
3. Pamasangan mémori (RAM).
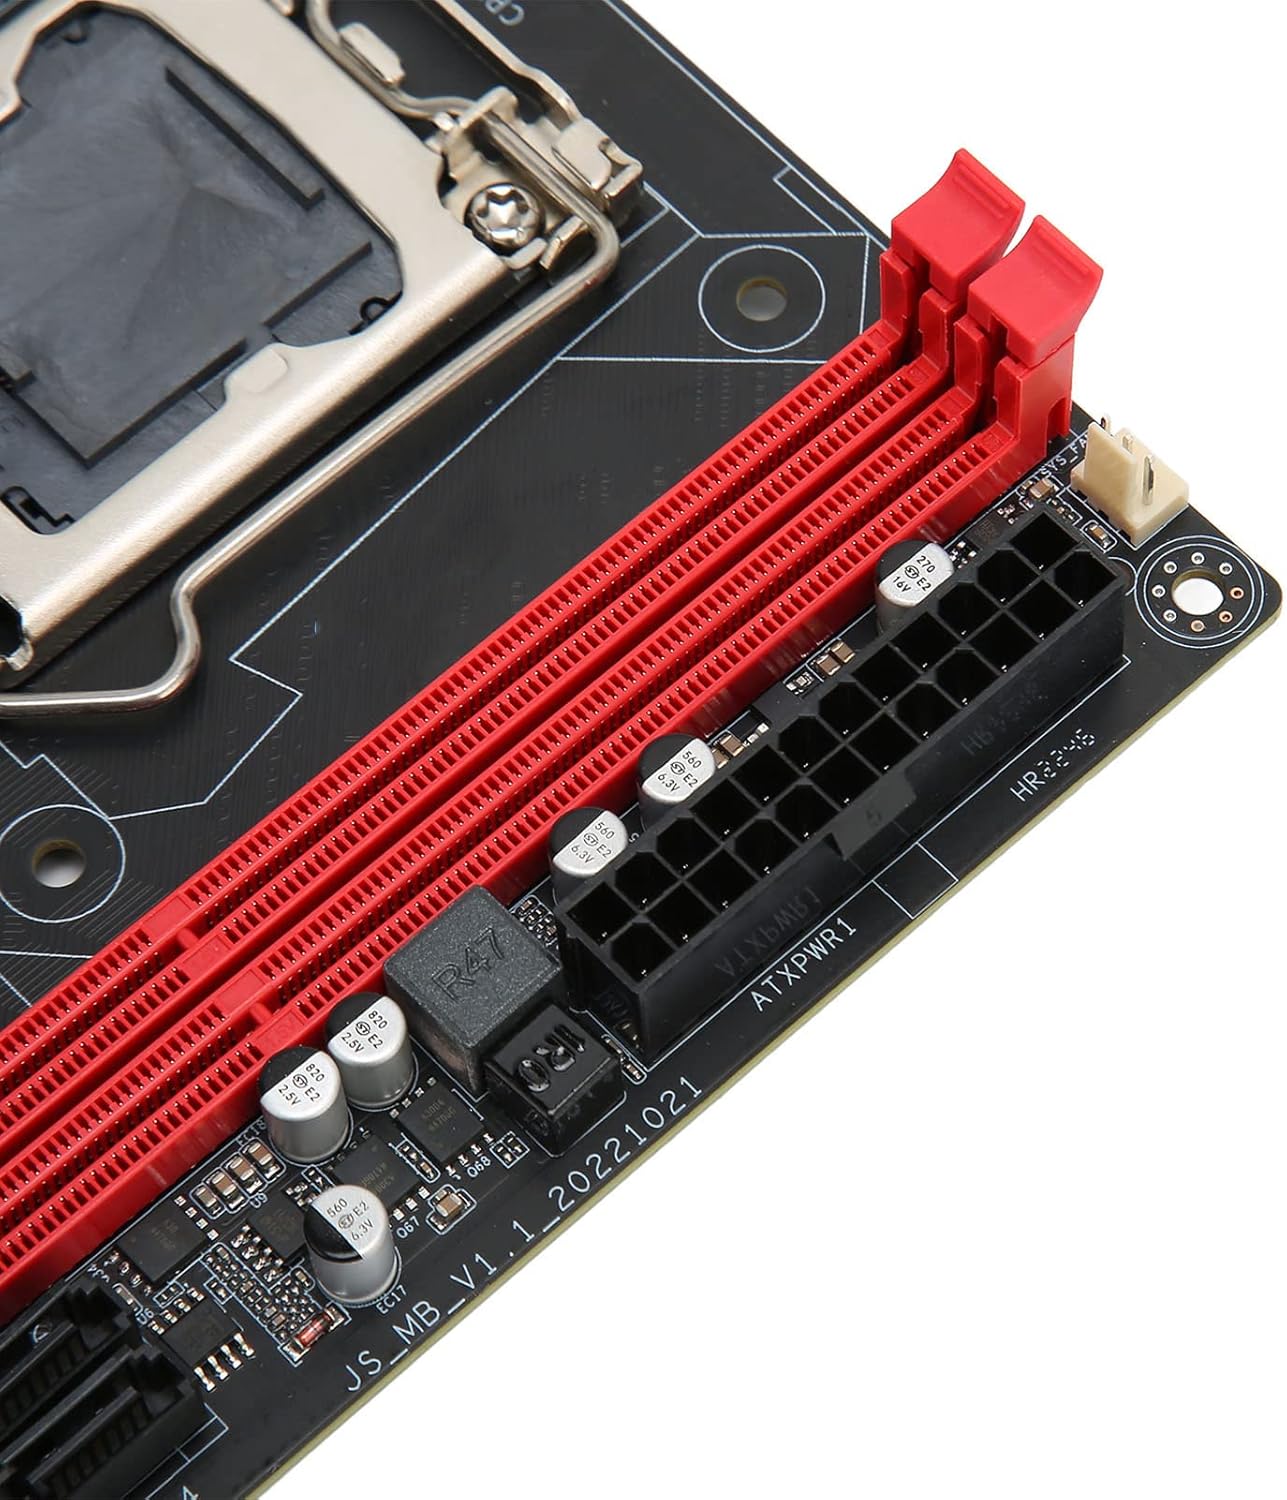
Gambar 6: Pahareup-hareup view of the DDR3 memory slots and the 24-pin ATX power connector, essential for RAM and main power connections.
- Identify the DDR3 memory slots (refer to Figure 5 and Figure 6).
- Buka klip dina kadua tungtung slot mémori.
- Align kiyeu dina modul memori DDR3 jeung konci dina slot memori.
- Pencét pageuh dina kadua tungtung modul mémori dugi ka jepitan dipasang dina tempatna.
4. Instalasi Motherboard kana Case
- Pasang tameng I/O kana bukaan pungkur wadah komputer anjeun.
- Taliti nempatkeun motherboard kana kasus nu, aligning liang screw kalawan standoffs.
- Ngamankeun motherboard kalawan screws. Ulah overighten.
5. Sambungan Power Supply
- Connect the 24-pin ATX power connector from your power supply to the 24PIN CPU Power Supply header on the motherboard (refer to Figure 5 and Figure 6).
- Connect the 4-pin or 8-pin CPU power connector (if applicable) to the 4PIN Power Supply header near the CPU socket.
6. Sambungan Alat Panyimpenan
- Connect your SATA storage devices (HDDs/SSDs) to the SATA3.0 (1 port) or SATA2.0 (3 ports) connectors on the motherboard using SATA data cables (refer to Figure 5).
- If using an NVMe M.2 SSD, insert it into the NVMe M.2 slot and secure it with the provided screw (refer to Figure 5).
7. Sambungan Panel hareup
Connect the front panel cables (Power SW, Reset SW, Power LED, HDD LED, Front USB, Front Audio) to their respective headers on the motherboard. Refer to Figure 5 for the location of these headers.
- kakuatan SW: Connects to the power button on your case.
- RESET SW: Connects to the reset button on your case.
- DAYA LED: Connects to the power indicator light. Observe polarity.
- HDD LED: Connects to the hard drive activity indicator light. Observe polarity.
- USB payun: Connects to the front USB ports on your case.
- Audio hareup: Connects to the front audio jacks on your case.
8. Kartu Ékspansi
If installing a dedicated graphics card or other PCIe expansion cards, insert them into the PCIe 16X slot and secure them with the case's retention mechanism (refer to Figure 5).
9. Cék ahir

Gambar 7: Pahareup-hareup view of the rear I/O panel, showing various ports including USB, Ethernet, VGA, and HD Multimedia Interface, where external devices will connect.
- Ganda-pariksa sadaya sambungan pikeun mastikeun aranjeunna aman.
- Ensure no loose screws or cables are obstructing fans or components.
- Close the computer case side panel.
Parentah Operasi
Once the motherboard and all components are correctly installed, you can proceed with operating your system.
1. Daya Awal Hurung
- Connect your monitor, keyboard, and mouse to the appropriate ports on the rear I/O panel (refer to Figure 7).
- Connect the power cable to your power supply and plug it into a wall outlet.
- Pencét tombol daya dina wadah komputer anjeun.
- The system should power on, and you should see output on your monitor.
2. BIOS / UEFI Setup
Upon initial boot, you may need to enter the BIOS/UEFI setup to configure settings such as boot order, date/time, and enable specific features. Typically, you can access BIOS by pressing the DEL or F2 konci sababaraha kali nalika ngamimitian.
3. Pamasangan Sistem Operasi
Install your preferred operating system (e.g., Windows 10) from a bootable USB drive or DVD. Follow the on-screen instructions provided by the operating system installer.
4. Pamasangan supir
After installing the operating system, install the necessary drivers for the motherboard chipset, audio, network, and any dedicated graphics cards. These drivers are usually provided on a CD/DVD with your components or can be downloaded from the manufacturer's websitus.
Pangropéa
Proper maintenance ensures the longevity and stable performance of your motherboard and overall system.
- Tetep beresih: Regularly clean the interior of your computer case to prevent dust buildup on components, especially heatsinks and fans. Use compressed air for this purpose.
- Pastikeun aliran hawa anu leres: Make sure your computer case has adequate ventilation and that fans are operating correctly to prevent overheating.
- Pembaruan Pembalap: Periodically check for and install the latest drivers for your motherboard chipset, graphics card, and other peripherals to ensure optimal performance and compatibility.
- Pembaruan BIOS/UEFI: Only update the BIOS/UEFI if necessary, and follow the manufacturer's instructions precisely. Incorrect BIOS updates can render your motherboard inoperable.
- Hindarkeun Stress Fisik: Handle the motherboard with care. Avoid bending or applying excessive force to components or connectors.
Pamérésan masalah
Bagian ieu nyayogikeun solusi pikeun masalah umum anu anjeun tiasa patepang.
Teu Aya Daya / Sistem Teu Hurung
- Pariksa sambungan kakuatan: Ensure the 24-pin ATX power connector and the 4-pin/8-pin CPU power connector are securely seated on the motherboard.
- Sasayogian tanaga: Verify that the power supply is switched on and connected to a working power outlet. Test the power supply if possible.
- Sambungan Panel hareup: Double-check the POWER SW header connection on the motherboard.
- Sirkuit pondok: Remove the motherboard from the case and test it on a non-conductive surface (e.g., cardboard box) with only essential components (CPU, one RAM stick, CPU cooler, power supply). This helps rule out short circuits caused by the case.
Taya Kaluaran Témbongkeun
- Sambungan Monitor: Ensure the monitor is properly connected to the VGA or HD Multimedia Interface port on the motherboard (or dedicated graphics card) and is powered on.
- RAM: Reseat the DDR3 memory modules. Try booting with only one RAM stick.
- Kartu grafik: If using a dedicated graphics card, ensure it is properly seated in the PCIe 16X slot and has auxiliary power connected (if required).
- Setélan BIOS: If you have a dedicated graphics card, ensure the BIOS is configured to use it as the primary display output.
System Instability / Random Crashes
- Overheating: Check CPU and case temperatures. Ensure CPU cooler is properly installed and fans are working. Clean dust from heatsinks.
- Masalah RAM: Run a memory diagnostic tool to check for faulty RAM modules.
- Masalah supir: Pastikeun sadaya drivers parantos diropéa sareng dipasang leres.
- Sasayogian tanaga: Pasokan listrik anu teu cekap atanapi gagal tiasa nyababkeun instability.
Slow Performance / Lagging
- Panyimpenan: Check the health of your storage drives (HDD/SSD). Ensure the operating system is installed on a fast drive (e.g., NVMe M.2 SSD).
- CPU/RAM Usage: Monitor CPU and RAM usage to identify resource-intensive applications.
- Supir: Outdated drivers can sometimes lead to performance issues.
- Sistem operasi: Ensure your operating system is optimized and free from malware.
Garansi sareng Rojongan
For warranty information and technical support, please refer to the documentation provided with your purchase or visit the official Cuifati websitus. Simpen bukti pameseran anjeun pikeun klaim garansi.
For further assistance, you may contact Cuifati customer support through their official channels. Please have your product model number (Cuifatipg823zgbh9) and purchase details ready.