1. Bubuka
This manual provides detailed instructions for the installation, operation, and maintenance of your AINAVI 9-inch QLED Car Stereo Head Unit. Please read this manual thoroughly before using the product to ensure proper function and safety. This unit is designed to upgrade the in-car entertainment and navigation system for Toyota Prius models manufactured between 2010 and 2015.
2. Produk Langkungview
The AINAVI 9-inch QLED Car Stereo Head Unit is an advanced multimedia system featuring a high-resolution touchscreen, integrated navigation, and smartphone connectivity. Key features include:
- 9-inch QLED Touchscreen: Provides a clear and vibrant visual experience with a resolution of 1280x720.
- Wired/Wireless CarPlay & Android Auto: Seamless integration with your smartphone for navigation, music, calls, and messages.
- Napigasi GPS Diwangun-di: Supports various satellite services and 5G WiFi for accurate, real-time navigation.
- Hardware Kinerja Tinggi: Equipped with an 8-core CPU, 3GB RAM, and 32GB ROM for smooth operation and amppanyimpenan pikeun aplikasi.
- Pangolahan Audio Lanjutan: Features a professional DSP and 48-band equalizer for customizable sound settings.
- Tukangeun View Rojongan kaméra: Compatible with 1080P AHD rear view cameras, displaying clear reversing scenes with trajectory lines.
- 5G WiFi & Bluetooth 5.0: Ensures fast internet connectivity and stable wireless communication.
- Fungsi Layar Pamisah: Allows simultaneous use of two applications on the screen.

Image: The AINAVI 9-inch QLED Car Stereo Head Unit, shown with a rearview camera and a smartphone displaying CarPlay/Android Auto interfaces.
3. Naon dina Box
Punten parios yén sadaya komponén aya sateuacan ngamimitian pamasangan:
- Car Head Unit (1280*720) with Frame for Toyota Prius 2010-2015
- Mikropon
- Blue Frame Removal Tool
- Antena GPS
- USB 4Pin Cable
- USB 6Pin Cable
- AHD 1080P Rear View Kaméra
- Manual pangguna (dokumén ieu)
- Kabel Daya
- RCA Kabel

Image: A visual representation of all items included in the product package.
4. Setup jeung Instalasi
Installation of the AINAVI Car Stereo Head Unit requires basic automotive electrical knowledge. If you are unfamiliar with car stereo installation, professional assistance is recommended.
4.1 Daptar pariksa Pra-Pamasangan
- Pastikeun ignition kendaraan pareum sareng batréna dipegatkeun.
- Gather necessary tools (e.g., screwdrivers, trim removal tools, wire strippers).
- Verify all components listed in Section 3 are present.
4.2 Léngkah-léngkah Pamasangan (Umum)
- Remove Existing Head Unit: Carefully remove the original car stereo and dashboard trim using the provided frame removal tool.
- Sambungkeun Wiring Harness: Connect the new power cable and RCA cables to the vehicle's wiring harness. Ensure all connections are secure.
- Pasang Antena GPS: Pasang anteneu GPS dina lokasi anu jelas view langit, ilaharna dina dasbor atawa handapeun kaca.
- Sambungkeun Kabel USB: Route the USB cables to a convenient location for external device connection.
- Pasang Rear View Kaméra (Opsional): If installing the rearview camera, route its cable from the rear of the vehicle to the head unit and connect it.
- Mount New Head Unit: Secure the AINAVI head unit into the dashboard opening, ensuring all cables are properly routed and not pinched.
- Sambungkeun deui Batré: Reconnect the vehicle's battery and test the unit's functionality before fully reassembling the dashboard trim.
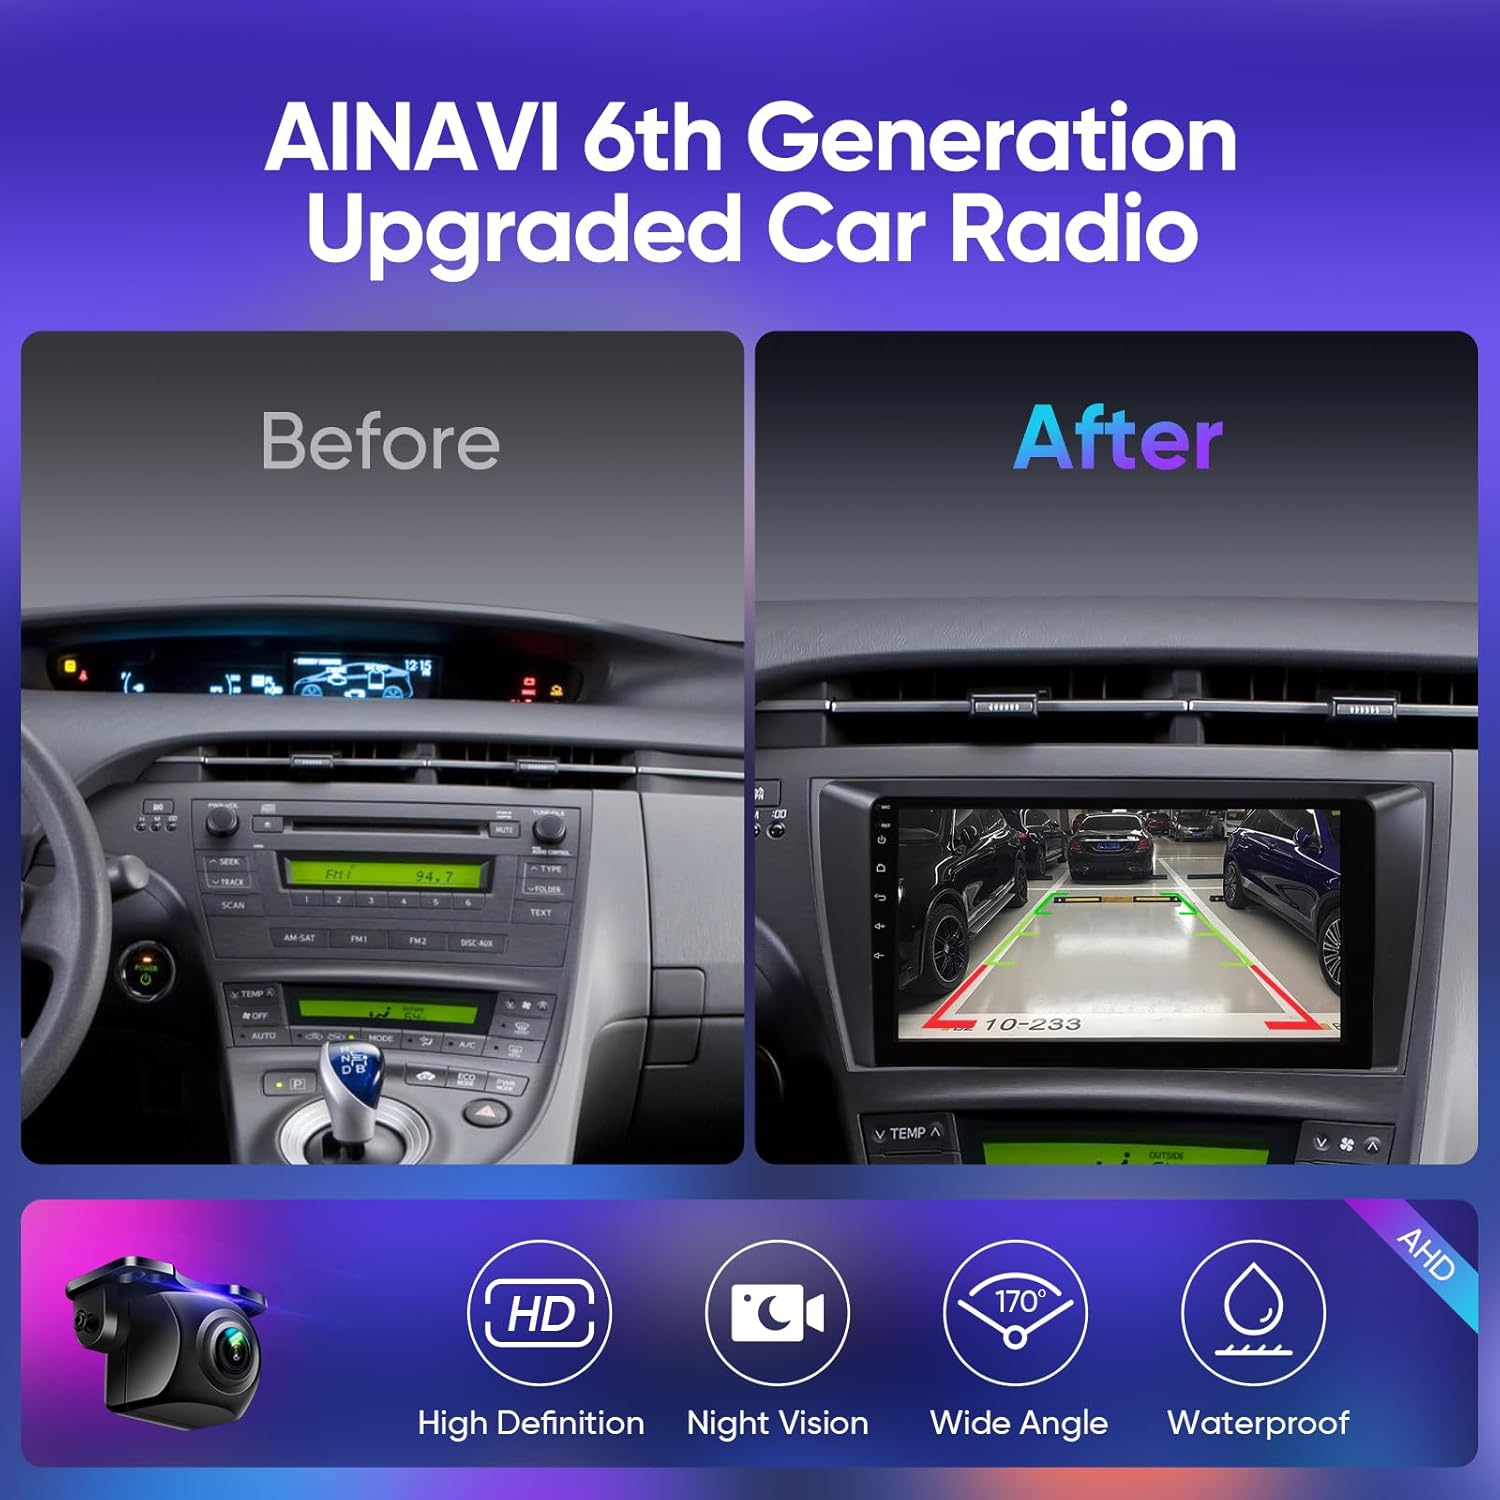
Image: Comparison of a Toyota Prius dashboard before and after the installation of the AINAVI head unit, highlighting the rearview tampilan kaméra.
5. Parentah Operasi
5.1 Daya Hurung/Pareuman
The unit powers on automatically with the vehicle's ignition. To manually power off or restart, use the designated power button on the unit's front panel.
5.2 CarPlay & Android Auto
Connect your iPhone via wired or wireless connection for CarPlay, or your Android smartphone via wired connection for Android Auto. Follow the on-screen prompts to complete the setup. This allows access to compatible apps, navigation, music, and voice assistants directly from the head unit.

Image: The head unit's display showing both Apple CarPlay and Android Auto interfaces, demonstrating smartphone integration.
5.3 Napigasi GPS
The unit supports various navigation applications. Ensure the GPS antenna is properly installed for optimal signal reception. Connect to 5G WiFi for real-time traffic updates and map data. Use the touchscreen to input destinations and select routes.

Image: The head unit screen showing a detailed GPS map and the Google Assistant voice command interface.
5.4 Audio Settings (DSP & EQ)
Access the audio settings to customize your listening experience. The built-in DSP and 48-band equalizer allow for precise adjustments to sound field, effects, surround sound, bass, treble, and individual speaker volumes. Presets like Normal, Jazz, Pop, Classical, Heavy Metal, Vocal, and Soft are available.

Image: The user interface for the Digital Sound Processor (DSP) and 48-band Equalizer, allowing detailed audio customization.
5.5 Fungsi Layar Pamisah
To activate split screen mode, drag an application icon to one side of the screen or use the dedicated split-screen button (if available). This allows two applications to run simultaneously, for example, navigation on one side and music playback on the other.

Image: The head unit demonstrating its split-screen capability, running a video player and a navigation app concurrently.
5.6 Konektipitas Bluetooth
Pair your smartphone via Bluetooth 5.0 for hands-free calling and audio streaming. Navigate to the Bluetooth settings on the head unit, enable Bluetooth, and search for your device. Select your device from the list and confirm the pairing code.
6. Pangropéa
Proper maintenance ensures the longevity and optimal performance of your head unit.
- Ngabersihan layar: Anggo lawon anu lemes sareng henteu lint pikeun ngusap layar rampa. Pikeun smudges nekad, rada dampen lawon jeung cai atawa cleaner aman layar. Hindarkeun bahan kimia anu kasar.
- Apdet parangkat lunak: Periodically check for software updates to ensure the system has the latest features and bug fixes. Updates can typically be performed via WiFi.
- Perawatan Umum: Hindarkeun ngalaan unit ka suhu anu ekstrim, sinar panonpoé langsung pikeun période anu berkepanjangan, atanapi kalembaban anu kaleuleuwihan.
7. Cara ngungkulan
Upami anjeun mendakan masalah, tingal léngkah-léngkah ngungkulan umum ieu:
- Henteu aya kakuatan: Check all power connections and vehicle fuses. Ensure the battery is properly connected.
- Henteu aya sora: Verify speaker connections. Check volume levels and audio settings (EQ/DSP). Ensure the mute function is not active.
- Kaleungitan Sinyal GPS: Ensure the GPS antenna is securely connected and has an unobstructed view langit. Coba hurungkeun deui unitna.
- CarPlay/Android Auto Teu Nyambung: Check USB cable integrity. Ensure your phone's operating system is up to date. Try restarting both the head unit and your phone.
- Layar rampa teu ngaréspon: Perform a system reset (refer to the unit's settings for reset options). If the issue persists, contact support.
- System Lag/Freezing: Close unnecessary background applications. Clear cache if available in system settings. A system restart may resolve temporary issues.
8. Spésifikasi
| Fitur | Spésifikasi |
|---|---|
| Ukuran tampilan | 9 inci |
| Resolusi | 1280 x 720 |
| Sistem operasi | Android 12 |
| Prosesor | 8-Inti |
| Ram | 3GB |
| Rom | 32GB |
| Konektipitas | Bluetooth 5.0, USB, Wi-Fi (2.4GHz & 5GHz), Wired/Wireless CarPlay, Wired Android Auto |
| Fitur husus | GPS Navigation, Hands-Free Calling, RDS, 48-EQ + Premium DSP, QLED Screen, Split Screen Function, Rear View Camera Input, Full RCA Video Output |
| Item Beurat | 3.69 pon |
| Ukuran Paket | 14 x 9 x 5.5 inci |
9. Émbaran jaminan
This AINAVI Car Stereo Head Unit comes with a 12 Months Manufacturer Guarantee from the date of purchase. This warranty covers defects in materials and workmanship under normal use. It does not cover damage caused by improper installation, accident, misuse, abuse, neglect, or unauthorized modification. Please retain your proof of purchase for warranty claims.
10. Rojongan Téknis
For installation assistance, technical questions, or troubleshooting beyond what is covered in this manual, our professional technical support team is available to help. Please contact us through the platform where you purchased the product. You may be asked to provide pictures or videos related to your inquiry to facilitate support.

Image: A guide illustrating the steps to contact the seller for installation and technical support via the online marketplace.

