1. Bubuka
This manual provides essential instructions for the proper installation, operation, and maintenance of your Interphone Cellularline U-Com 6R Motorcycle Bluetooth Intercom. Please read this manual thoroughly before using the device to ensure optimal performance and safety.
The U-Com 6R is designed to enhance your riding experience with reliable Bluetooth 5.2 communication, allowing connection with up to two riders over a distance of 1 kilometer. It offers compatibility with various OEM and GPS systems and features a long-lasting, replaceable battery.
2. Émbaran Kasalametan
Always prioritize safety while riding. Operating the intercom should not distract you from road conditions or traffic. Ensure the device is securely mounted and all cables are properly routed to avoid interference with helmet functionality or rider movement.
- Ulah nyobian ngabongkar atawa ngaropéa alat.
- Jauhkeun alat tina suhu ekstrim sareng sinar panonpoé langsung.
- Pastikeun panutup port ngecas ditutup pageuh nalika teu ngecas pikeun ngajaga tahan cai.
- Adjust volume to a safe level that allows you to hear ambient traffic sounds.
3. Eusi Paket
Pastikeun yén sadaya item anu didaptarkeun di handap kalebet kana pakét anjeun:
- U-Com 6R Main Unit
- Helmet Mounting Bracket (Clip and Adhesive options)
- Spéker Set
- Mikropon Boom
- Mikropon kabel
- Kabel Ngecas USB-C
- Velcro Pads for Speakers and Microphones
- Spons Mikropon
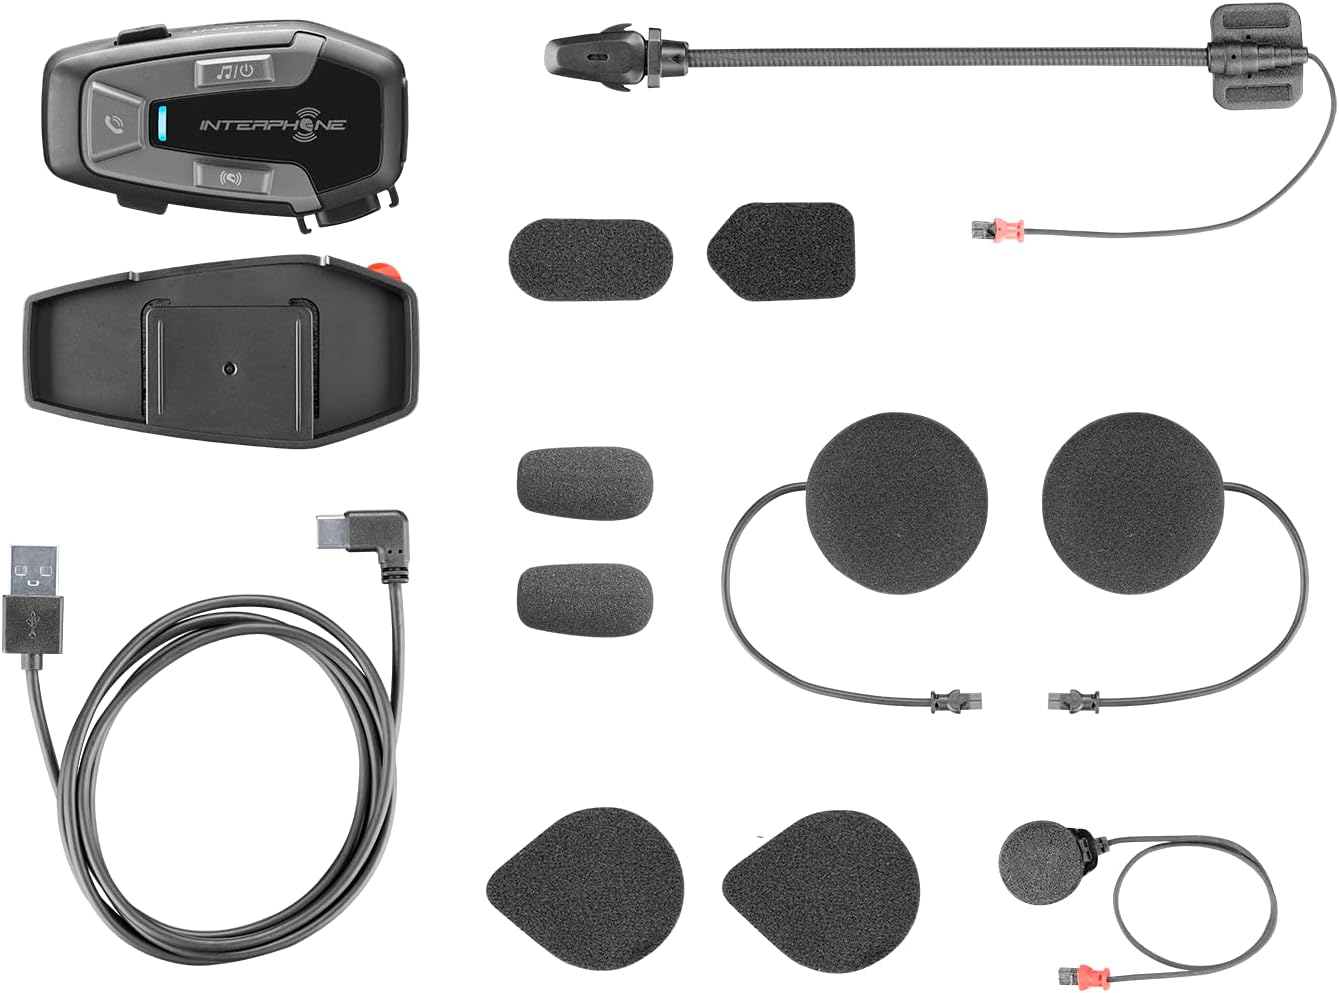
Gambar 3.1: All components included in the Interphone U-Com 6R package. This image displays the main intercom unit, mounting accessories, speakers, two types of microphones (boom and wired), and the USB-C charging cable.
4. Alat Leuwihview
4.1. Main Unit Controls

Gambar 4.1: Hareupeun view of the Interphone U-Com 6R main unit. This image highlights the primary control buttons for music, call management, and intercom functions, along with the LED indicator.
- Tombol Musik: Controls music playback (play/pause, skip tracks).
- Tombol Telepon: Manages phone calls (answer/end, voice assistant).
- Tombol panganteur: Initiates and manages intercom conversations.
- Indikator LED: Displays device status (pairing, charging, power).
4.2. Palabuhan sarta Panyambungna

Gambar 4.2: Samping view of the Interphone U-Com 6R unit. This image clearly shows the USB-C charging port and the speaker/microphone connector.
- Palabuhan USB-C: Dipaké pikeun ngecas alat.
- Speaker/Microphone Connector: Connects the speaker and microphone assembly to the main unit.
5. Pamasangan
5.1. Pamasangan Unit Utama
The U-Com 6R can be mounted to your helmet using either the clip mount or the adhesive mount.
- Klip Gunung: Selapkeun klip antara cangkang helm sareng bantalan jero di sisi kénca. Pastikeun éta dipasang pageuh.
- napel Gunung: Clean the desired mounting area on the left side of your helmet. Peel off the protective film from the 3M adhesive on the bracket and firmly press it onto the helmet for at least 30 seconds. Allow 24 hours for the adhesive to fully cure before use.

Gambar 5.1: Adhesive mounting bracket for the Interphone U-Com 6R. This image shows the bracket with the 3M adhesive backing, ready for attachment to a helmet.
5.2. Masang Spiker sareng Mikropon
Position the speakers inside the helmet's ear pockets. The microphone should be placed in front of your mouth, ensuring clear voice pickup.
- Attach the speakers to the helmet's interior using the provided Velcro pads. Ensure the speaker with the shorter wire is for the left ear and the longer wire for the right.
- Choose the appropriate microphone for your helmet type:
- Mikropon Boom: Ideal for open-face or modular helmets. Attach it to the inside of the helmet near your mouth.
- Mikropon kabel: Suitable for full-face helmets. Attach it to the inside of the chin bar, close to your mouth.
- Connect the speaker and microphone assembly to the main U-Com 6R unit.
- Tuck all wires neatly under the helmet padding to prevent discomfort or entanglement.

Gambar 5.2: Installation of speakers and wired microphone inside a full-face helmet. This diagram illustrates the placement of the flat speakers in the ear recesses and the wired microphone near the chin bar.

Gambar 5.3: Installation of speakers and boom microphone inside an open-face helmet. This diagram shows the placement of speakers and the flexible boom microphone extending towards the rider's mouth.
6. Setup jeung Operasi Dasar
6.1. Ngecas Alat
Before first use, fully charge the U-Com 6R. Connect the supplied USB-C cable to the charging port on the unit and to a USB power source. The LED indicator will show charging status and turn off when fully charged. A full charge provides approximately 15 hours of talk time.
6.2. Daya Hurung / Pareum
- Daya Hurung: Press and hold the Music button for 3 seconds. The LED will flash blue.
- Pareum listrik: Press and hold the Music button for 5 seconds. The LED will turn red and then off.
6.3. Ngapasangkeun Bluetooth sareng Telepon Sélulér
- With the U-Com 6R powered off, press and hold the Call button for 5 seconds until the LED flashes red and blue alternately, indicating pairing mode.
- Dina telepon sélulér anjeun, aktipkeun Bluetooth teras milarian alat énggal.
- Select "Interphone U-Com 6R" from the list of available devices.
- Once paired, the LED on the U-Com 6R will flash blue periodically.
6.4. Intercom Pairing (Up to 2 Riders)
The U-Com 6R supports communication with one other rider. For Mesh 2.0 technology with multiple riders, refer to the advanced features section or the full online manual.
- Ensure both U-Com 6R units are powered on and not connected to other devices.
- On both units, press and hold the Intercom button for 5 seconds until the LED flashes red and blue alternately.
- The units will automatically search and pair with each other. Once connected, the LEDs will flash blue.
- To initiate an intercom conversation, briefly press the Intercom button on either unit.
7. Operasi
7.1. Telepon Telepon
- Ngajawab Telepon: Pencét sakeudeung tombol Telepon.
- Tungtung Telepon: Pencét sakeudeung tombol Telepon.
- Nolak Telepon: Pencét sareng tahan tombol Telepon salami 2 detik.
- Asistén Sora: Briefly press the Call button twice to activate your phone's voice assistant (Siri, Google Assistant).
7.2. Puterkeun Musik
- Puter / Reureuh: Briefly press the Music button.
- Lagu salajengna: Press the Music button twice.
- Lagu Sateuacanna: Press the Music button three times.
7.3. Volume adjustment
The U-Com 6R features dedicated buttons for volume control, typically integrated with the main control panel. Refer to the device overview (Figure 4.1) for button locations.
- Ningkatkeun Jilid: Pencét tombol 'Volume Naék'.
- Turunkeun Jilid: Pencét tombol 'Volume Turun'.
7.4. GPS and OEM System Compatibility
The U-Com 6R is designed with Bluetooth 5.2 to ensure broad compatibility with various GPS navigation devices and original equipment manufacturer (OEM) systems found on motorcycles. Pair these devices as you would a mobile phone, following their respective pairing instructions.
8. Pangropéa
- beberesih: Ngagunakeun lemes, damp cloth to clean the unit. Do not use abrasive cleaners or solvents.
- Tahan cai: The U-Com 6R is waterproof. However, ensure the USB-C port cover is fully sealed to maintain its water-resistant properties.
- Perawatan batré: For optimal battery life, avoid fully discharging the battery frequently. Charge the device regularly, especially if it will be stored for extended periods. The integrated battery is replaceable, extending the product's lifespan.
- Panyimpenan: Simpen alat dina tempat anu tiis sareng garing upami henteu dianggo.
9. Cara ngungkulan
| Masalah | Mungkin Cukang lantaranana | Solusi |
|---|---|---|
| Alat teu hurung. | batré lemah. | Ngecas alat sapinuhna. |
| Cannot pair with phone/intercom. | Device not in pairing mode; distance too far; interference. | Ensure device is in pairing mode (flashing red/blue). Move closer to the other device. Turn off other Bluetooth devices. |
| Teu aya audio atanapi kualitas audio anu goréng. | Volume too low; speakers incorrectly positioned; loose connection. | Increase volume. Check speaker placement and connections. Ensure microphone is correctly positioned. |
| Sambungan interkom sering pegat. | Out of range; environmental interference. | Stay within 1 km range. Avoid areas with strong radio interference. |
9.1. Reset pabrik
If issues persist, a factory reset may resolve them. Consult the full online manual or contact customer support for specific instructions on performing a factory reset for the U-Com 6R.
10. Spésifikasi
| Fitur | Rincian |
|---|---|
| Nomer modél | INTERPHOUCOM6R |
| Vérsi Bluetooth | 5.2 |
| Rentang Intercom | Up to 1 Kilometer (between 2 riders) |
| Waktu Ngobrol | Kurang leuwih 15 jam |
| Jenis Batré | Lithium Polymer (included, replaceable) |
| Konektipitas | Bluetooth, Mesh 2.0 (compatible with Sena) |
| Tahan cai | Sumuhun |
| Beurat | 0.36 Kilogram (12.7 ons) |
| Diménsi | 9.09 x 5.83 x 2.64 inci (Pakét) |
| Kasaluyuan | GPS and OEM systems, most other brands on the market |
11. Garansi jeung Rojongan
Interphone products are manufactured to high-quality standards. For warranty information, please refer to the warranty card included with your product or visit the official Interphone website. For technical support or further assistance, please contact Interphone customer service through their official channels.
Anjeun tiasa mendakan langkung seueur inpormasi sareng sumber dukungan ku nganjang ka Interphone Store on Amazon.