1. Bubuka
This user manual provides comprehensive instructions for the LILYGO T7-S3 ESP32-S3 Development Board. The T7-S3 is a versatile module based on the ESP32-S3-WROOM-1, featuring 16MB Flash and 8MB PSRAM. It supports Wi-Fi, Bluetooth 5, and Bluetooth Mesh connectivity, making it suitable for a wide range of IoT and embedded applications.
This document covers the board's features, setup procedures, operational guidelines, maintenance tips, troubleshooting steps, and detailed technical specifications.
2. Eusi Paket
Upon opening the package, please verify that all components listed below are present and in good condition:
- 1 x LILYGO T7-S3 V1.1 Development Board
- 2 x 2.0mm Long Female Pin Headers (1*10P)
- 2 x 2.0mm Short Female Pin Headers (1*10P)
- 2 x 2.0mm Male Pin Headers (1*10P)
- 1 x JST 1.25mm 2-Pin Connector with wires
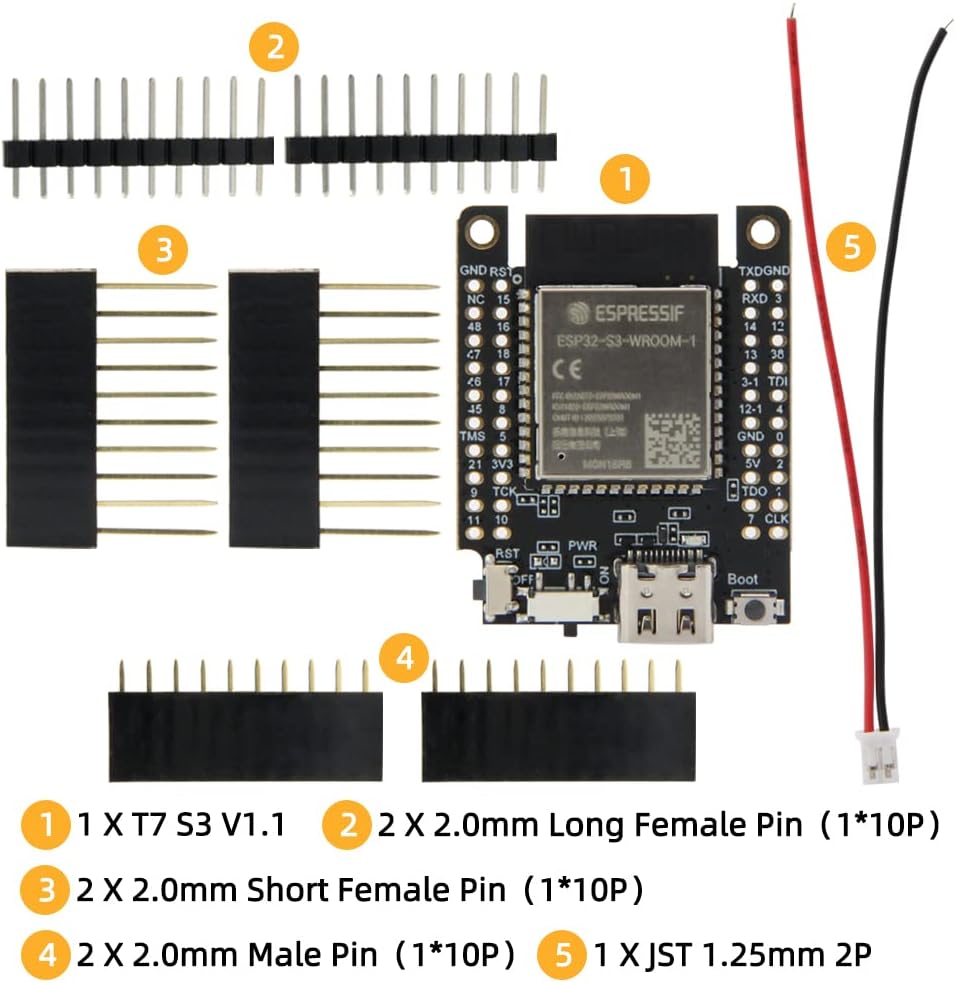
Figure 2.1: Contents of the LILYGO T7-S3 Development Board package. This image displays the main T7-S3 board, two sets of long female pin headers, two sets of short female pin headers, two sets of male pin headers, and a JST 1.25mm 2-pin connector with wires.
3. Dewan Leuwihview sareng Pinout
The LILYGO T7-S3 board is designed for ease of use and integration into various projects. Below are images illustrating the board's physical layout and a detailed pinout diagram.

Gambar 3.1: Hareupeun view of the LILYGO T7-S3 board, showing the ESP32-S3-WROOM-1 module, USB-C port, power switch, and boot button.

Gambar 3.2: Balik view of the LILYGO T7-S3 board, displaying the LILYGO branding and additional components.

Gambar 3.3: Gabungan hareup sareng tukang view of the LILYGO T7-S3 board, providing a comprehensive look at both sides.

Figure 3.4: Dimensions of the LILYGO T7-S3 board, indicating its compact size for integration into projects.
3.1 Diagram Pinout
Understanding the pinout is crucial for connecting peripherals and utilizing the full capabilities of the ESP32-S3. The diagram below details the function of each pin.
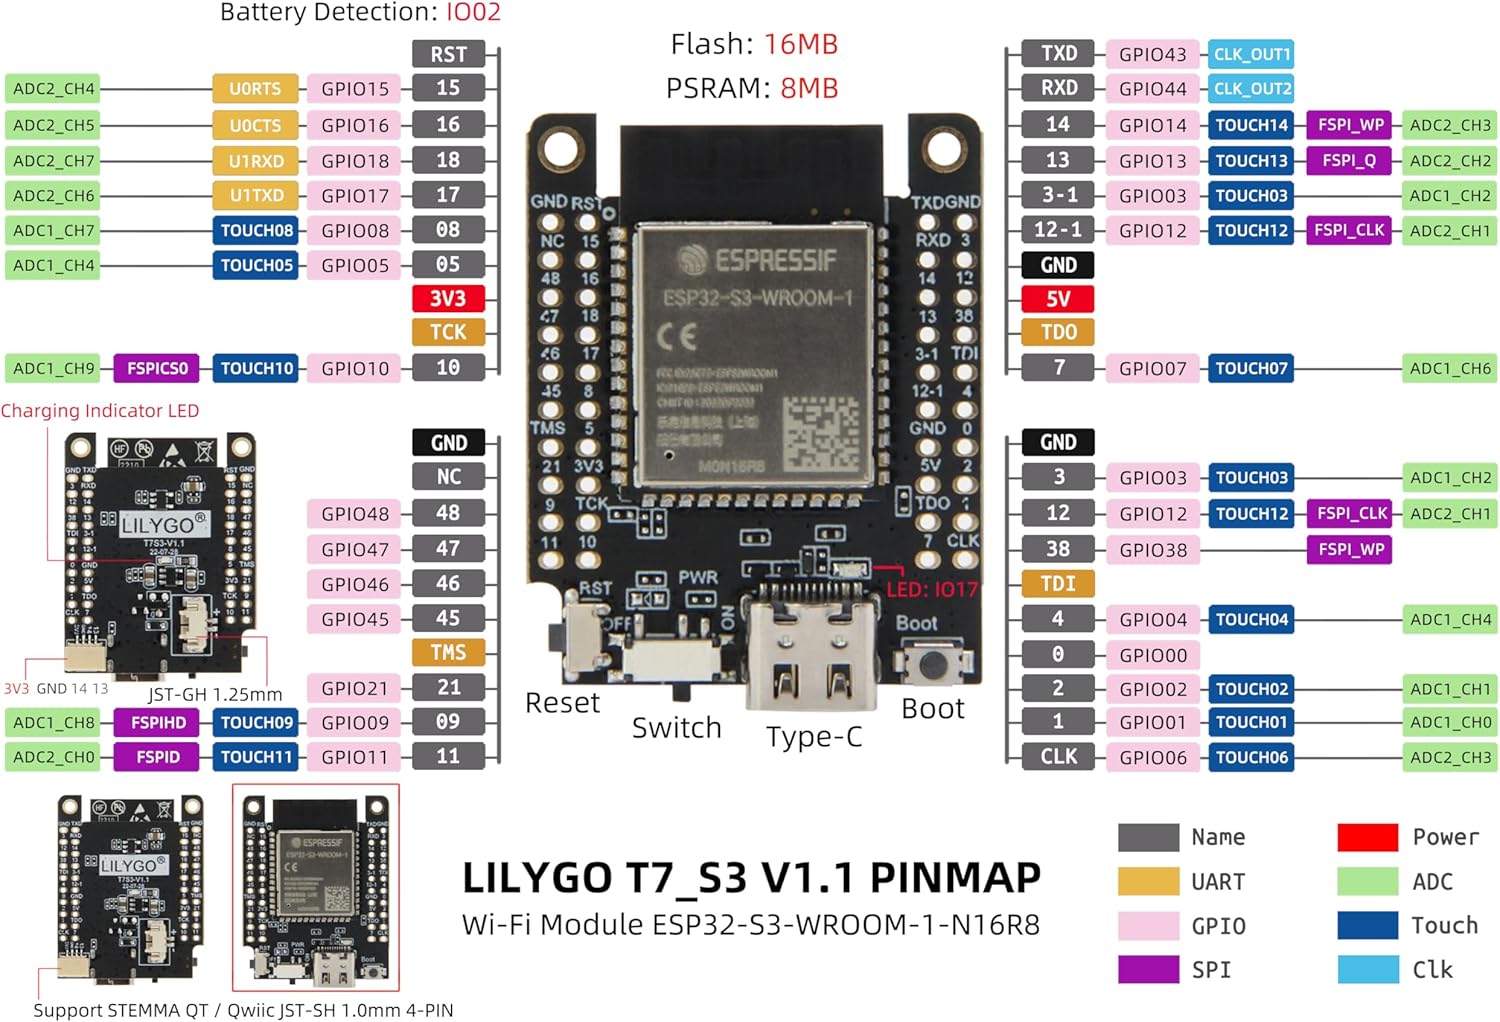
Figure 3.5: LILYGO T7-S3 V1.1 Pinmap. This diagram illustrates the various GPIOs, power pins, communication interfaces (UART, SPI), ADC, and Touch pins, along with indicators for charging and battery detection.
Key pin functions include:
- Pin GPIO: General Purpose Input/Output pins for digital and analog signals.
- Pin kakuatan: 3V3, 5V, and GND for power supply.
- Antarbeungeut Komunikasi: TXD/RXD for UART, CLK/TDO/TDI/TMS/TCK for JTAG/SPI.
- Fungsi husus: Pins for ADC (Analog-to-Digital Converter), Touch sensors, and I2S.
4. Setup jeung Pamakéan Awal
4.1 Connecting the Board
- Sasayogian tanaga: Connect the LILYGO T7-S3 board to your computer using a USB-C cable. The board can be powered via the USB-C port.
- Saklar kakuatan: Ensure the power switch on the board is in the "ON" position.
- Pamasangan supir: Your operating system may automatically install necessary drivers. If not, you might need to install the appropriate USB-to-serial drivers (e.g., CP210x or CH340, depending on the specific chip used on the board for USB communication).
4.2 Setelan Lingkungan Pangwangunan
The LILYGO T7-S3 supports various programming languages and platforms:
- Basa Pemrograman: C/C++, MicroPython
- Programming Platforms: Arduino-IDE, VS Code (with PlatformIO extension)
For detailed setup instructions and examples, please refer to the official LILYGO GitHub repository:
github.com/Xinyuan-LilyGO/T7-S3
This repository provides code examples, documentation, and community support to help you get started with your projects.
5. Operating the Board
5.1 Operasi Dasar
- Hurungkeun/Pareuman: Use the physical power switch to turn the board on or off.
- Tombol Reset: Press the "RST" button to perform a hardware reset of the ESP32-S3 module.
- Boot Button: The "Boot" button is typically used to put the ESP32-S3 into bootloader mode for flashing new firmware. Hold down the "Boot" button, press and release "RST", then release "Boot".
5.2 Programming and Uploading
Once your development environment is set up, you can write and upload your code to the T7-S3 board. The process generally involves:
- Writing your C/C++ or MicroPython code.
- Selecting the correct board model (ESP32-S3 Dev Module) and COM port in your IDE.
- Compiling and uploading the code to the board. The IDE will typically handle putting the board into flashing mode automatically, or you may need to manually use the Boot button as described above.
6. Pangropéa
To ensure the longevity and optimal performance of your LILYGO T7-S3 Development Board, follow these maintenance guidelines:
- Nanganan kalayan ati-ati: Avoid dropping the board or subjecting it to physical shock.
- Listrik statik: Always handle the board in an anti-static environment or take precautions to discharge static electricity before touching it.
- Kabersihan: Keep the board free from dust, dirt, and moisture. Use a soft, dry brush or compressed air to clean it if necessary. Do not use liquids or solvents.
- Panyimpenan: When not in use, store the board in an anti-static bag or a protective enclosure to prevent damage.
- Sasayogian tanaga: Use only appropriate power sources (e.g., 5V via USB-C) to avoid damaging the board.
7. Cara ngungkulan
If you encounter issues with your LILYGO T7-S3 board, consider the following troubleshooting steps:
- Board Not Detected by Computer:
- Ensure the USB-C cable is securely connected to both the board and your computer.
- Verify the power switch on the board is in the "ON" position.
- Install or update the necessary USB-to-serial drivers (e.g., CP210x or CH340).
- Coba port USB atawa kabel béda.
- Failed to Upload Code:
- Check if the correct COM port is selected in your IDE.
- Ensure the board is in flashing mode (often achieved by holding "Boot" and pressing "RST", then releasing "Boot").
- Verify that the correct board type (ESP32-S3 Dev Module) is selected in your IDE.
- Close any other applications that might be using the serial port.
- Unexpected Behavior / Code Not Running:
- Perform a hard reset using the "RST" button.
- Double-check your code for logical errors or syntax mistakes.
- Ensure all external components are correctly wired according to the pinout diagram.
- Pariksa stabilitas catu daya.
For more advanced troubleshooting or specific issues, consult the LILYGO GitHub repository or relevant online forums for ESP32-S3 development.
8. Spésifikasi Téknis
Below are the detailed technical specifications for the LILYGO T7-S3 ESP32-S3 Development Board:
Figure 8.1: LILYGO T7-S3 V1.1 Specifications. This image summarizes key features such as MCU, connectivity, memory, programming languages, and physical attributes.
| Fitur | Spésifikasi |
|---|---|
| MCU | ESP32-S3-WROOM-1 Xtensa® 32-bit RISC-V MCU |
| Mémori Flash | 16 MB |
| PSRAM | 8 MB |
| Konéktipitas Wireless | Wi-Fi, Bluetooth 5 + BluetoothMesh |
| Basa Pemrograman | C/C++, MicroPython |
| Programming Platforms | Arduino-IDE, VS Code |
| Panganteur USB | USB-C (Support USB 3.0) |
| Panyambung batré | 1.25mm JST connector |
| Deteksi batré | IO02 |
| Programmable LED | IO17 |
| Indikator Ngecas | LED biru |
| Ukuran (L x W x H) | Approx. 3.9cm x 3.1cm x 0.6cm (1.54 x 1.2 x 0.21 inches) |
| Item Beurat | Kira-kira. 1.44 ons |
| Sistem operasi | RTOS or Lightweight Operating System |
| Negara asal | Cina |
9. Garansi jeung Rojongan
9.1 Émbaran jaminan
Specific warranty details for the LILYGO T7-S3 Development Board are typically provided at the point of purchase or on the official LILYGO website. Please retain your proof of purchase for any warranty claims. Generally, electronic development boards are covered against manufacturing defects for a limited period.
For information regarding returns or replacements, please refer to the seller's return policy. The standard return policy for this product is 30 days for refund/replacement.
9.2 Rojongan Téknis
For technical assistance, programming guides, and community support, the primary resource is the official LILYGO GitHub repository:
github.com/Xinyuan-LilyGO/T7-S3
This resource contains up-to-date information, example code, and a platform for reporting issues or asking questions. You may also find helpful information on the LILYGO store page on Amazon or by contacting the seller directly.


