1. Bubuka
This manual provides essential information for the proper assembly, operation, and maintenance of your Whadda WMMI211 Air Quality Monitor. Please read these instructions carefully before using the device to ensure safe and efficient performance. The WMMI211 is designed to measure various environmental parameters including equivalent CO2 (eCO2), total volatile organic compounds (TVOC), barometric pressure, temperature, and humidity.
2. Émbaran Kasalametan
- Jauhkeun alat tina cai sareng lingkungan kalembaban anu luhur.
- Ulah ngalaan alat ka suhu ekstrim atawa sinar panonpoé langsung pikeun période berkepanjangan.
- Hindarkeun ragrag atanapi ngagentoskeun alat kana tabrakan anu kuat.
- Ulah nyobian muka atawa ngaropéa alat. Rujuk sadayana jasa ka tanaga anu mumpuni.
- Use only the specified power adapter or USB cable for power supply.
3. Eusi Paket
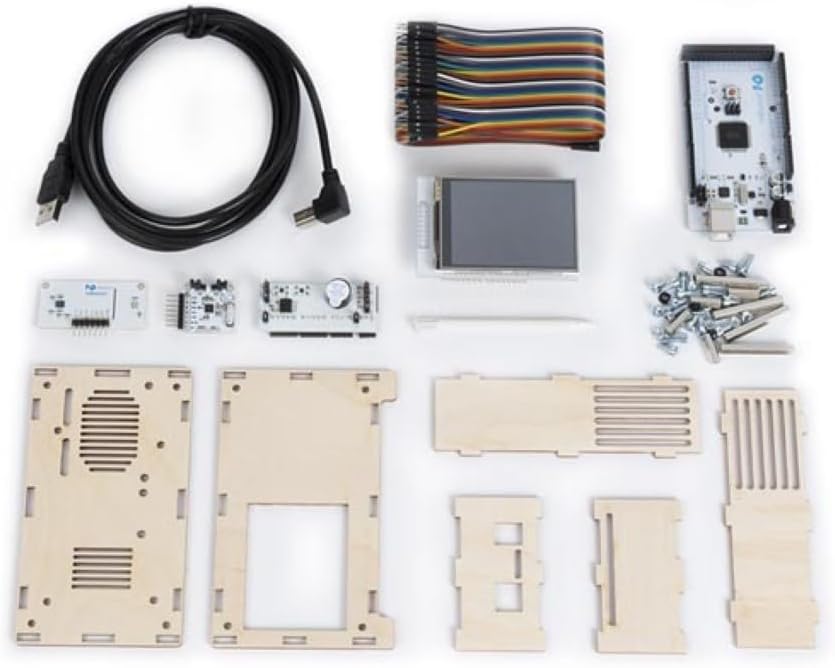
Pastikeun yén sadaya komponén anu didaptarkeun di handap aya dina pakét anjeun:
- Main circuit board with display
- Environmental sensor module
- Wooden enclosure panels
- Kabel listrik USB
- Connecting wires/ribbon cable
- Screws and nuts for assembly
- Small screwdriver (if included)

Gambar 3.1: All components of the Whadda WMMI211 Air Quality Monitor kit, including circuit boards, display, wooden panels, cables, and fasteners.
4. Setup jeung Majelis
The Whadda WMMI211 is provided as a kit requiring assembly. Follow these steps carefully:
- Nyiapkeun komponén: Unpack all components and identify each part as per the package contents list.
- Ngarakit Kandang: Carefully interlock the wooden panels to form the main enclosure. Ensure the display opening is correctly oriented.
- Mount Main Board: Secure the main circuit board into the designated slots or standoffs within the enclosure using the provided screws and nuts.
- Sambungkeun tampilan: Connect the display module to the main circuit board using the ribbon cable. Ensure the connection is firm and correctly oriented.
- Install Sensor Module: Connect the environmental sensor module to the main board using the appropriate connecting wires. Position the sensor module in its designated area, often with ventilation slots.
- Panel Aman: Once all internal components are connected, secure the remaining wooden panels, ensuring all screws are tightened gently to avoid damaging the wood.
- Sambungan Daya: Connect the USB power cable to the device's USB port and then to a suitable USB power source (e.g., a computer USB port or a 5V USB power adapter).
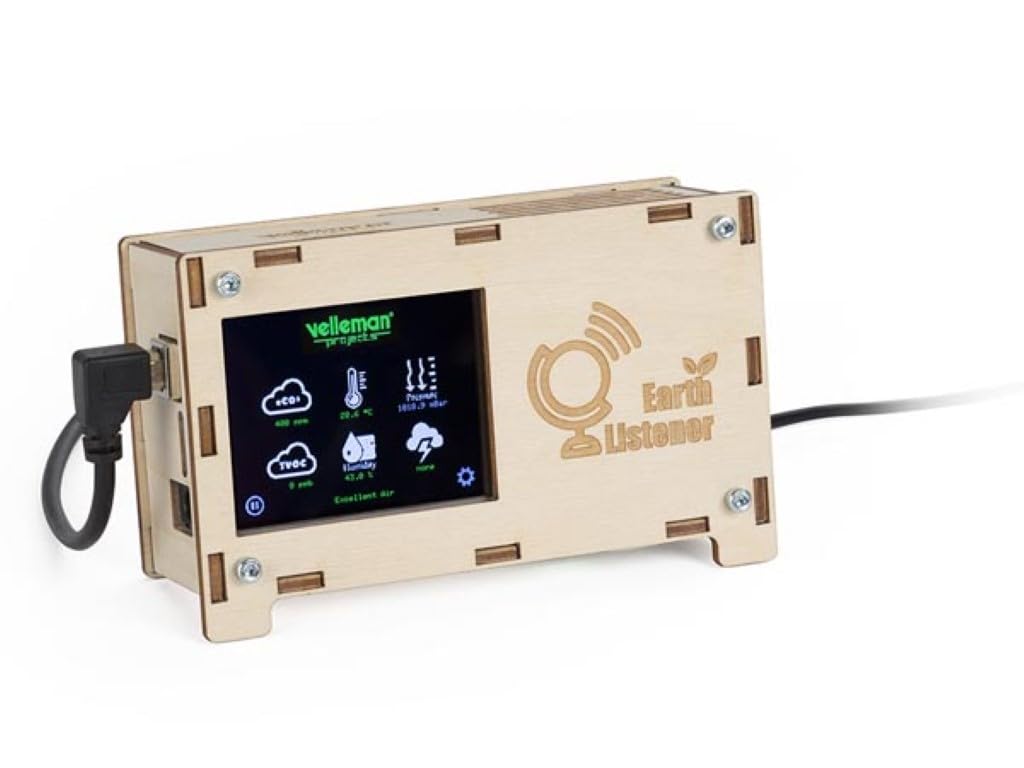
Gambar 4.1: Hareupeun view of the fully assembled Whadda WMMI211 Air Quality Monitor, showing the display and USB power connection.

Gambar 4.2: Samping view of the assembled Whadda WMMI211, highlighting the wooden enclosure and fasteners.
Gambar 4.3: Handapeun view of the assembled Whadda WMMI211, showing ventilation slots for sensor operation.
5. Parentah Operasi
Once assembled and powered, the Whadda WMMI211 will automatically begin to display environmental readings.
- Daya Hurung: Connect the USB cable to a power source. The device will power on automatically and the display will illuminate.
- Pemanasan Awal: Allow the device approximately 5-10 minutes for the sensors to stabilize and provide accurate readings.
- Maca Tampilan: The display shows various parameters with corresponding icons:
- eCO2: Equivalent Carbon Dioxide levels (in ppm).
- TVOC: Total Volatile Organic Compounds (in ppb).
- Suhu: Ambient temperature (in °C or °F).
- Kalembaban: Relative humidity (in %).
- Tekanan: Barometric pressure (in hPa or mbar).
- Navigation/Settings: If buttons are present (as indicated by a gear icon on the display), they typically allow you to cycle through display modes, adjust brightness, or access calibration options. Refer to the on-screen prompts for specific functions.
- Pareum listrik: Disconnect the USB power cable to turn off the device.
6. Pangropéa
- beberesih: Gently wipe the device's exterior with a soft, dry cloth. Do not use liquid cleaners or abrasive materials. Ensure no dust or debris obstructs the sensor ventilation slots.
- Panyimpenan: Lamun teu dipake, nyimpen alat dina tiis, tempat garing, jauh ti sinar panonpoé langsung jeung hawa ekstrim.
- Kalibrasi sénsor: The sensors are typically factory-calibrated. If you suspect inaccurate readings, consult the manufacturer's support for potential recalibration procedures.
7. Cara ngungkulan
| Masalah | Mungkin Cukang lantaranana | Solusi |
|---|---|---|
| Alat teu hurung. | Taya catu daya atawa sambungan faulty. | Check USB cable connection and power source. Try a different USB port or adapter. |
| Layarna kosong atanapi nunjukkeun kasalahan. | Loose display cable or software issue. | Ensure display ribbon cable is securely connected. Power cycle the device. |
| Readings appear inaccurate. | Sensor warm-up period not complete, or environmental interference. | Allow 5-10 minutes for sensor stabilization. Ensure device is not near strong air currents, heat sources, or chemical fumes. |
| Alatna teu ngaréspon. | glitch software samentara. | Disconnect power for 10 seconds, then reconnect to perform a hard reset. |
8. Spésifikasi
- Jumlah modél: WMMI211
- Pabrikan: Wada
- Ukuran produk: 17.78 x 12.7 x 6.35 cm
- Beurat barang: 425.24 g (15 ons)
- Fitur husus: Measures eCO2, TVOC, Barometric Pressure, Temperature, Humidity
- Sasayogian tanaga: USB 5V (via USB cable)
9. Garansi jeung Rojongan
For warranty information, technical support, or service inquiries, please refer to the official Whadda websitus atanapi ngahubungan pangecér Anjeun. Simpen resi pameseran anjeun salaku bukti pameseran.


