1. Bubuka
This manual provides detailed instructions for the safe and efficient operation of your InFocus P120 INL412 Multimedia Projector (Model INL4128). Please read this manual thoroughly before using the projector and keep it for future reference. This projector is designed for high-quality image projection, suitable for various applications including presentations, home entertainment, and gaming.
2. Émbaran Kasalametan
Perhatikeun pancegahan kaamanan di handap ieu pikeun nyegah karusakan proyektor sareng mastikeun kasalametan pangguna:
- Ventilasi: Pastikeun ventilasi anu cekap di sakitar proyéktor. Ulah ngahalangan liang ventilasi. Jaga jarak sahenteuna 30 cm (12 inci) ti témbok atanapi barang-barang sanésna.
- Sumber Daya: Anggo ukur catu daya sareng voltage. Connect the power cord securely.
- Panas: The projector generates heat during operation. Do not touch the projector's vents or exhaust areas directly after use.
- Kaluaran cahaya: Ulah nempo langsung kana lensa projector lamun lamp hurung, sabab cahaya anu tarik pisan tiasa nyababkeun karusakan panon.
- panempatan: Place the projector on a stable, level surface. Avoid placing it in direct sunlight, near heat sources, or in areas with high humidity or dust.
- beberesih: Cabut kabel listrik sateuacan dibersihkeun. Anggo lawon anu lemes sareng garing. Entong nganggo pembersih cair atanapi aerosol.
- Palayanan: Ulah nyobian ngalereskeun proyéktor sorangan. Serahkan sadaya perawatan ka petugas layanan anu mumpuni.
3. Produk Langkungview
3.1 Top Panel and Lens Area
The top panel features the control buttons for basic operation and the lens area with focus and zoom adjustments.

Gambar 3.1: Top view of the InFocus P120 INL412 projector, highlighting the control panel on the right and the lens adjustment area on the left. The InFocus logo is visible on the top surface.
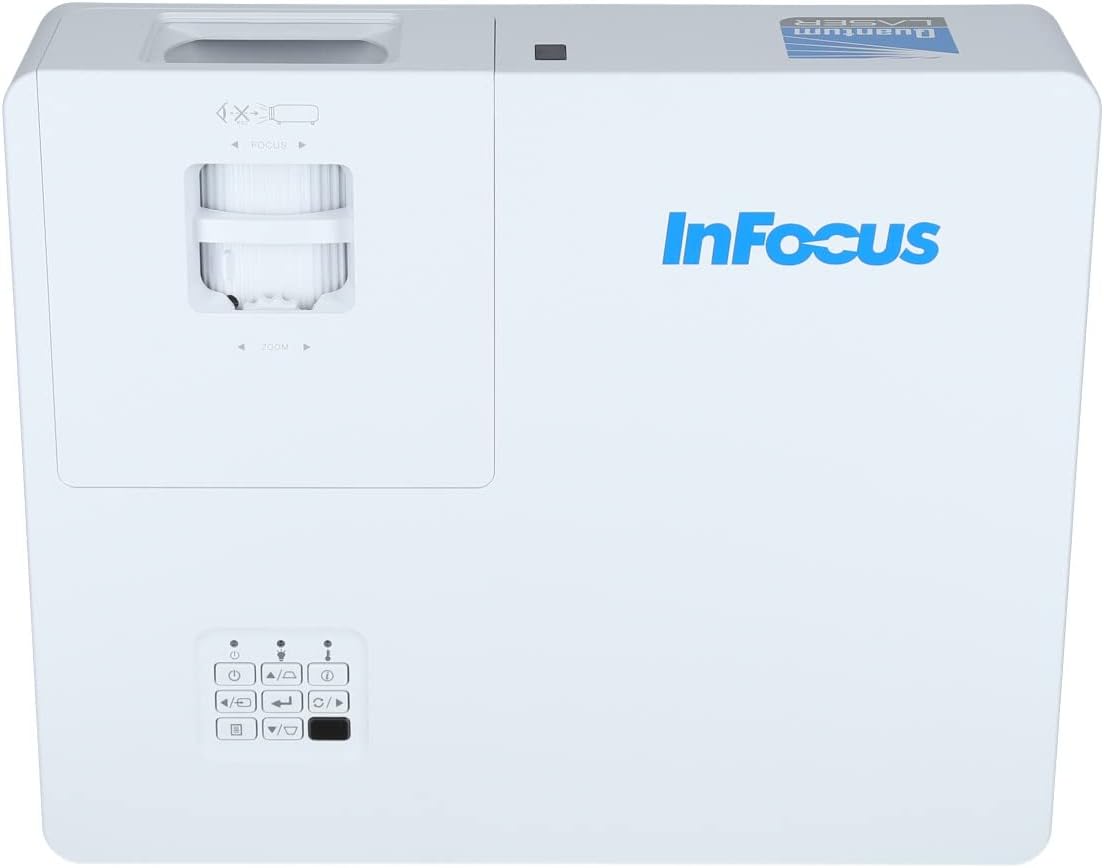
Gambar 3.2: A ngadeukeutan view of the projector's top panel, showing the focus and zoom rings near the lens opening and the array of control buttons for power, menu, source selection, and navigation.
3.2 Sambungan Panel Rear
The rear panel provides various input and output ports for connecting external devices.

Figure 3.3: Rear panel of the InFocus P120 INL412 projector, displaying a comprehensive array of connectivity options including HDMI (x2), USB, S-Video, Ethernet (LAN), VGA In (x2), VGA Out, RS232, and Audio In/Out ports. The power input is located on the bottom left.
Key ports include:
- HDMI 1 & 2: For connecting high-definition digital video and audio sources.
- USB: For connecting USB devices, potentially for media playback or firmware updates.
- S-Video: For connecting older video sources.
- VGA IN 1 & 2: For connecting computers or other devices with VGA output.
- VGA OUT: For connecting to an external monitor.
- Ethernet (LAN): Pikeun konektipitas jaringan sareng kontrol.
- Audio IN 1 & 2 / Audio OUT: Pikeun sambungan audio analog.
- RS232: Pikeun kontrol serial.
- Input kakuatan: Pikeun nyambungkeun kabel daya AC.
3.3 Front and Side Panels
The front panel houses the projection lens and front ventilation, while the side panels feature additional ventilation grilles.

Gambar 3.4: Hareupeun view of the InFocus P120 INL412 projector, displaying the main projection lens on the right and the extensive front ventilation grille on the left, crucial for heat dissipation.

Gambar 3.5: Sisi view of the InFocus P120 INL412 projector, illustrating the side ventilation grilles that contribute to maintaining optimal operating temperature.
4. Setélan
4.1 Nempatkeun Projector
Position the projector on a stable, flat surface or mount it securely. Ensure the projector is within the optimal projection distance for your screen size. Maintain clear space around the projector for proper ventilation.
4.2 Nyambungkeun Alat
Before connecting any cables, ensure the projector and all source devices are powered off.
- Sambungan HDMI: Connect an HDMI cable from your source device (e.g., laptop, Blu-ray player, gaming console) to either the HDMI 1 or HDMI 2 port on the projector.
- Sambungan VGA: Connect a VGA cable from your computer to either VGA IN 1 or VGA IN 2. For audio, connect a separate audio cable from your computer's audio output to the corresponding Audio IN port on the projector.
- Sambungan USB: Insert a USB drive into the USB port for media playback (if supported by firmware) or service functions.
- Sambungan Ethernet (LAN): Connect an Ethernet cable to the LAN port for network control or updates.
- Kaluaran Audio: If using external speakers, connect an audio cable from the Audio OUT port on the projector to your audio system.
4.3 Sambungan Daya
Connect the power cord to the projector's power input and then plug the other end into a grounded electrical outlet.
5. Parentah Operasi
5.1 Powering on / Pareum
- Daya Hurung: Pencét éta Kakuatan tombol dina panel kontrol proyéktor atanapi remot kontrol. Lampu indikator daya bakal robih.
- Pareum listrik: Pencét éta Kakuatan button again. A confirmation message may appear. Press the button a second time to confirm shutdown. Allow the projector to cool down before unplugging it.
5.2 Nyaluyukeun Fokus sareng Zoom
Rotate the focus ring around the lens until the image appears sharp and clear. Use the zoom ring to adjust the image size to fit your screen.
5.3 Milih Sumber Input
Pencét éta Sumber button on the control panel or remote control to cycle through available input sources (HDMI 1, HDMI 2, VGA 1, VGA 2, S-Video, USB). Select the input corresponding to your connected device.
5.4 Navigasi Menu
Ngagunakeun éta ménu button to access the on-screen display (OSD) menu. Use the arrow buttons to navigate through menu options and the Lebetkeun tombol pikeun milih. Pencét ménu deui pikeun kaluar.
6. Pangropéa
6.1 Ngabersihan Lensa
Gently wipe the lens with a soft, lint-free cloth specifically designed for optical surfaces. Do not use abrasive cleaners or excessive force, as this can scratch the lens.
6.2 Cleaning the Projector Exterior
Use a soft, dry cloth to clean the projector's casing. For stubborn dirt, dampen the cloth slightly with water, then wipe dry immediately. Avoid getting liquids into the projector's openings.
6.3 Ventilation Care
Regularly check the projector's ventilation grilles for dust accumulation. Use a soft brush or a vacuum cleaner with a brush attachment to gently remove dust from the vents to ensure proper airflow and prevent overheating.
7. Cara ngungkulan
7.1 Taya Gambar Ditémbongkeun
- Pastikeun proyektor dihurungkeun sareng lampu indikator kakuatan padet.
- Verify that the video cable (HDMI, VGA, etc.) is securely connected to both the projector and the source device.
- Pariksa yen sumber input bener dipilih dina projector nu.
- Confirm that the source device (laptop, player) is powered on and outputting a signal.
7.2 Image is Blurry or Out of Focus
- Saluyukeun ring pokus dina lensa proyektor nepi ka gambarna seukeut.
- Pastikeun proyektor aya dina jarak anu leres ti layar.
- Bersihkeun lénsa proyektor upami katingalina kotor.
7.3 Taya Sora
- If using HDMI, ensure the source device's audio output is set to HDMI.
- If using VGA, ensure a separate audio cable is connected from the source to the projector's Audio IN port.
- Pariksa setélan volume dina proyéktor sareng alat sumber.
- If using external speakers, ensure they are properly connected to the Audio OUT port and powered on.
8. Spésifikasi
| Fitur | Rincian |
|---|---|
| merek | InFokus |
| Produsén | Dina Fokus |
| Ngaran modél | P120 INL412 |
| Nomer modél | INL4128 |
| Taun | 2023 |
| Panganteur Hardware | Ethernet, HDMI, S-Video, USB |
| Jumlah Item | 1 |
| Rasio Aspék | 16:9 |
| Wattage | 341 watt |
| Batré Kaasup | No |
| Batré Diperlukeun | No |
| Faktor Bentuk | Desktop |
| Tipe Pamasangan | Méja dipasang |
| Jauh Control Kaasup | Sumuhun |
| Dimensi produk | 56.13 x 46.48 x 25.15 cm |
| Item Beurat | 5.5 kg |
| Ukuran Gambar Maksimum | 308.28 inci |
| Ukuran Gambar Minimum | 910.63 milimeter |
| Tanggal Sadia munggaran | 5 Januari 2022 |
9. Garansi jeung Rojongan
For warranty information and technical support, please refer to the documentation included with your purchase or visit the official InFocus websitus. Simpen bukti pameseran anjeun pikeun klaim garansi.


