1. Bubuka
Thank you for choosing the ETA Falco Smart Robot Vacuum Cleaner with Mopping Function. This manual provides essential information for the safe and efficient operation, maintenance, and troubleshooting of your device. Please read this manual thoroughly before using the product and keep it for future reference.
Émbaran Kasalametan penting
- Always ensure the robot is placed on a stable, level surface.
- Jauhkeun alat tina cai sareng Uap.
- Do not allow children or unauthorized persons to operate the robot.
- Use only the original charging adapter and accessories provided.
- Before cleaning or maintenance, ensure the robot is powered off and unplugged from the charging station.
- Avoid operating the robot near open flames or flammable materials.
2. Produk Langkungview
Komponén jeung kontrol
Familiarize yourself with the main parts and controls of your ETA Falco Smart robot vacuum cleaner.
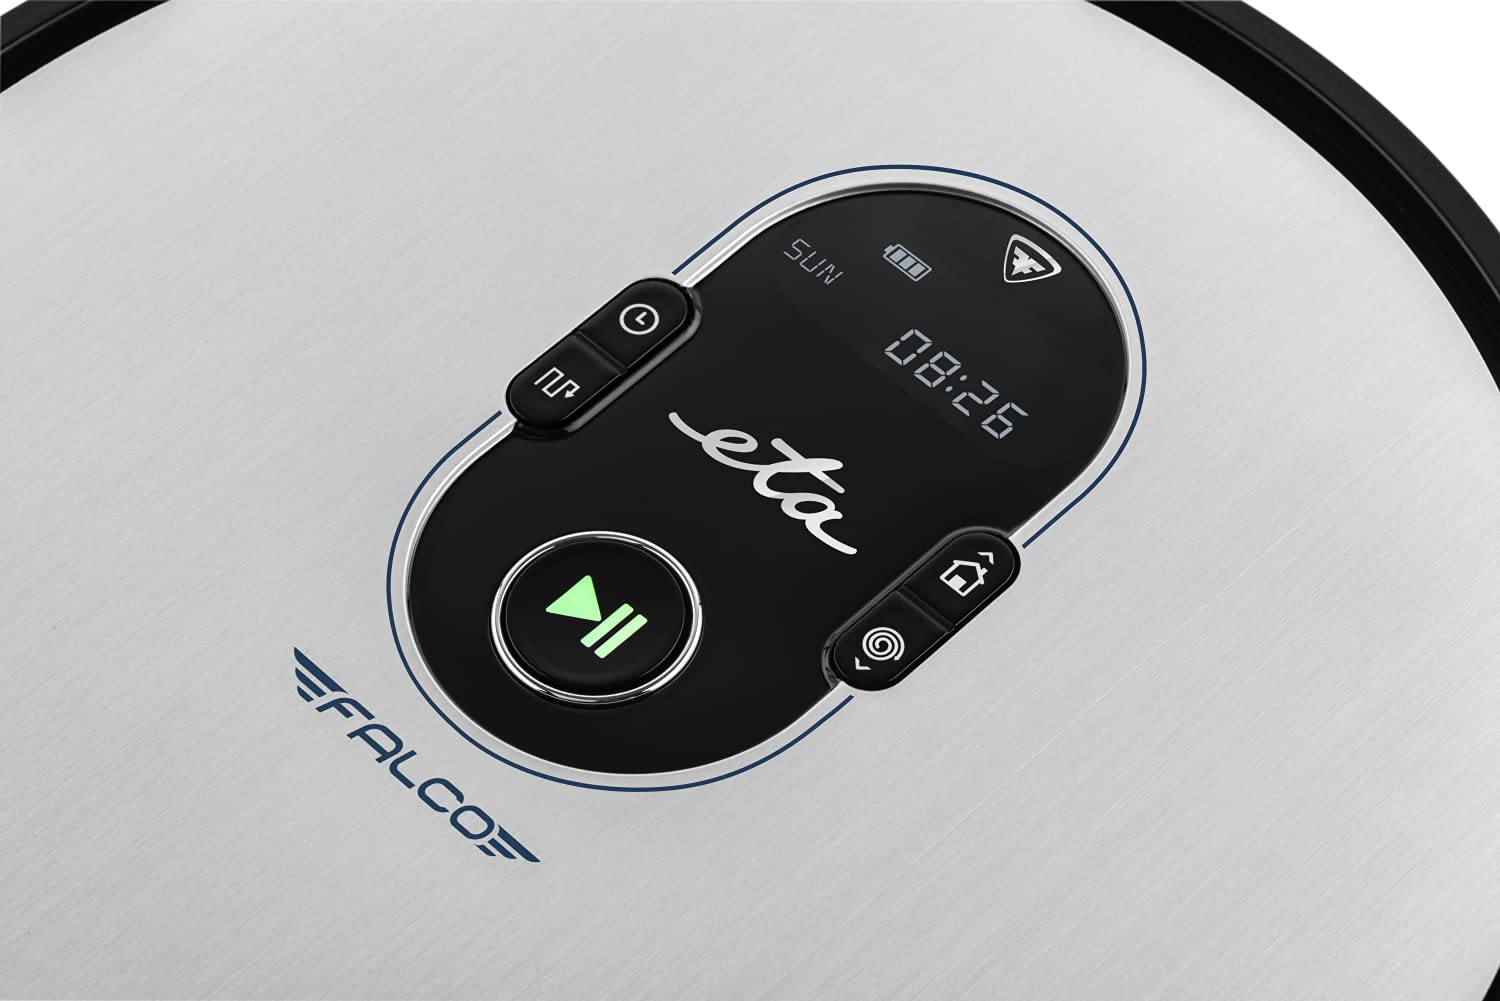
Gambar 2.1: Top panel controls. This image shows the main control panel on the top of the robot, including buttons for power, scheduling, and return to charging station, along with a digital display.

Gambar 2.2: Handapeun view. This image displays the bottom of the robot, highlighting the main brush, two side brushes, and the mop attachment.

Gambar 2.3: Underside diagram. This diagram labels the key components on the robot's underside, including the side brushes, main brush, and mop attachment.
3. Eusi Paket
Saatos ngabongkar bungkusan, pastikeun sadaya barang di handap ieu aya:
- ETA Falco Smart Robot Vacuum Cleaner
- Tempat ngecas
- Adaptor ngecas
- Kadali jauh
- 2x Spare Side Brushes
- Special Rotary and Lamella Brush
- 2x Cleaning Cloths (Mop Pads)
- Saringan HEPA cadang
- Mop Attachment with 300 ml Water Tank
- Tembok Virtual
4. Setélan
4.1 Ngecas Awal
- Tempatkeun stasiun ngecas kana témbok di tempat anu kabuka, pastikeun teu aya halangan dina jarak 1 méter ka sisi sareng 2 méter di payun.
- Connect the charging adapter to the charging station and plug it into a power outlet.
- Place the robot vacuum cleaner on the charging station. Ensure the charging contacts align. The robot will begin charging automatically. A full charge takes approximately 5 hours.
4.2 Masang Sikat Sikat
Attach the side brushes to the designated posts on the underside of the robot by pressing them down until they click into place. Ensure the 'L' and 'R' markings on the brushes match the corresponding markings on the robot.
4.3 Connecting to the ETA SMART App
The ETA SMART app enhances the functionality of your robot. Download the app from your smartphone's app store. Follow the in-app instructions to connect your robot to your home Wi-Fi network and pair it with the app.
4.4 Setting up the Virtual Wall
The virtual wall creates an invisible barrier to restrict the robot's access to certain areas. Place the virtual wall device on the floor where you want to create a boundary. Ensure the infrared beam is directed towards the area you wish to block. The robot will detect this beam and avoid crossing it.

Gambar 4.1: Robot with charging station and virtual wall. This image shows the robot positioned near its charging station, with a virtual wall device placed nearby to illustrate its function.
5. Parentah Operasi
5.1 Modeu beberesih
The ETA Falco Smart offers four distinct cleaning modes:
- PINJANG: General cleaning mode for optimal coverage.
- KLASIK: Standard cleaning pattern.
- EDGE: Cleans sapanjang tembok jeung edges jati.
- SPOT: Konsentrasi beberesih di wewengkon husus.
You can select these modes via the ETA SMART app or the remote control.
5.2 Ngajadwalkeun beberesih
Use the ETA SMART app to set a cleaning schedule for your robot. You can program specific times and days for the robot to automatically start cleaning.
5.3 Kontrol Manual
You can manually control the robot's movement and functions using the remote control or the ETA SMART app. The app also allows you to monitor cleaning activity, battery charge, and view cleaning routes.

Gambar 5.1: ETA Smart App features. This image displays the ETA Smart App interface on a smartphone, highlighting features such as remote control, cleaning history, activity monitoring, battery status, cleaning modes (SMART, CLASSIC, EDGE, SPOT), cleaning schedule, mopping intensity control, and suction power adjustment.
5.4 Fungsi Mopping
- Fill the 300 ml water tank with clean water. Do not use detergents or cleaning solutions that are not approved for robot vacuums.
- Attach a clean mop pad to the mop attachment.
- Slide the mop attachment into the designated slot on the underside of the robot.
- Mimitian siklus beberesih. Robot bakal nyedot debu sareng ngepel sakaligus.
6. Pangropéa
Pangropéa rutin ngajamin kinerja optimal sareng manjangkeun umur robot vacuum cleaner anjeun.
6.1 Cleaning the Dust Bin and Filter
- Pencét tombol sékrési tong lebu sareng cabut tong lebu.
- Open the dust bin and empty its contents into a trash can.
- Remove the HEPA filter and primary filter. Tap them gently to remove dust. If washable, rinse under running water and allow to air dry completely before reinserting.
- Wipe the inside of the dust bin with a dry cloth.
- Reassemble the filters and dust bin, then reinsert into the robot.
6.2 Ngabersihan Sikat Utama
- Balikeun robot.
- Cabut panutup sikat utama ku cara mencét tab pelepas.
- Angkat sikat utama.
- Use the cleaning tool (if provided) or scissors to remove hair and debris tangled around the brush.
- Bersihkeun wadah sikat.
- Pasangkeun deui sikat utama teras pageuhkeun panutupna.
6.3 Ngabersihan Sikat Sisi
Periodically check the side brushes for tangled hair or debris. If necessary, remove them by gently pulling upwards and clean them. Replace worn or damaged brushes with the spare ones provided.
6.4 Ngabersihkeun Pel Pad sareng Tangki Cai
After each mopping session, remove the mop pad and wash it thoroughly. Empty any remaining water from the water tank and rinse it. Allow both to air dry completely before storing or reusing.
6.5 Sénsor beberesih
Wipe the anti-drop sensors, bumper sensors, and charging contacts on the robot and charging station with a clean, dry cloth to ensure proper function.
7. Cara ngungkulan
Upami robot vacuum cleaner anjeun mendakan masalah, tingal masalah sareng solusi umum ieu:
| Masalah | Mungkin Cukang lantaranana | Solusi |
|---|---|---|
| Robot teu hurung | batré lemah; Pareum listrik | Ngecas robot; Pastikeun switch kakuatan ON |
| Robot teu ngecas | Charging contacts dirty; Charging station unplugged | Bersihkeun kontak pangisi daya; Pastikeun stasiun pangisi daya parantos dicolokkeun |
| Kinerja beberesih goréng | Dust bin full; Brushes tangled; Filter clogged | Empty dust bin; Clean brushes; Clean/replace filter |
| Robot sering macét | Halangan di lantai; Sensor kotor | Clear floor of cables/small items; Clean sensors |
| Virtual wall not working | Virtual wall batteries low; Incorrect placement | Replace batteries; Adjust virtual wall position |
Lamun masalah persists sanggeus nyobian solusi ieu, mangga ngahubungan rojongan customer.
8. Spésifikasi
Technical specifications for the ETA Falco Smart Robot Vacuum Cleaner (Model ETA251590000):
| Fitur | Rincian |
|---|---|
| Produsén | ETA |
| Ukuran produk (L x W x H) | 32.5 x 33.5 x 7.5 cm |
| Beurat | 250 gram |
| Nomer Modél Item | ETA251590000 (T2261) |
| Warna modél | Biru |
| Bahan | palastik |
| Jinis kakuatan | Batré Powered |
| Voltage | 3 Volts (14.4V Li-ion battery, 2400 mAh) |
| Jumlah barang dina pakét | 1 |
| Fitur husus | Pet brush compatibility, Smart App control, Floating brush system, HEPA filter, Virtual wall |
| Komponén Kaasup | Battery, Filter, Charging station, Adapter, Remote control, Side brushes, Rotary brush, Cleaning cloths, Mop attachment, Virtual wall |
| Komposisi batré | Litium-ion |
| Kahirupan batré | Nepi ka 120 menit |
| Waktu Ngecas | Kira-kira. 5 jam |
| Surface Rekomendasi | Laminasi |
| Tipe Controller | Kontrol aplikasi |
| Kasadiaan suku cadang | Inpormasi henteu sayogi dina suku cadang |
9. Garansi jeung Rojongan
For warranty information, product support, or to inquire about spare parts, please refer to the warranty card included with your purchase or visit the official ETA websitus. Simpen bukti pameseran anjeun pikeun klaim garansi.


