AZZA CSAZ-340F
AZZA CSAZ-340F CELESTA ATX Mid Tower Gaming Case
Manual pamaké
1. Bubuka
This manual provides comprehensive instructions for the installation, operation, and maintenance of your AZZA CSAZ-340F CELESTA ATX Mid Tower Gaming Case. Please read this manual thoroughly before beginning installation to ensure proper setup and to maximize the performance and longevity of your system components.

Gambar 1: The AZZA CSAZ-340F CELESTA Mid Tower ATX Case, showcasing its design and form factor.
2. Émbaran Kasalametan
- Always disconnect the power supply from the wall outlet before installing or removing any components inside the case.
- Handle all components with care to prevent damage from electrostatic discharge (ESD). Consider using an anti-static wrist strap.
- Keep the case and components away from liquids and excessive moisture.
- Mastikeun ventilasi ditangtoskeun sabudeureun kasus pikeun nyegah overheating.
- Do not attempt to modify the case structure or components, as this may void your warranty and pose safety risks.
- Jauhkeun bagian leutik sareng bahan bungkusan tina jangkauan barudak.
3. Eusi Paket
Pastikeun yén sadaya item anu didaptarkeun di handap aya dina pakét anjeun:
- AZZA CSAZ-340F CELESTA ATX Mid Tower Gaming Case
- Kotak aksésori (ngandung screws, standoffs, kabel dasi, jsb)
- Manual pangguna (dokumén ieu)
4. Spésifikasi
The following table details the technical specifications of the AZZA CSAZ-340F CELESTA case:
| Fitur | Spésifikasi |
|---|---|
| merek | AZZA |
| Ngaran modél | CSAZ-340F CELESTA |
| Jenis Kasus | Pertengahan Menara |
| Motherboard kasaluyuan | ATX, Micro ATX, Mini ITX |
| Warna | Hideung |
| Bahan | logam |
| Power Supply ningkatna Tipe | Gunung handap |
| Métode Cooling | Hawa |
| Fan Size (Included/Supported) | 120mm (Rear included), Supports 120mm/140mm |
| Max GPU Panjangna | 320 mm |
| Max CPU Cooler Jangkungna | 165 mm |
| Max Panjang PSU | 160 mm |
| 3.5" HDD Support | 2 |
| 2.5" SSD Support | 4/6 (depending on configuration) |
| Rojongan Kipas Hareup | 3 x 120mm atanapi 3 x 140mm |
| Top Fan Support | 2 x 120mm atanapi 2 x 140mm |
| Rear Fan Support | 1 x 120 mm |
| Rojongan Radiator hareup | Up to 280mm/360mm |
| Rojongan Radiator Top | 2 x 120mm (from image) |
| Rojongan Radiator Rear | 1 x 120mm (from image) |
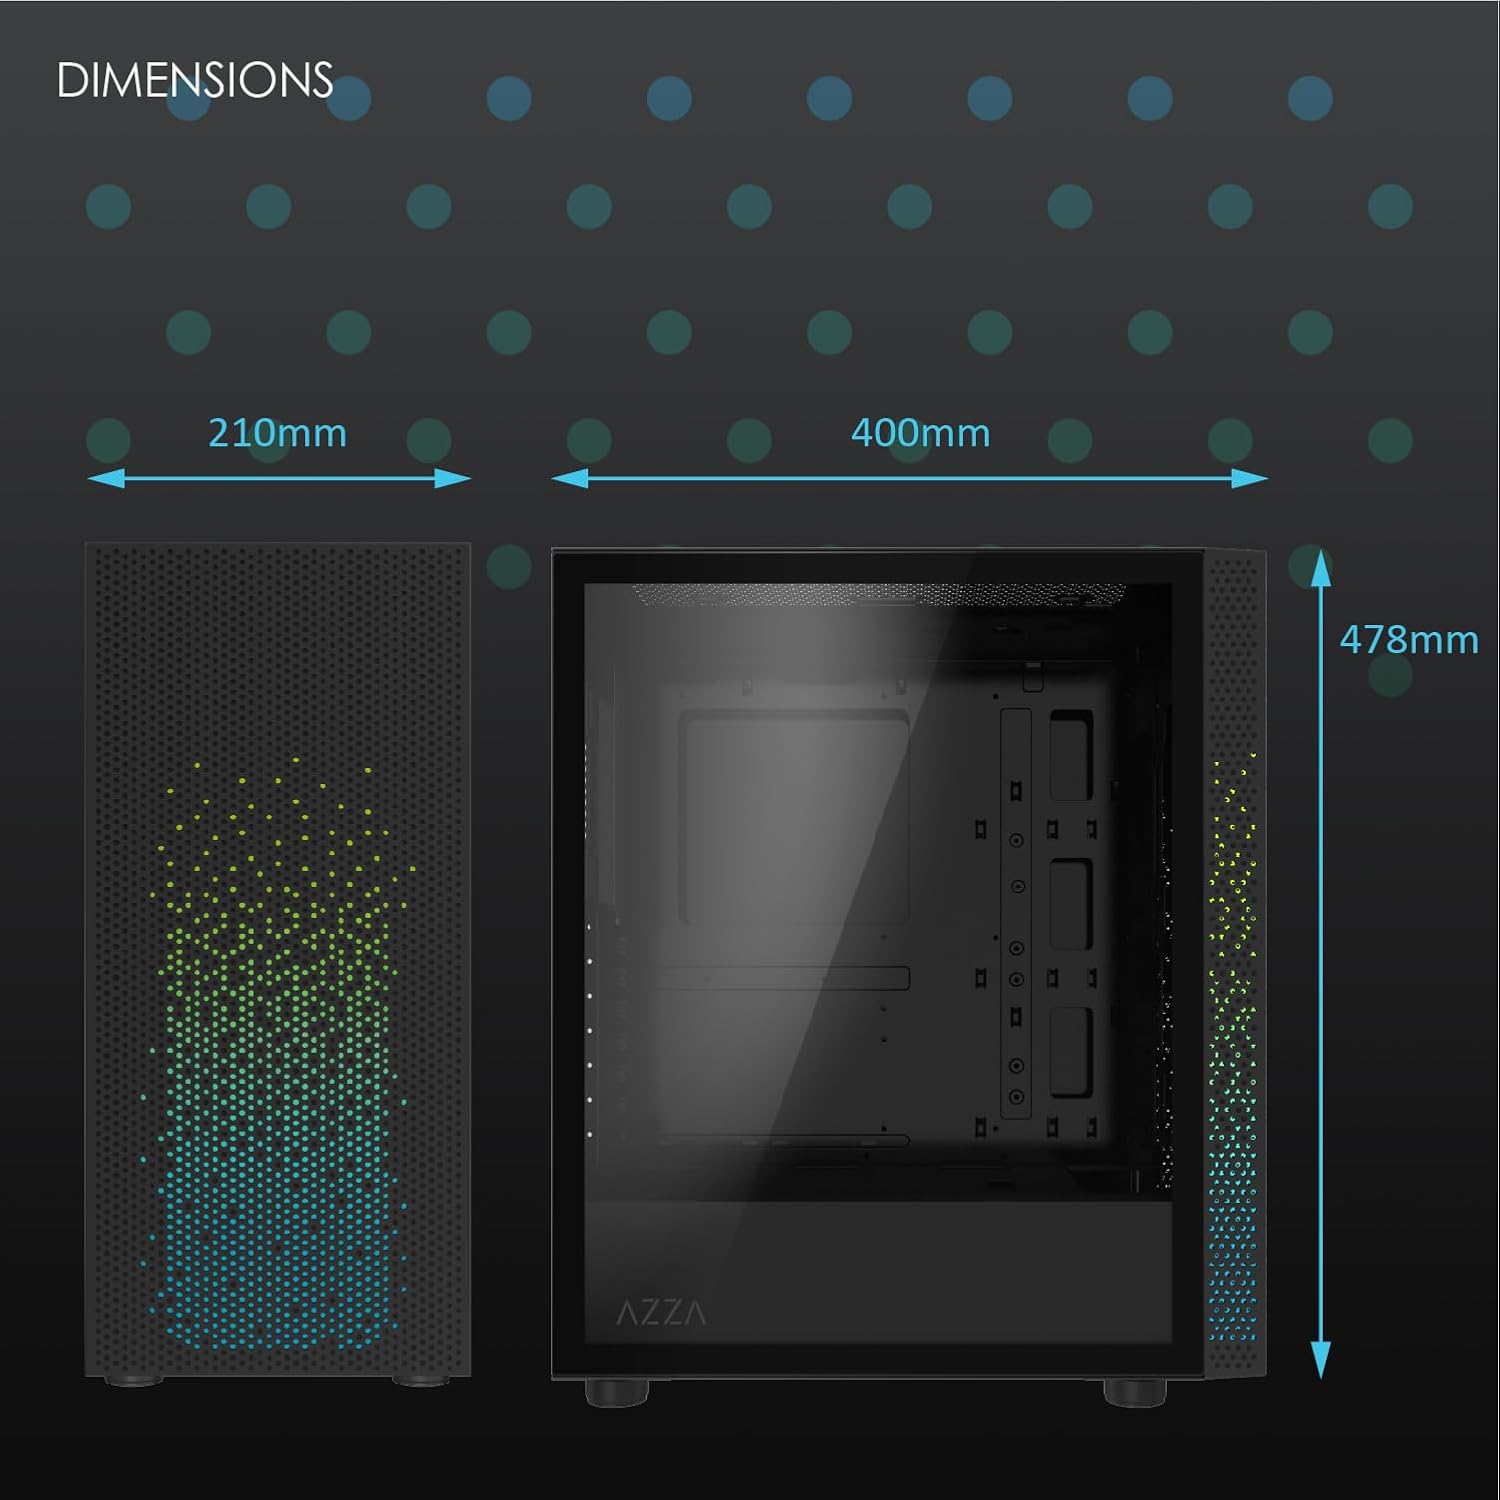
Gambar 2: Physical dimensions of the AZZA CSAZ-340F CELESTA case: 210mm (width), 400mm (depth), 478mm (height).

Gambar 3: Diagram illustrating fan and radiator mounting options for the AZZA CSAZ-340F CELESTA case, including front, top, and rear configurations.

Gambar 4: Internal component support diagram for the AZZA CSAZ-340F CELESTA, showing maximum dimensions for CPU cooler, GPU, and PSU, along with drive bay locations.
5. Setup jeung Instalasi
Follow these steps to install your components into the AZZA CSAZ-340F CELESTA case.
5.1 Nyiapkeun Pasualan
- Tempatkeun wadahna dina permukaan anu datar sareng stabil.
- Remove the side panels. Typically, these are secured with thumbscrews at the rear of the case.
5.2 Pamasangan motherboard
- Install the I/O shield (if not pre-installed) into the rear opening of the case.
- Ensure the correct standoffs are installed for your ATX, Micro-ATX, or Mini-ITX motherboard. Adjust or add standoffs as needed using the provided tools.
- Taliti nempatkeun motherboard anjeun kana standoffs, aligning liang screw.
- Pasangkeun motherboard nganggo sekrup anu pas tina kotak asesorisna. Ulah kenceng teuing.
5.3 Pamasangan Power Supply Unit (PSU).
- Position the PSU in the bottom rear compartment of the case, ensuring the fan faces downwards (if there's a filtered vent) or upwards.
- Secure the PSU to the case with the provided screws from the rear.
- Route the necessary power cables through the cable management cutouts.
5.4 Pamasangan Girang Panyimpenan (HDD/SSD)
- 3.5" HDDs: Locate the drive cage. Slide the 3.5" HDDs into the drive trays and secure them, often tool-less or with screws.
- 2.5" SSDs: Mount 2.5" SSDs to the dedicated mounting points on the motherboard tray or drive cage using screws.
- Connect SATA data and power cables to the installed drives.
5.5 Pamasangan Kartu Grafika (GPU).
- Leupaskeun slot PCIe perlu nyertakeun ti pungkur kasus.
- Carefully insert your graphics card into the appropriate PCIe slot on the motherboard until it clicks into place.
- Ngamankeun kartu grafik kana kasus kalawan screws.
- Connect any required PCIe power cables from the PSU to the graphics card.
5.6 Pamasangan CPU cooler
Install your CPU cooler according to its specific manufacturer instructions. Ensure it does not exceed the maximum height of 165mm.
5.7 Pamasangan kipas sareng radiator
Kasus ngadukung sababaraha konfigurasi kipas sareng radiator:
- Hareup: Up to 3 x 120mm or 3 x 140mm fans, or radiators up to 280mm/360mm.
- luhur: Up to 2 x 120mm or 2 x 140mm fans, or 2 x 120mm radiators.
- Tukangeun: 1 x 120mm fan (pre-installed) or 1 x 120mm radiator.
Mount fans and radiators using the appropriate screws and ensure proper airflow direction.
5.8 Manajemén kabel
Mangpaatkeun guntingan manajemen kabel sareng titik pangiket di tukangeun baki motherboard pikeun ngarahkeun sareng ngamankeun kabel. Ieu ningkatkeun aliran hawa sareng estetika.
5.9 Majelis ahir
- Double-check all connections and ensure no cables are obstructing fans.
- Reattach the side panels.
- Connect external peripherals (monitor, keyboard, mouse, etc.) and the power cable.
6. Operasi Sistim anjeun
Once all components are installed and connected, you can power on your system. The front panel features power and reset buttons, along with USB and audio ports for convenient access.

Gambar 5: Close-up of the AZZA CSAZ-340F CELESTA's front panel, highlighting the integrated lighting effects.
7. Pangropéa
- Saringan debu: Regularly clean the dust filters (if present) to maintain optimal airflow and cooling performance.
- Beberesih interior: Periodically open the case and use compressed air to remove dust from components and fans. Ensure the system is powered off and unplugged before cleaning.
- Bersihan Luar: Ngusap permukaan luar kalayan lemes, damp lawon. Hindarkeun bahan kimia anu kasar.
8. Cara ngungkulan
Upami anjeun mendakan masalah, pertimbangkeun léngkah-léngkah ngungkulan umum ieu:
- Sistem Henteu Diaktipkeun:
- Pastikeun kabel daya disambungkeun pageuh kana PSU sareng stop kontak témbok.
- Check that the PSU switch is in the "ON" position.
- Verify all internal power connections (24-pin ATX, 8-pin CPU, PCIe power) are seated correctly.
- Pastikeun kabel tombol kakuatan panel hareup disambungkeun neuleu kana motherboard nu.
- Henteu aya kaluaran tampilan:
- Pastikeun monitor anjeun nyambung kana kartu grafis (lain kana port grafis terintegrasi motherboard, kecuali anjeun nganggo grafis terintegrasi).
- Pasang deui kartu grafik dina slot PCIe na.
- Pariksa pilihan input monitor.
- Overheating:
- Verify all case fans are spinning and oriented correctly for airflow.
- Clean any dust filters and internal components.
- Ensure CPU cooler is properly seated and making good contact with the CPU.
9. Garansi jeung Rojongan
For warranty information and technical support, please refer to the official AZZA website or contact AZZA customer service directly. Keep your proof of purchase for warranty claims.
AZZA Official Websitus: www.azza.com
Ask a question about this manual
Ask about setup, troubleshooting, compatibility, parts, safety, or missing instructions. Manuals+ will review the question and use this page’s manual context to help answer it.